Resources & Best Practices for Photography Cleanup
This document walks through the best practices for editing and cleaning photographs that were collected during the day-of collection event.
This is broken down into five sections:
- Batch processing photo cleanup with Photoshop
- Manually cleaning photos on a Mac computer
- Manually cleaning photos on a Windows computer
- Manually cleaning photos with an iPhone
- Manually cleaning photos with an Android
Batch Processing with Photoshop
If you have access to Photoshop, this section covers how to clean the photos from the collection event in a batch process. This means that the edits you make will be applied to all the photos in the collection at one time, which should eliminate time spent on photo cleanup.
How to Download a Folder of Images
This section covers how to download the whole folder of photos from the collection event.
- Click on the three dots next to the folder name

- Select “Download”

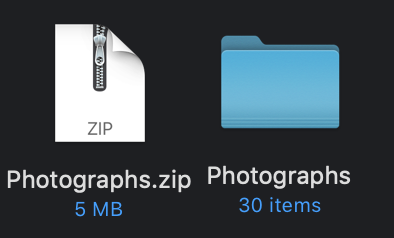
- Locate the folder on your local computer. By default, this will be in your Downloads folder. The folder will be saved as a .zip file.
How to Open a Zip file
Locate the zip file on your local computer. By default, this will be in your Downloads folder. If you double-click the zip file, it will automatically open the file and create a folder for your photos.
How to Batch Resize Photos
Your photos may vary in size, and this might impact your ultimate output onto the digital community archive. Batch photo resizing can ensure that all photos are similar pixel length and will appear similarly sized on the digital archive.
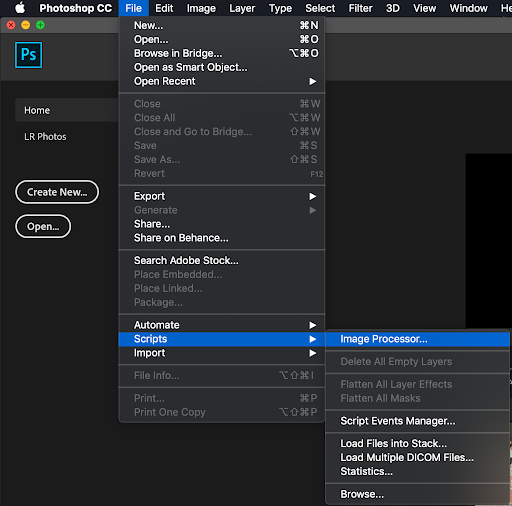
- Open Adobe Photoshop. Choose File > Scripts > Image Processor.
- A dialog box will appear. In the section labeled “1- Select the images to process”, click the “Select Folder…” button, then navigate to your chosen folder in the pop-up window below. Click “Open” in the bottom right corner.
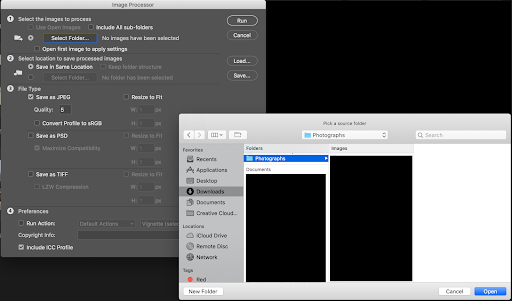
- In the section labeled “2- Select location to save processed images”, Select the location for the saved processed photos. If you choose “Save in Same Location”, Photoshop will create a subfolder in that original location. If there is already a subfolder with the same name, Photoshop will add a number to the new subfolder to differentiate it from the original.
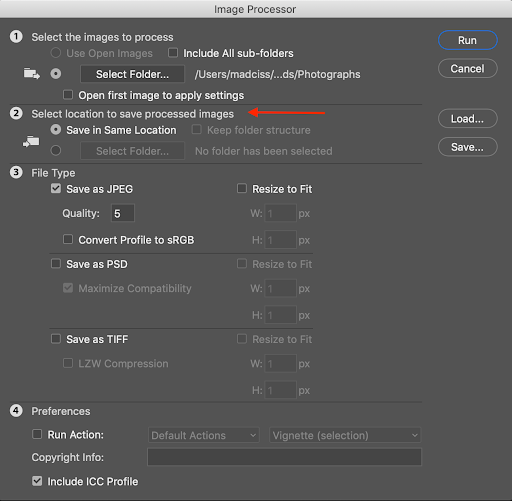
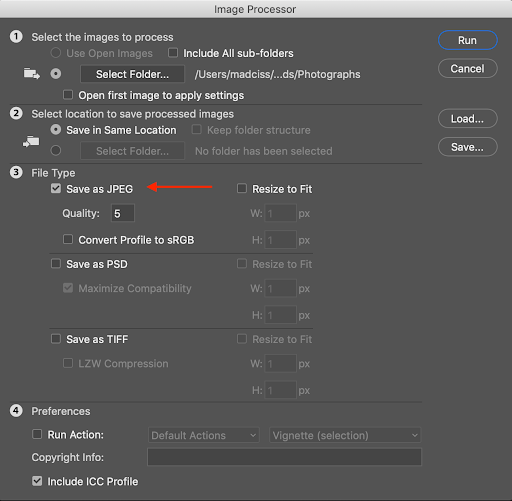
- In section 3, “File Type,” we recommend that you save the files as JPEGs.
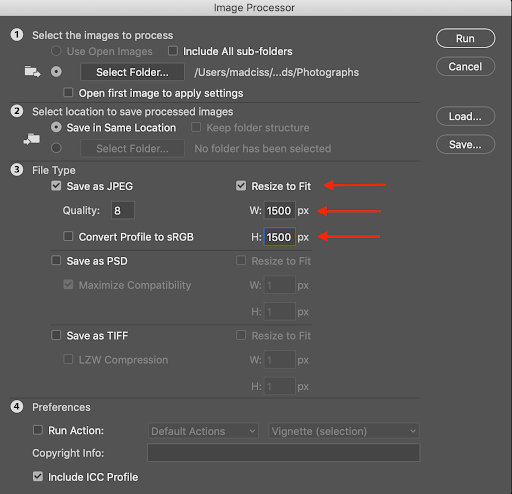
- In section 4, “Preferences,” on the right hand side of the section, click “Resize to Fit,” then set the resizing parameters to 1500 for both W and H
- Click the “Run” button in the upper right corner of the Image Processor window. Photoshop will open, resize, and save each image based on the parameters you set in the script.
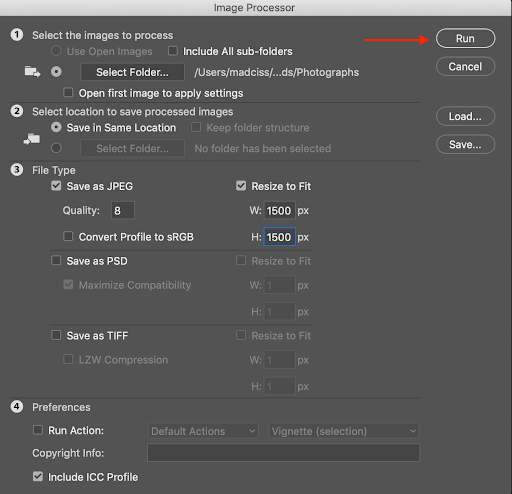
- Review your resized files by navigating to the location or folder where you chose to save your outputs.
Photo Cleanup on a Mac Computer
If you do not have access to Photoshop or software that will batch process the photos from the collection event, no worries, you can still do all the necessary cleaning on a Windows or Mac computer. This section will cover how to clean photos manually on a Windows computer.
How to Download an Image
If you will only be editing a few photos from the collection event, this section covers how to individually download photos that need cleaning.
Note: The screen captures used during this section are from Google Drive and will use an arbitrary Object ID, used to show the file naming convention suggested earlier in this guide.
The steps are as follows to download an image:
- Click on the three dots next to the file name
- Select “Download”
- Locate the file on your local computer. By default, this will be in your Downloads folder.
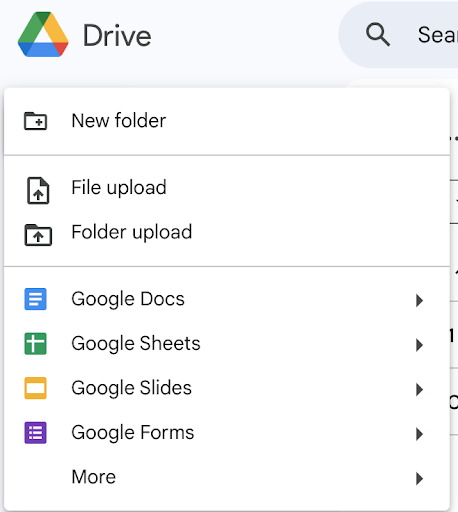
How to Download a Folder of Images
This section covers how to download the whole folder of photos from the collection event.
- Click on the three dots next to the folder name
- Select “Download”
- Locate the folder on your local computer. By default, this will be in your Downloads folder. The folder will be saved as a zip file.
How to Open a Zip File
Locate the zip file on your local computer. By default, this will be in your Downloads folder. If you double-click the zip file, it will automatically open the file and create a folder for your photos.
How to Import Image Downloads to Photos
Once you have downloaded all the photos that you will be editing, you will want to make sure that they have been imported to the “Photos” application on your Mac, which you will use to edit the photos.
- Go to the “Photos” application on your Mac

- Go to File > Import and select the folder of the photos from your downloads
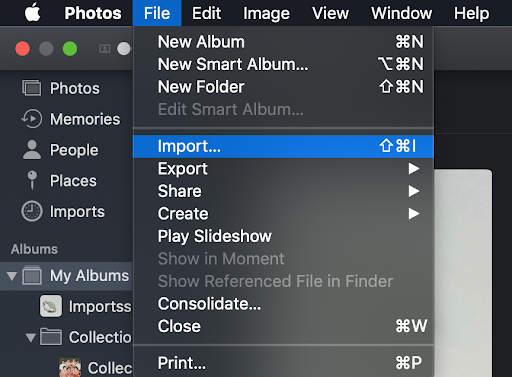
- Proceed with the import
- Instead of just importing the folder of images to your general Library, click the drop-down menu where it days “Import to:” and select “New album”

- Rename the new album so it will be distinguishable from the originals
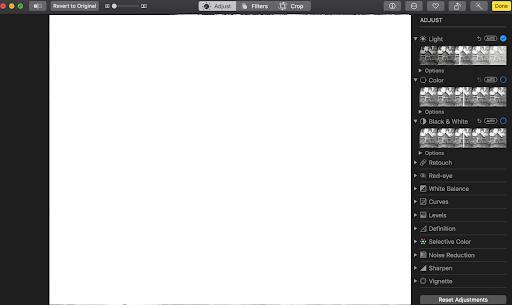
How to Open an Image for Editing
Now that you have imported the images into the Photos application, you can now begin editing.
First, open the first image in the folder (or the image you would like to edit). You can do this by double-clicking on the image. Click on the “Edit” button, which is in the top right.

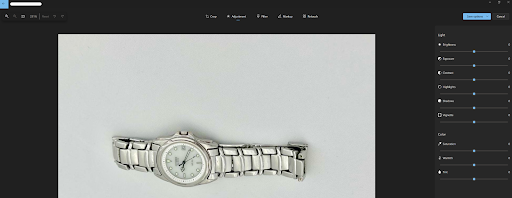
Crop
You should first consider cropping the image if it is off-center or contains unnecessary space. This can be achieved by selecting the “Crop” button at the top of the screen. From there, you can manipulate all four sides of the image by hovering the mouse over the selected edge and then clicking and dragging the edge to the desired cut-off point.

Brighten
Next, try playing around with the lightness/darkness of the image by toggling to the “Adjust” button at the top of the screen. A menu on the right should appear, and “Light” should be the first option that appears at the top of the menu. You can adjust the lighting by dragging the bar in the middle towards the left or right. In some cases, images from the collection event could use more lighting, and making the photo brighter could enhance details from the object that was donated to the digital archive.
Saving and Uploading the Final Version
Once you have finished editing the photo, be sure to click the yellow “Done” button in the top right corner.

After you have repeated this process for all the other photos that need to be edited, you will want to re-upload the photos to the same place where you kept the originals.
- Select all of the photos from the day-of collection, whether edited or not. All photos should be in the folder.
- Click File > Export > Export Folder. You can save the export anywhere on your local device. By default, it will save the folder to your desktop.
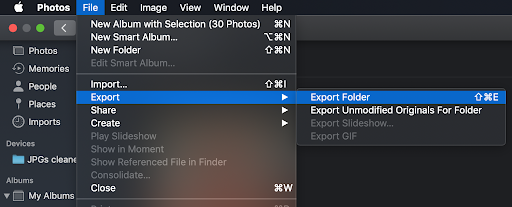
- Locate the folder of edited photos.
- Go to the location of the original photos in Google Drive. Do NOT replace the originals.
- Click New > Folder upload
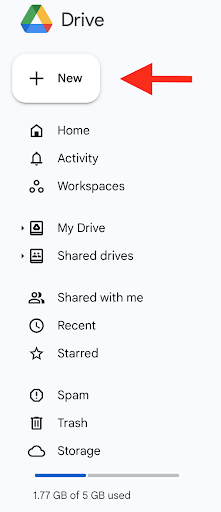
- Once the folder has uploaded, make sure that it is distinguishable from the original photos with naming conventions like “Cleaned Photos.”
Photo Cleanup on a Windows Computer
If you do not have access to Photoshop or software that will batch process the photos from the collection event, no worries, you can still do all the necessary cleaning on a Windows or Mac computer. This section will cover how to clean photos manually on a Windows computer.
How to Download an Image
If you will only be editing a few photos from the collection event, this section covers how to individually download photos that need cleaning.
Note: The screen captures used during this section are from Google Drive and will use an arbitrary Object ID, used to show the file naming convention suggested earlier in this guide.
The steps are as follows to download an image:
- Click on the three dots next to the file name
- Select “Download”
- Locate teh filde on your local computer. By default, this will be in your Downloads folder
How to Download a Folder of Images
This section covers how to download the whole folder of photos from the collection event.
- Click on the three dots next to the folder name
- Select “Download”
- Locate the folder on your local computer. By default, this will be in your Downloads folder. The folder will be saved as a zip file.
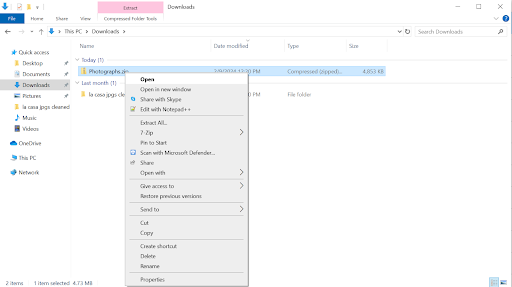
How to Open a Zip File
Locate the zip file on your local computer. By default, this will be in your Downloads folder. If you left-click on the zip file, then right-click, a menu will appear. Select “Open”. This will extract the folder and create a folder of photos that you can edit.
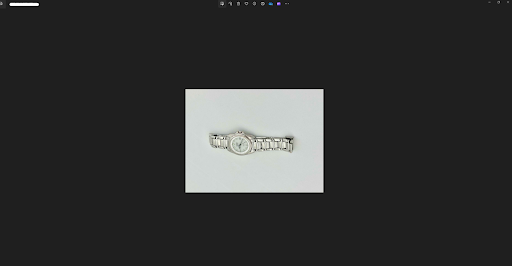
How to Open an Image for Editing
Now that you have the images on your local computer, you can now begin editing.
First, open the first image in the folder (or the image you would like to edit). You can do this by double-clicking on the image. Click on the “Edit image” button, which is the left-most icon in the bar in the center of the screen, with the icon with a pencil in it. You can also begin editing by doing (Ctrl+E).
Crop
You should first consider cropping the image if it is off-center or contains unnecessary space. This can be achieved by selecting the “Crop” button at the top left of the center bar. From there, you can manipulate all four sides of the image by hovering the mouse over the selected edge and then clicking and dragging the edge to the desired cut-off point.
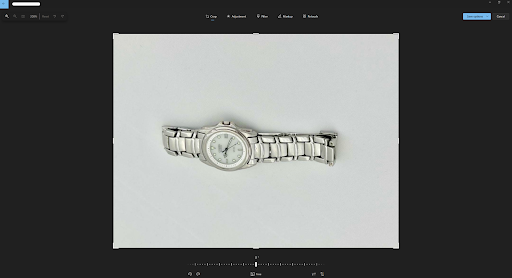
Brighten
Next, try playing around with the lightness/darkness of the image by toggling to the “Adjustment” setting at the top of the screen, to the right of “Crop”. A menu on the right should appear, and “Brightness” should be the first option that appears at the top of the menu. You can adjust the lighting by dragging the bar in the middle towards the left or right. In some cases, images from the collection event could use more lighting, and making the photo brighter could enhance details from the object that was donated to the digital archive.
Saving and Uploading the Final Version
Once you have finished editing the photo, be sure to click the blue “Save options” drop-down menu in the top right corner. Since there are original copies of the photos on the cloud, you should select “Save” and overwrite the version on your device with the edits you just made.

Once you have repeated this process for all the other photos that need to be edited, you will want to re-upload the photos to the same place where you kept the originals.
- Go to the location of the original photos in Google Drive. Do NOT replace the originals.
- Click New > Folder upload
- Once the folder has uploaded, make sure that it is distinguishable from the original photos with naming conventions like “Cleaned Photos.”
Photo Cleanup with an iPhone
This section will cover how to edit and clean photos using an iPhone. When using the default photo editing option on iPhone’s Photo App, there are many options to edit and clean photos. This guide will cover a few of them, but not all, so feel free to try the features on test photos yourself.
How to Edit a Photo on iPhone
To edit a photo on iPhone, select the photo you want to edit and select Edit in the top right corner.

Contrast
Contrast is used to adjust the contrast in the photo itself, bringing out either more of the darker tones or the lighter tones.
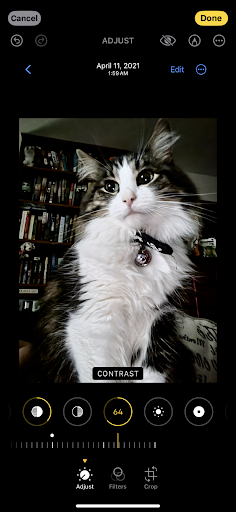
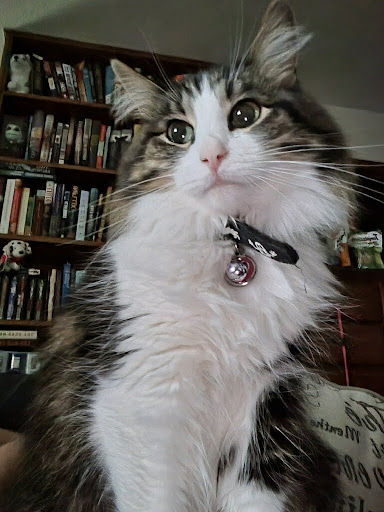
On the left, the photo is edited with bringing in the darker tones but increasing the contrast against the original photo on the right with no editing being done.
Brightness
Brightness is used to adjust how bright or dark the photo is overall.
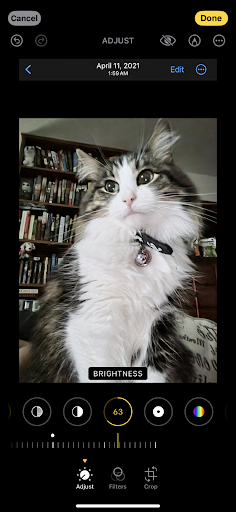

On the left, the photo is adjusted to bring the brightness up higher against the original photo on the right with no editing being done.
Photo Cleanup with an Android
This section will cover how to edit and clean photos using an Android. When using the default photo editing option on Android’s Photo App, there are many options to edit and clean photos. This guide will cover a few of them, but not all, so feel free to try the features on test photos yourself.
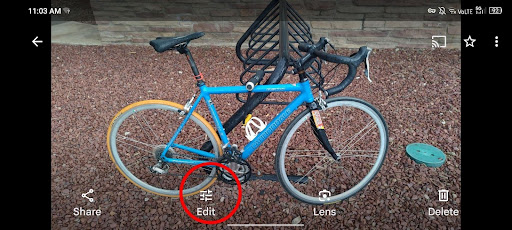
How to Edit a Photo on Android
To edit a photo on an Android device, select the photo you want to edit and select Edit towards the bottom left.
Crop
Cropping is used to adjust the borders of the photo itself, which can eliminate empty space and create a better focus on the central object of the photograph.
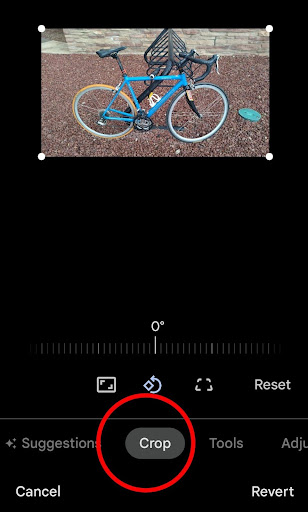
On the bottom left, the photo editor has a “Crop” function. From there, you can manipulate the edges of the photo to fit your needs.
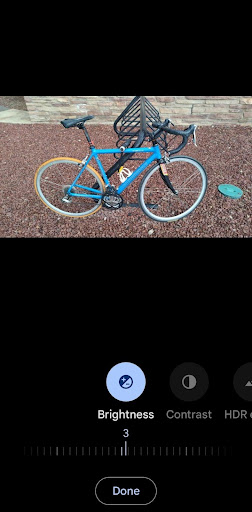
Brightness
Brightness is used to adjust how bright or dark the photo is overall. Navigate to this setting by clicking on “Adjust” at the bottom of the screen. From there, click on “Brightness” in the bottom left.
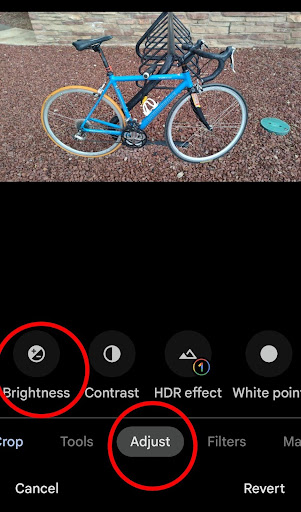
On the scale, you can toggle the brightness between 0 and 100. Lower numbers will result in a darker photo, higher numbers will result in a brighter photo.