Check-In
Welcome
Be sure to welcome and introduce yourself and the event to contributors. Some may be encountering you or your group for the first time and may not know the purpose of your event. Below is a script you can use or adapt to explain:
“Welcome! As part of the (EVENT TITLE), we are creating a digital community archive showcasing an important object and associated memories that will contribute to the history of the culture center. Are you interested in contributing to the archive and do you have an object – a photo, letter, video, story, or memory – that you would like to share?”
- Refer to [example flyer] and talk through options. If you are unsure, ask a coordinator for help.
If they have a contribution:
- Ask to see their object to make sure you can capture it. This will depend on your digitization and photography limitations.
- Go over the process with them. This will depend on your particular event, but be sure to explain what limitations there are, where to go, and how long the process will take. For instance:
- “For video, the process should take about 30 minutes, of which only 10-15 minutes would actively involve you. You will work with the video digitizers to indicate what up-to-30 minute chunk to digitize and you will record a video narration that should last about 5 minutes.”
- “For non-video items, the process should take about 10 minutes from start-to-finish for each item. After you complete check-in, you will go to the digitization station and then to the oral history interview station. The last stop is check-out. “
- Direct the contributor to sign-in for each object.
- Introduce the appropriate guide to the contributor.
- The guide should introduce themselves by name.
- The guide should remind the contributor that they will walk with them through the process and that they are happy to answer any questions along the way.
If they DO NOT have a contribution:
- Thank them for their time and give them a [flyer].
Sign-In
Every object contributed will need their own entry in the sign-in form. Contributors may be asked to submit the sign-in form more than once. Questions may arise about consent. here’s a quick explanation of each:
Consent Types
- Full participation: Post their contributions, digitized images, and oral history interview to the community archiving website.
- No audio, full participation: Post their contributions, digitized images, and oral history interview TRANSCRIPTION, not the actual audio recording, to the community archiving website.
- Anonymous, full participation: Post their contributions, digitized images, and oral history interview TRANSCRIPTION, not the actual audio recording, to the community archiving website, not including personal information.
- Private, full participation: We will NOT publish anything contribution to the website, but will keep their contact information for sending digital copies of the items contributed.
Before a contributor moves to the form station, tell each contributor that you will give them a flyer with contact information at the end. - The guide’s role here is to listen to the conversation between the contributor and the check-in volunteers, noting questions that may arise that could benefit from more clarification as they go through the process. The guide can also help the contributor fill out the form on the iPads.
Step 1: Complete a Form for Each Object
- Direct the contributor to the appropriate device(s) to complete the sign-in form. This should take no longer than 5 minutes.
- If the contributor has more than one object, each object will need a separate form submitted.
- You may reference the sign-in form on your own device in case the contributor has questions.
- Once the appropriate number of forms is complete, direct the contributor to the volunteer(s) in charge of Step 2 of the sign-in process.
The sign-in spreadsheet should have three tabs:
- Sign-In
- Verified Sign-In
- Assign ID
Step 2: Verify Sign-In
The purpose of this step is to make sure that the contributor does not need to make any changes to what was originally submitted via the form and captured in the “Sign-In” tab. - Consider having the volunteer read back the information: - “Thank you, (NAME OF CONTRIBUTOR). I will now verify your sign-in information.” - Be attentive to the pronunciation of names. If you are unsure, ask the contributor to confirm the pronunciation.
- Copy and paste the contents of the contributor’s row/rows from the “Sign-In” tab to the “Verified Sign-In” tab.
- Take a moment to review the information and determine whether everything looks good. Confirm the contributor’s consent and make any changes if needed.
- It is unlikely that you will need to make a change, but some scenarios that may require a change can include:
- Change of consent during verification or at check-out.
- One entry depicts more than 1 item
- If this is the case, it will require a conversation. Sometimes it makes sense for items to be groups. Other times it may make more sense to have each items as a separate row in the “Verified Sign-In” tab.
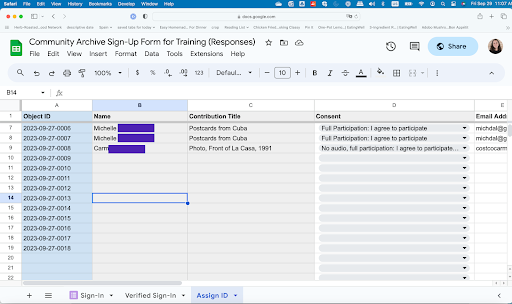
- See example below an accompanying screen recording for an example of one entry needing to be split into two entries in “Verified Sign-In.”
- Example: Original submission contained two postcards as one entry. After discussion at check-in, it was decided that each postcard should have its own entry since they were addressed to different people with different messages. In “Verified Sign-In,” a second entry, copy-and-pasted from the original that was created, with minor changes to each entry: (to grandmother) and (to friend), to distinguish them.
- It is unlikely that you will need to make a change, but some scenarios that may require a change can include:
Step 3: Assign ID and Recorder
- Find the record in the spreadsheet-view of the sign-in form.
- Go to Assign ID tab
- The information you copied will automatically populate in this tab.
- Each object the contributor brings will be assigned a separate “Object ID.”
- Go to Assign ID tab
- Quickly verify that the contributor’s name and title(s) of the object(s) matches the information in the “Verified Sign-In” tab.
- Verify that an Object ID has already been created. The ID structure should be based on the date of the event and a sequential number (i.e. YYYY-MM-DD_nnnn).
- Locate the corresponding Object IDs on the [sticker sheets]. Each contributor will be assigned two identical Object ID stickers for each object.
- Verify the consent level in the “Assign ID” tab.
- If they would like to make a change to consent, do so in the “Assign ID” tab. The “Verified Sign-In” tab should be a record of original consent, and the “Assign ID” tab should always be the final reference for permissions.
- Let the contributor know that they will have a chance to change their consent at check-out.
- Modify the Object ID stickers to reflect verified consent:
- Full Participation: Leave the stickers alone; tell them you will edit their audio for clarity.
- No audio, full participation: “NA” on the stickers; tell them you will record them, but put only the transcript online.
- Anonymous, full participation: “ANON” on the stickers; tell them you will keep their contanct information for sending them digital copies of their contributions, but will NOT include their information in the digital archive.
- Private, full participation: “PRIV” on the stickers; tell them you will not publish anything that is provided, but will keep their contact information for sending digital copies of their contributions.
- Write the first name of the participant and the title of the object (if they have more than one) for each identifier sticker.
- Below the consent note in the bottom-right, copy the first name and title given by the contributor in the spreadsheet.
- If they are contributing an Oral History, select an audio recorder for the contributor.
- If they are contributing a video, direct the contributor to the Video Digitization Station.
- Pull both of the stickers from the sticker sheet with the associated Object ID(s).
- Place each sticker (1, or more if there are multiple objects) on index cards, one for the guide and one for the contributor.
- Hand the index card(s) with the sticker to the contributor
- Hand the matching index card(s) with the sticker to the guide
- Place each sticker (1, or more if there are multiple objects) on index cards, one for the guide and one for the contributor.