This document was produced from online documentation that is regularly updated. For an up-to-date version, please visit
digitalarcplatform.github.io/documentation
Generated March 13, 2026
The community-archive process has lots of moving pieces. We’ll outline the whole thing, start to finish, in really rough simple terms here so that the more detailed documentation that follows makes more sense.
Looking for a printable version of the full process? Click Here
Figuring out what your goals are for your community’s archive–what your community’s needs are, what history you have to preserve, and how you can all work together to plan a community-archiving event–is the biggest part of any community-archive project. A few questions will help you get started.
Once you’ve got a set of shared goals and an event date set, you’ll need to think about how to photograph objects, record interviews, and then save those recordings and photos with all the info you need to make a web site. Having set stations that each contributor visits can help manage the chaos
Now that you have a boatload of photos and interviews in digital form, you’ll want to make sure you have the right info about each object and can connect that object back to the person who brought it. That means
With information about each object in hand, it’s time to launch a website, which means:
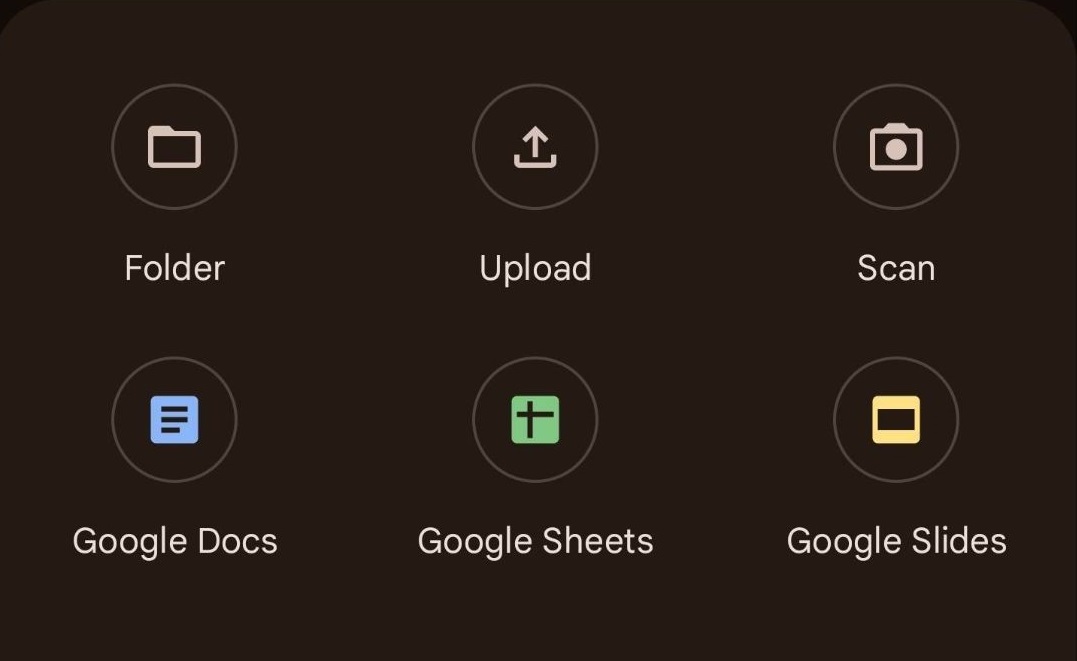
Before you delete the sample items, make your first item .md file or else the _items folder will disappear.
Since this is one of the more technical steps, we’ve got a guide just for this section that’s a little more detailed. Click here to read it.
There are a few things to consider for anyone thinking about community archiving.
The first step is to consider what your community has already done and what your goals are.
Is your community starting from scratch with no community events to use as a guide? Start with the Planning Committee section in First Steps and find collaborators who can help you figure out how to get started.
Are you part of a community that holds community events but has never held a community-archiving event? Start with the Assessment section in the Pre-Event Planning section and see what your community needs. Then work through the entire Pre-Event Planning process.
Are you part of a community that already has a rich collection of history but needs guidance in taking photos and collecting oral histories? Start with the During the Event section for a guide on how to collect and keep track of photos and oral histories. Then check out the Pre-Event Planning section to fill in the gaps for any event-planning needs that might come up as you chat about what will happen during the event.
Are you part of a community that has already done some digitization and oral-history collection? Start with the Post-Event Clean-Up section for a guide on how to name and format the items in your community collection for publication on a web site.
Finally, many communities will want to publish their digital community archives on a website. That’s covered in the Publishing Your Site section of the documentation. If you don’t want your community archive to be available for the general public, using the Post-Event Clean-Up section to organize your photos and oral histories might be enough.
In order to quickly and easily facilitate your community archive event, there are a number of items you will need to make sure are in place.
Whether specialized equipment like audio recorders or digital cameras are provided or your team uses personal smart phones to capture stories, your team will need to decide on a collaborative, cloud-based file-sharing solution like Google Drive or Microsoft One Drive. This will need to be in place ahead of the community archiving event.
There are several of cloud-based, collaborative file-sharing and file-management options like Backblaze, Dropbox, Google, and Microsoft. While each of these have Android and iPhone apps to make file management fairly easy on your mobile phone or tablet, some of these like Google or Dropbox are seamlessly integrated with uploading actions supported by phones or tablets.
Given Google’s ubiquity, familiarity and ease-of-use, we provide suggestions for setting up a Google environment for file-sharing.
You will need some sort of form in order to collect information from the contributors about their items, contact information, and permission preference.
For user-friendliness on both your and the contributors’ ends, we recommend using Google Forms as it is an interface with which the public is generally familiar and it allows you to export the responses to a spreadsheet.
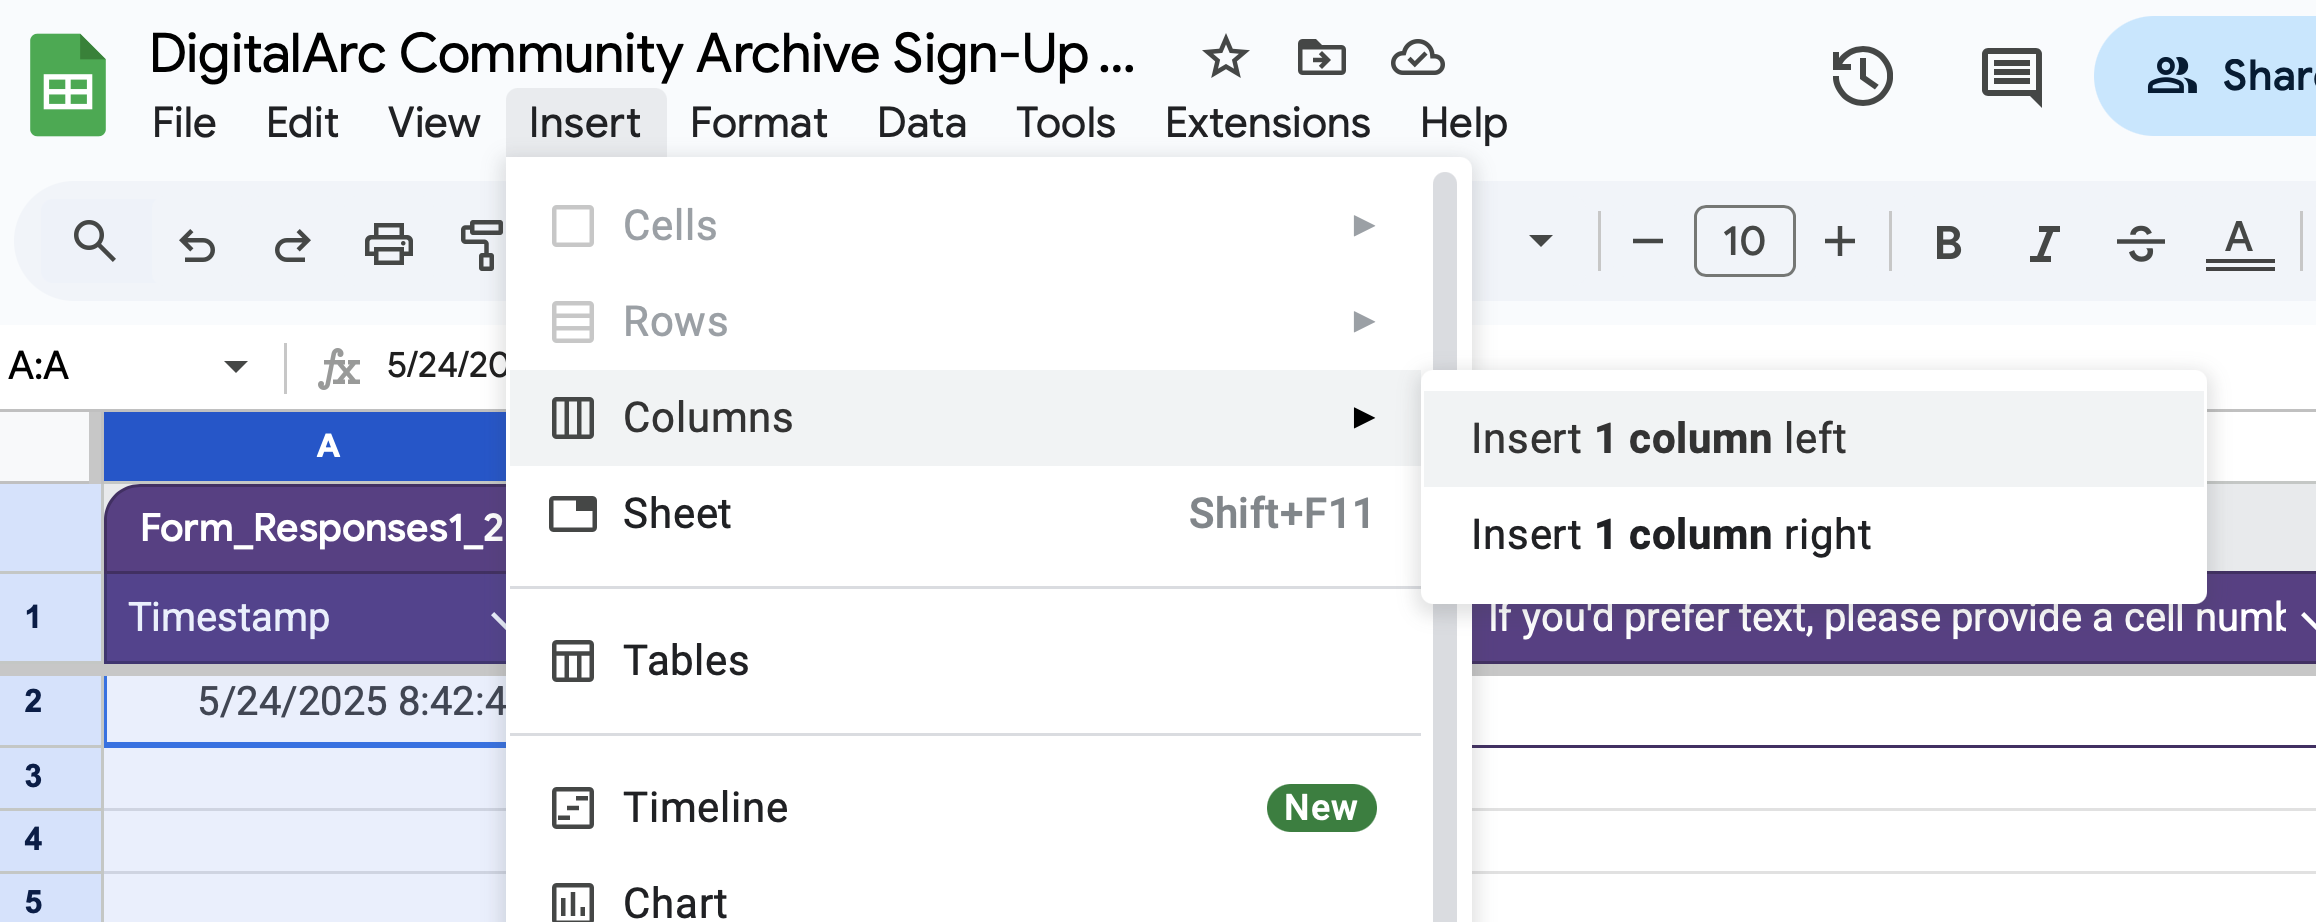
It will also help to have Object ID stickers created in advance. These stickers will allow both you and the contributors to keep track of their individual items.
For ease of use, we recommend following the format YYYY-MM-DD-XXXX where:
Hence 2024-03-21-0004 would correspond to the fourth item collected on March 21st, 2024.
You will likely want to prepare a surplus of these stickers so as to avoid any disruptions during the course of the event.
NOTE: These IDs will also be essential for assigning file names in preparation for processing and publishing these files.
To begin the planning process for a community archiving event, organizers will want to consider convening a planning committee to assist in the planning and execution of this event. This will help divide the work among other interested parties. When selecting members for the planning committee, consider previous community events and prioritize individuals who assisted in the planning process of those events. Although previous event planning is not necessary, having some experience will aid in the organization of the archiving event.
Once interested parties have been identified, you will want to assign roles and responsibilities to each member of the planning committee. This will allow volunteers to take ownership of a particular area of the event, and they will be the point of contact for that area. In determining each member’s role, the committee may consider an individual’s strengths and interests and make decisions based on this information. You may also consider the interpersonal relationships between each member when making decisions about roles.
Some possible roles and responsibilities can include:
Storing meeting notes, files, photos, audio transcripts, event-planning logistics can be overwhelming.
A file-sharing setup that lets many people take notes and refer to those notes, or see shared files, is one of the best ways to help a team manage a big community-archiving event.
Google Docs and Spreadsheets are one of the easiest ways to manage shared files across many different computers and phones.
Here, we run through a basic setup process that you can follow to create a shared account that many people can access for planning and storage purposes
Given Google’s ubiquity, familiarity and ease-of-use, we provide suggestions for setting up a Google environment for file-management and sharing. We recognize that this is just one way to setup file-sharing. There are any number of ways of facilitating this, but the goals are the same:
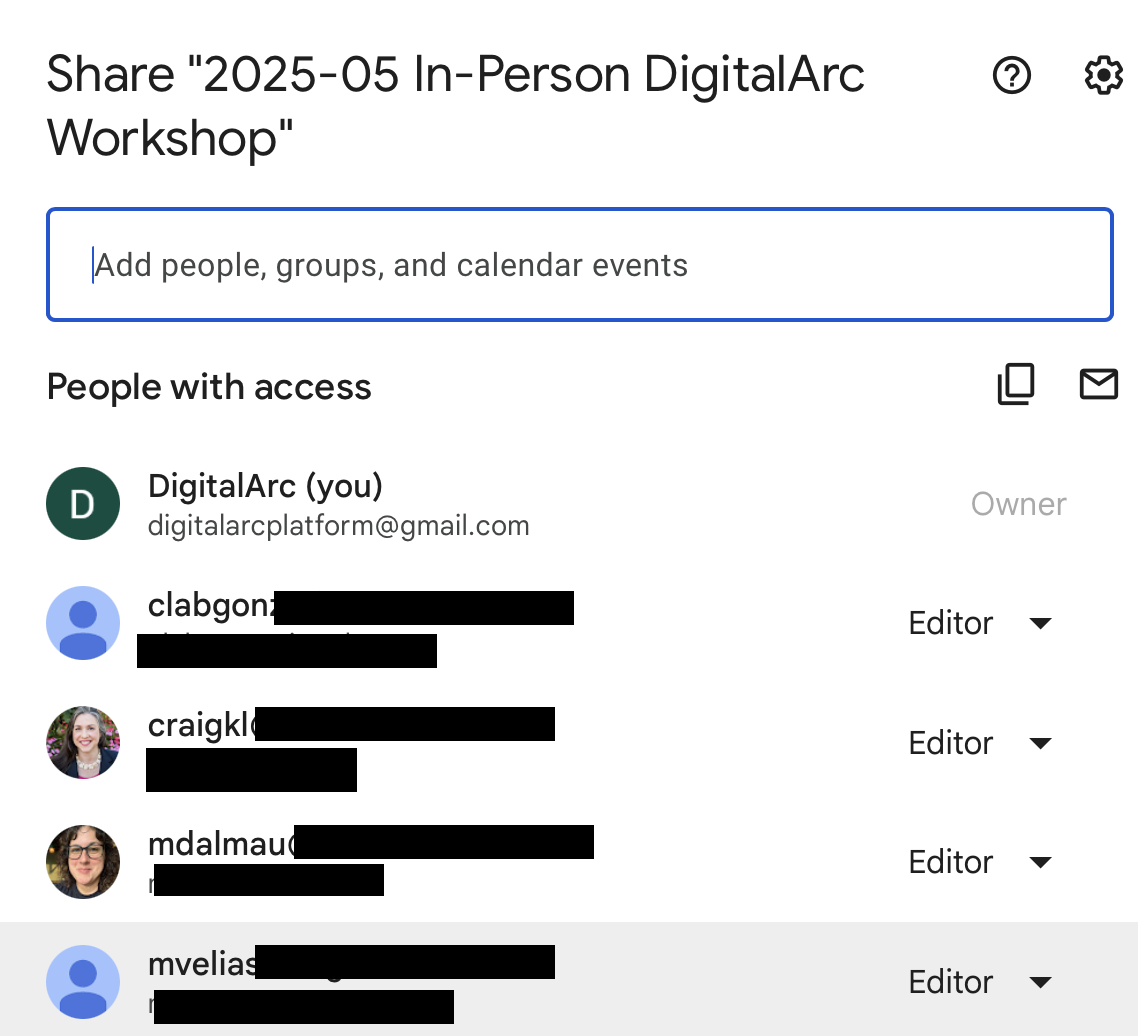
We recommend creating a Google personal account for your project. For example, we created ‘digitalarcplatform@gmail.com’ for managing cloud-based file sharing, our GitHub account and other accounts you may need for your community archiving project.
Only one person can fully manage this account so you will need to determine who would be best positioned to do this for your project. That person would provide a recovery phone number and a recover email as back-up. In some cases, your project may be better suited to setting up a Google organizational account, but this seems to work better if your project is affiliated with an incorporated entity.
A Google personal account can be used as a “group” account in which the username/gmail and password is shared with a limited number of project coordinators or the project leaders, allowing multiple people to help with day-to-day management of the account.
Once you have a project Gmail account in place, you have 15 GB of free storage for all your files including gmail, Drive, etc. Depending on your project this may be enough.
If you need additional storage, explore Google One plans for a fee.
The average file size for a photo is 2 MB per image. Audio and video files will be much larger, and it’s hard to determine an average based on length, sample rate and other factors, but storing a compressed file like MP3, MPEG1 pr MPEG2 would take up less space.
While sharing the login with more than one project leader is a good idea, we recommend that project leaders are assigned the highest level of restricted access (Editor) using their personal gmail or other email linked to a Google account.
For a given project, you may create a folder for that project. Within that folder you may have additional folders allowing for different levels of participation. For example:
The “Photograph” and “Interviews” folders will need to be accessible by your volunteers or community contributors. You can do this by either inviting specific people (via email, but they would need to make sure that email is attached to a Google account) or by opening the folder to anyone with a link. The “Event Planning Documents” may only be available to a smaller subset of project coordinators.
To learn more about creating folders and assigning sharing permissions, visit Google Drive Help.
It is critical to have an accurate assessment of all the moving parts of your history collection event. This includes a variety of details such as having the appropriate number and types of guides, the requisite equipment, and an accurate understanding of the venue (layout, parking accomodations, etc.).
The pages provided here are meant to assist you in thinking through these considerations and to provide examples and ideas for planning your event.
As always, your needs may differ from exactly what we present here; plan accordingly.
Now that you and your community have decided to continue with a community archiving event, the next steps are to understand better the community’s wants and needs for the event. Also, you will want to gather information about community members’ skills and availability for the event.
The first assessment gathers information about the type of stories your community would like to share and the objects they own and would like to contribute to the archive.
Click here to view a sample community-needs survey
You can circulate this sample survey with your community. We recommend using similar questions when creating a survey for your community.
Once community members have completed this initial survey, you will better understand the types of stories your community is interested in sharing and the type of material or objects members would like to contribute to the archive. This will help you better plan for the archiving event, such as logistical decisions, the size of the venue, and the number of volunteers needed. It will also help you decide on the equipment you will need to digitize the objects and record the stories.
Community archives rebalance authority, value lived experience, and create a more liberatory, participatory archival process. Considering how your community stories will be represented ahead of time can help you craft an oral-history interview approach that better represents community values in the final digital archive.
Every digital archive object will have a web page. Prepping in advance for some of the topics that are likely to come up can help your community control how the community archive shows up in online searches. We’ll come back to this twice, once in the Oral History section of the during-event process and again in the “Metadata” section of the post-event process.
The second assessment gathers information about the skills and availability of community members willing to help organize the event. This information will help you manage volunteers and help you make decisions about assignments for volunteers. You can send this survey at the same time as sending out the first survey, or you can wait until after the first survey and incorporate the results of the first survey into the volunteer survey.
Click here to view a sample skills-and-availability survey
Click on the following link for a sample survey you can circulate among members who have expressed interest in helping organize the event.
As you begin the initial steps to hosting a community archive, you will want to schedule a meeting with community members to discuss their interest in taking on this project. During the meeting, you can show sample projects to help explain the idea and vision behind your community archiving its history. Below are some recommendations for ideas or talking points to discuss during the meeting with community members.
It is essential to plan your event carefully in order that you encounter as few challenges on the day of your event.
One important consideration is the way in which your contributors will experience the event.
This section provides a walkthrough of how to think about the physical organization of your event and is meant to prompt you to think about how the event proceeds from the perspective of a contributor.
Now that you have an idea of the type of material you will be archiving and a general sense of the number of community members who can help throughout the event, the next steps are to find a venue that can support it. This should happen early in the planning period.
Below are some considerations for choosing a place and date to host the archiving event:
When choosing a date and location for your archiving event, you should consider typical weather conditions. If a particular venue requires part of the setup to be outdoors, you will want to have a backup plan in the event of adverse weather conditions or have the necessary equipment (e.g., tents, heaters, etc.) to run part of the event outside. When possible, picking a date with typically pleasant weather conditions is highly recommended, but we understand it is not always possible.
Once community members have completed the community survey, you will have a rough estimate of the number of participants for the event. This will help you determine the size of the venue. We recommend that a venue have at least three spaces to set up the stations. The room that will possibly be used for check-in/ check-out should be large enough to hold approximately 20 people. For digitization, you’ll need a table or other flat surface to set up lightbox photography. Additionally, for the oral histories, you need a space with a door that can be shut for privacy, like an office. The more rooms that allow for a door to be closed, the faster you can move community members through the process, as the oral history typically takes the longest (10-20 minutes per contributing object).
You will want to consider the proximity of the rooms you will use for the event. For example, you may not want to choose a venue where the rooms you will use are too far apart from each other, as this will require community members to walk longer distances and can prolong the entire process. Additionally, the rooms that will be used for the oral histories should be in an area that is quieter, away from the check-in room, so that the audio recording does not pick up background noise from other community members participating in the archiving event.
During the event, you will be using various electronic devices that will require power throughout the day, so when checking out venues, consider the number of outlets available and their location in various rooms. You can use power strips to increase available outlets, but you want to avoid situations where power strips create trip hazards to community members and volunteers. Taking this into account will help you determine how the rooms can be used and whether the location is appropriate for your event.
Accessibility is an essential component to consider when choosing a venue, especially considering the needs of community members. You will want to ensure the location is physically accessible to all participants. Ideally, your chosen location will allow you to host the event all on the same floor to help with movement through the event.
The objective of this section is to summarize how contributors make their way through the event, from Check-In to Check-Out.
A few preliminary items you should consider are:
Since the check-in table will be contributors’ first stop, there should be clear and identifiable signage, as well as at least one greeter to staff the station at any given time.
Depending on the scale of your event, the exact setup for your technology stations may vary. For instance, if you anticipate a larger quantity of video content than photography, think about increasing the number of video stations.
If someone is contributing video, this will be the first stop of the technology-related stations since it is the most time consuming.
If a contributor has any photography needs, then this will be the next stop.
Subsequently, contributors will head to the oral history station if they have any such content to contribute.
This is the final station which contributors pass through.
For a successful community archive event, you will need a variety of volunteers to fulfill the roles necessary for directing contributors, digitizing their contributions, and conducting oral history interviews. We recommend recruiting volunteers for the following roles. Prior to assigning roles, be sure to send out a volunteer skills survey to assess potential volunteers’ skill sets. This will help you decide what role suits them and your event best.
Note: The number of individuals you will need for each role will depend on the size and scope of your event. Plan accordingly.
Greeters will welcome contributors by providing an introduction to the event, helping contributors sign-in, and assigning a guide and identifiers. For this role, the volunteer should be comfortable with interpersonal communication, comfortable using laptops, computers or tablets, and have experience with spreadsheets.
Guides will walk contributors through the process, from check-in through checkout. They will need to be familiar with the whole process and will have prompts for the different stations. For this role, the volunteer should be comfortable with interpersonal communication. For more, see Guides.
Digitization Technicians will photograph objects contributed either in a lightbox or using stands/mounts for flat objects using a combination of personal (i.e., smartphone) and provided equipment. For this role, the volunteer should be detail-oriented and have experience using smartphones as cameras. For more, see Digitization and Photography.
The oral history interviewers will ask the contributors pre-determined questions about the object they are contributing to the community archive. They will use provided equipment (i.e., recorders) to do this work. For this role, the volunteer should be comfortable with interpersonal communication. For more, see Oral History Interviews.
Event coordinators should also be on-site to make sure the overall process is working, to help troubleshoot issues, assist at the stations, and provide any other support that may be needed.
We take a DIY approach to capturing stories using devices that are readily available like mobile smart phones or tablets, aiming for the best quality capture even if they may not meet digital archival standards. This work does not preclude using digital cameras, flatbed scanners or professional audio recorders that are able to capture content at a higher resolution. Nor does it preclude using a combination approach.
Much will depend on access to equipment, training opportunities, and the community archiving event setting. Our documentation is largely geared toward using smartphones for capture.
In order to make sure that your event proceeds smoothly, plan all of your equipment needs well in advance. The lists below are not comprehensive, but do cover a wide array of materials that you will likely need for running your event. Be sure to consult your Venue to see what equipment needs you will need to meet yourself.
Below is a list of tasks leading up to your archiving event, so you can be fully prepared.
It is essential to let your intended community know that your event is happening well in advance. The purpose of this section is to outline the basic materials and considerations for advertising your event.
There are a few ways you can go about marketing your event. You can promote it through social media platforms (Instagram, Facebook, etc.), email listservs, organizational newsletters, or other publications which reach your intended audience. For each of these modes of communication, we have found that a digital flyer that contains all of the event details has been highly effective. Be sure to choose fonts and colors that are easy to read and visually engaging. The goal is to attract attention!
Your flyer should include the following information, as well as any other relevant information:
We have included a barebones example of how you can consider organization the information above into a flyer:
For your own flyer, consider including any relevant images or logos for your organization.
The best ways to publicize your event will depend on your audience and their preferred forms of communication. If your organization has a newsletter or recurring publication, consider beginning there. Other modes of communication may include social media (Facebook, Instagram, etc.), email listservs, or posting printed flyers on community event boards.
Be sure to include all essential information about the event (see Marketing) as well as contact information for any questions or concerns.
For best results, start promoting your event early! Getting the information circulating 6 - 8 weeks ahead of the event date will provide plenty of time for participants to put it on their calendars, think about their contributions to the archive, collect their items, and invite others who may be interested.
This page and its sub-pages provide a step-by-step guide for running a community digital archiving event, including how-tos and tips at each stage of the process. Each community collaboration will be unique in scale, scope, themes, and highlighted artifacts/objects. You should tailor your plans and documents to specific community partnerships.
The number of organizers needed per role/station will depend on the size of the community event and partner capacity. The following stations are listed in-order of the process. Contributors will visit each station.
Greeters will welcome contributors by introducing the event, helping contributors sign-in, and assigning a guide and identifiers. For this role, the volunteer should be comfortable with interpersonal communication, comfortable using laptops, computers or tablets, and have experience with spreadsheets.
Guides will walk contributors through the process, from check-in through checkout. They will need to be familiar with the whole process and will have prompts for the different stations. For this role, the volunteer should be comfortable with interpersonal communication.
Digitization Technicians will photograph objects of interest either in a lightbox or on stands/mounts for flat objects using a combination of personal (i.e., smartphone) and provided equipment. For this role, the volunteer should be detail-oriented and have experience using smartphones as cameras.
The oral history interviewers will ask the contributors pre-determined questions about the object they are contributing to the community archive. They will use either a personal device like a smartphone or provided equipment (i.e., recorders) to do this work. For this role, the volunteer should be comfortable with interpersonal communication.
Event coordinators should also be on-site to make sure the overall process is working, to help troubleshoot issues, assist at the stations, and provide any other support that may be needed. Often, the even coordinators are also running stations. If you have trained volunteer, who can serve as a floater (regularly checking in on all the stations) for back-up, we recommend you designate this role.
For the check-in station, you should have:
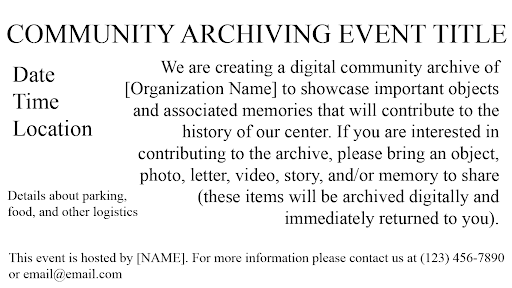
Be sure to welcome and introduce yourself and the event to contributors. Some may be encountering you or your group for the first time and may not know the purpose of your event. Below is a script you can use or adapt to explain:
“Welcome! As part of the (EVENT TITLE), we are creating a digital community archive showcasing an important object and associated memories that will contribute to the community’s history. Are you interested in contributing to the archive and do you have an object – a photo, letter, video, story, or memory – that you would like to share?”
If they have a contribution:
Ask to see their object to make sure you can capture it. Talk through options. You may not be able to digitize an entire scrapbook so you will need to work with the community members on identifying aspects of the scrapbook that are most important to the story they plan to share.
“The process should take about 15 minutes from start-to-finish for each item (assuming a focused oral history interview). After you complete check-in, you will go to the digitization station and then to the oral history interview station. The last stop is check-out.”
Direct the contributor to sign-in for each object.
If they DO NOT have a contribution:
Every object contributed will need its own entry in the sign-in form. Contributors may be asked to submit the sign-in form more than once. Questions may arise about consent. here’s a quick explanation of each:
Before a contributor moves to the next station, tell each contributor that you will give them a flyer with contact information at the end.
The guide’s role here is to listen to the conversation between the contributor and the check-in volunteers, noting questions that may arise that could benefit from more clarification as they go through the process. The guide can also help the contributor fill out the form on the iPads.
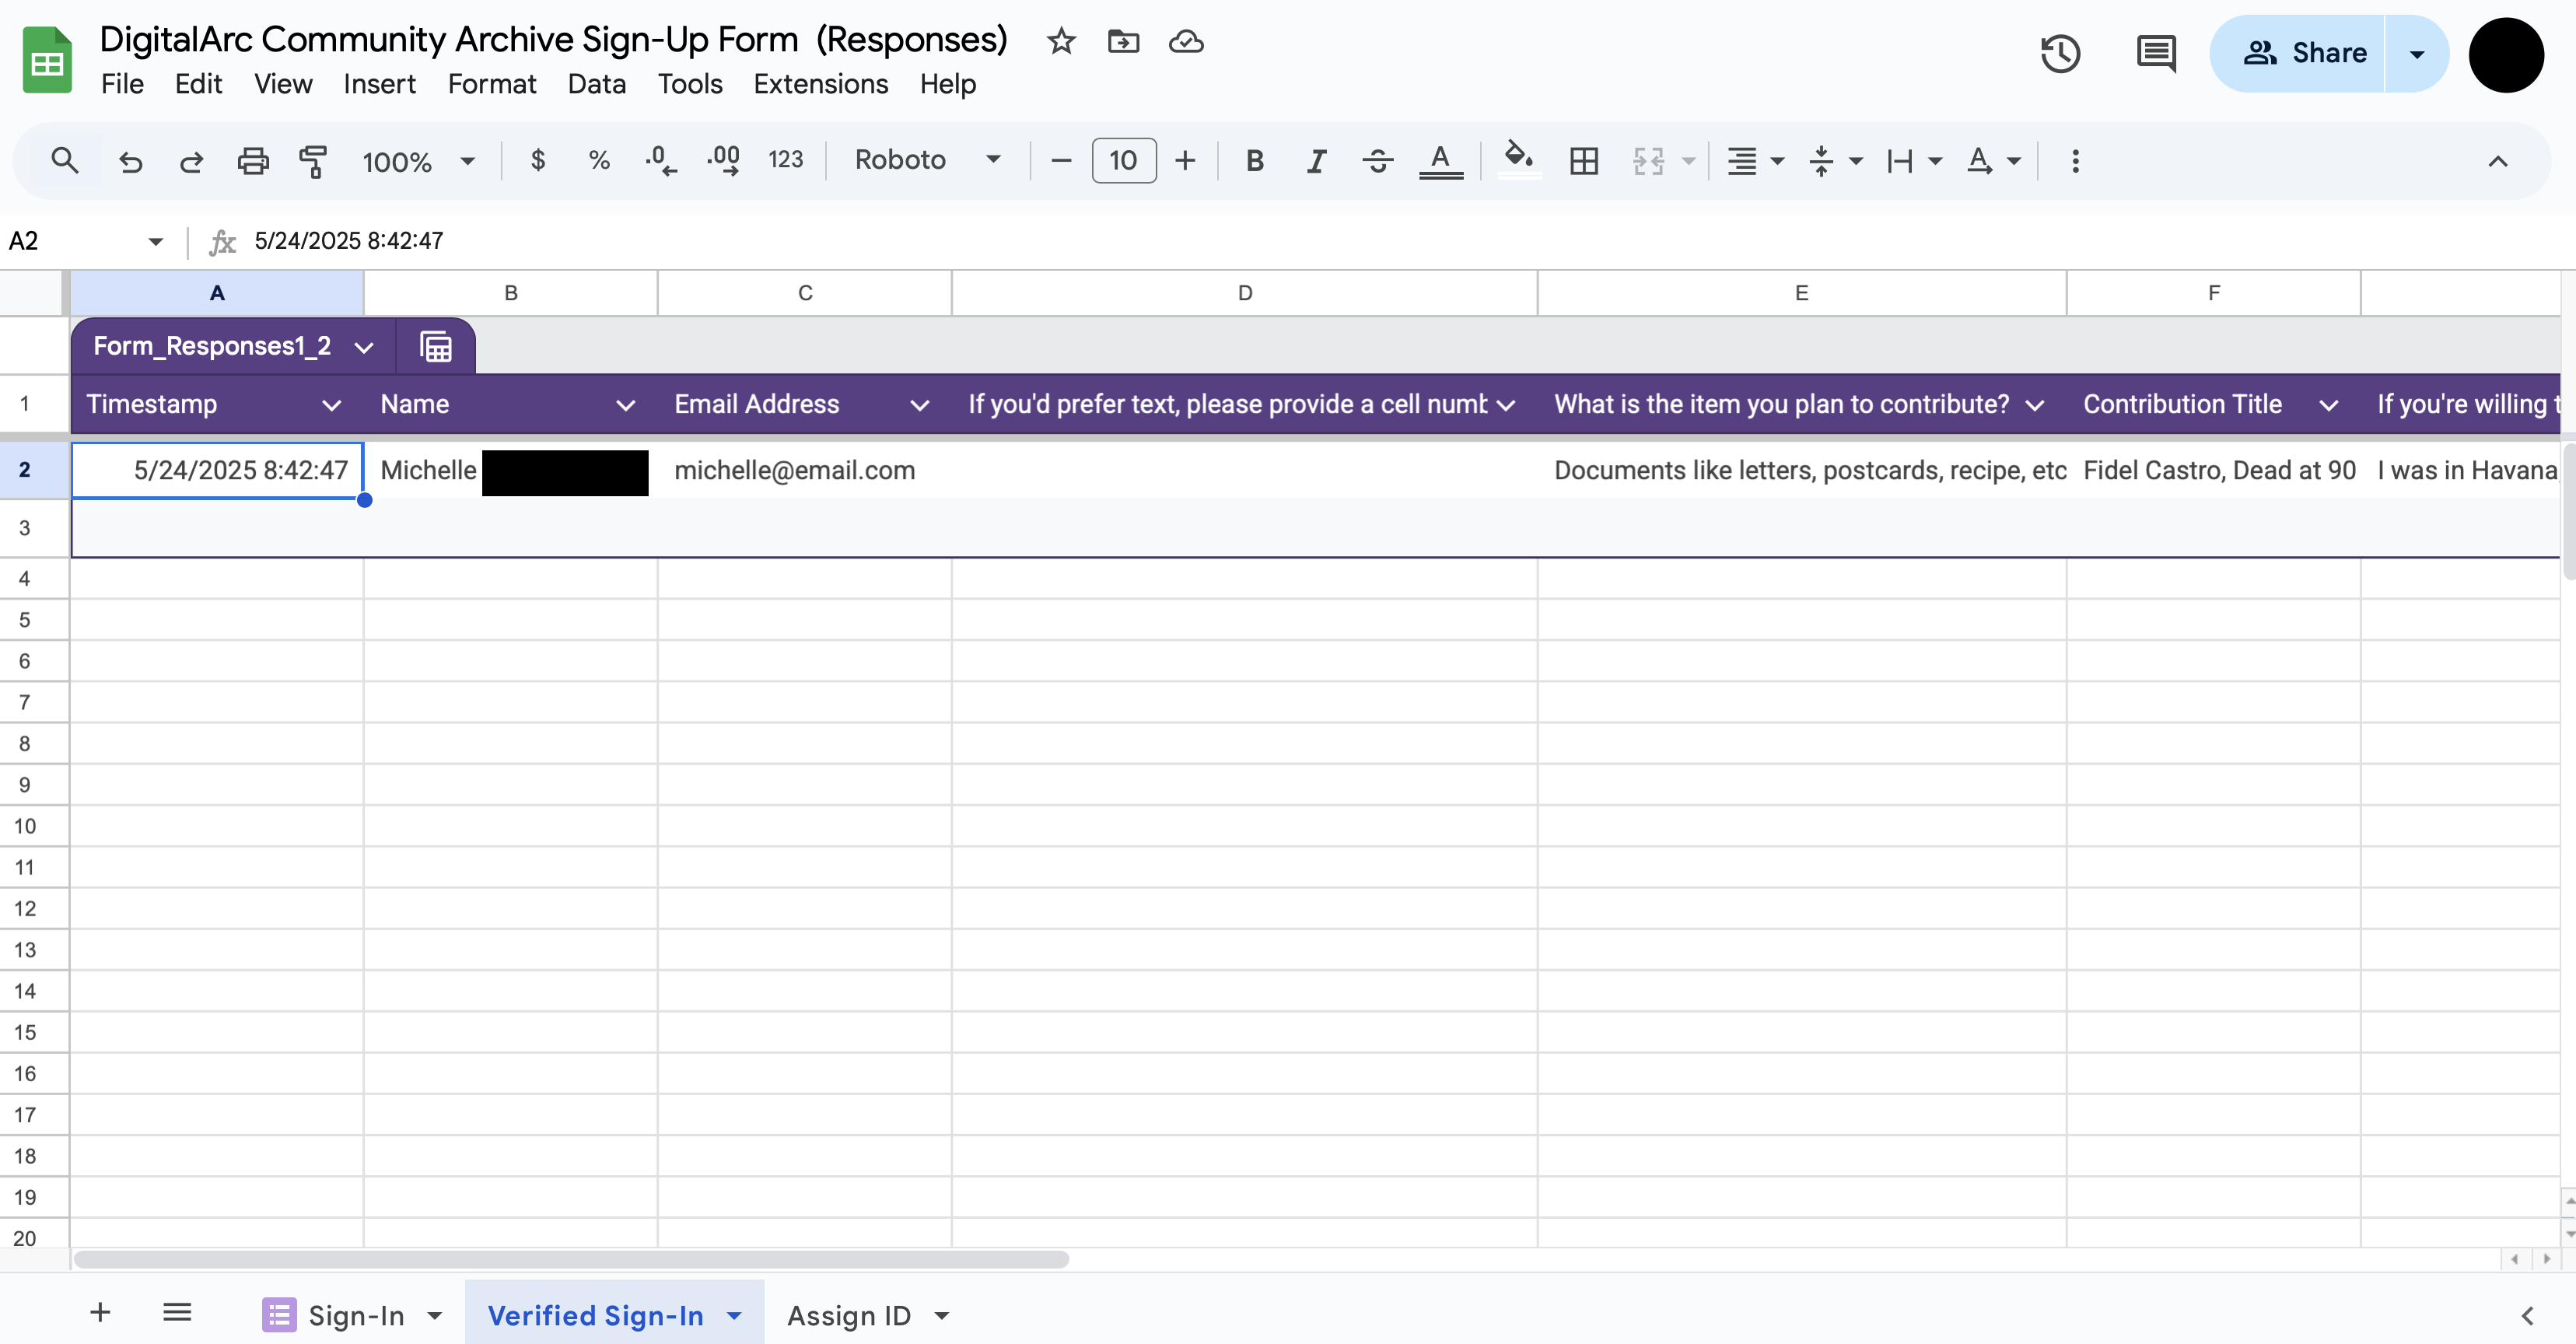
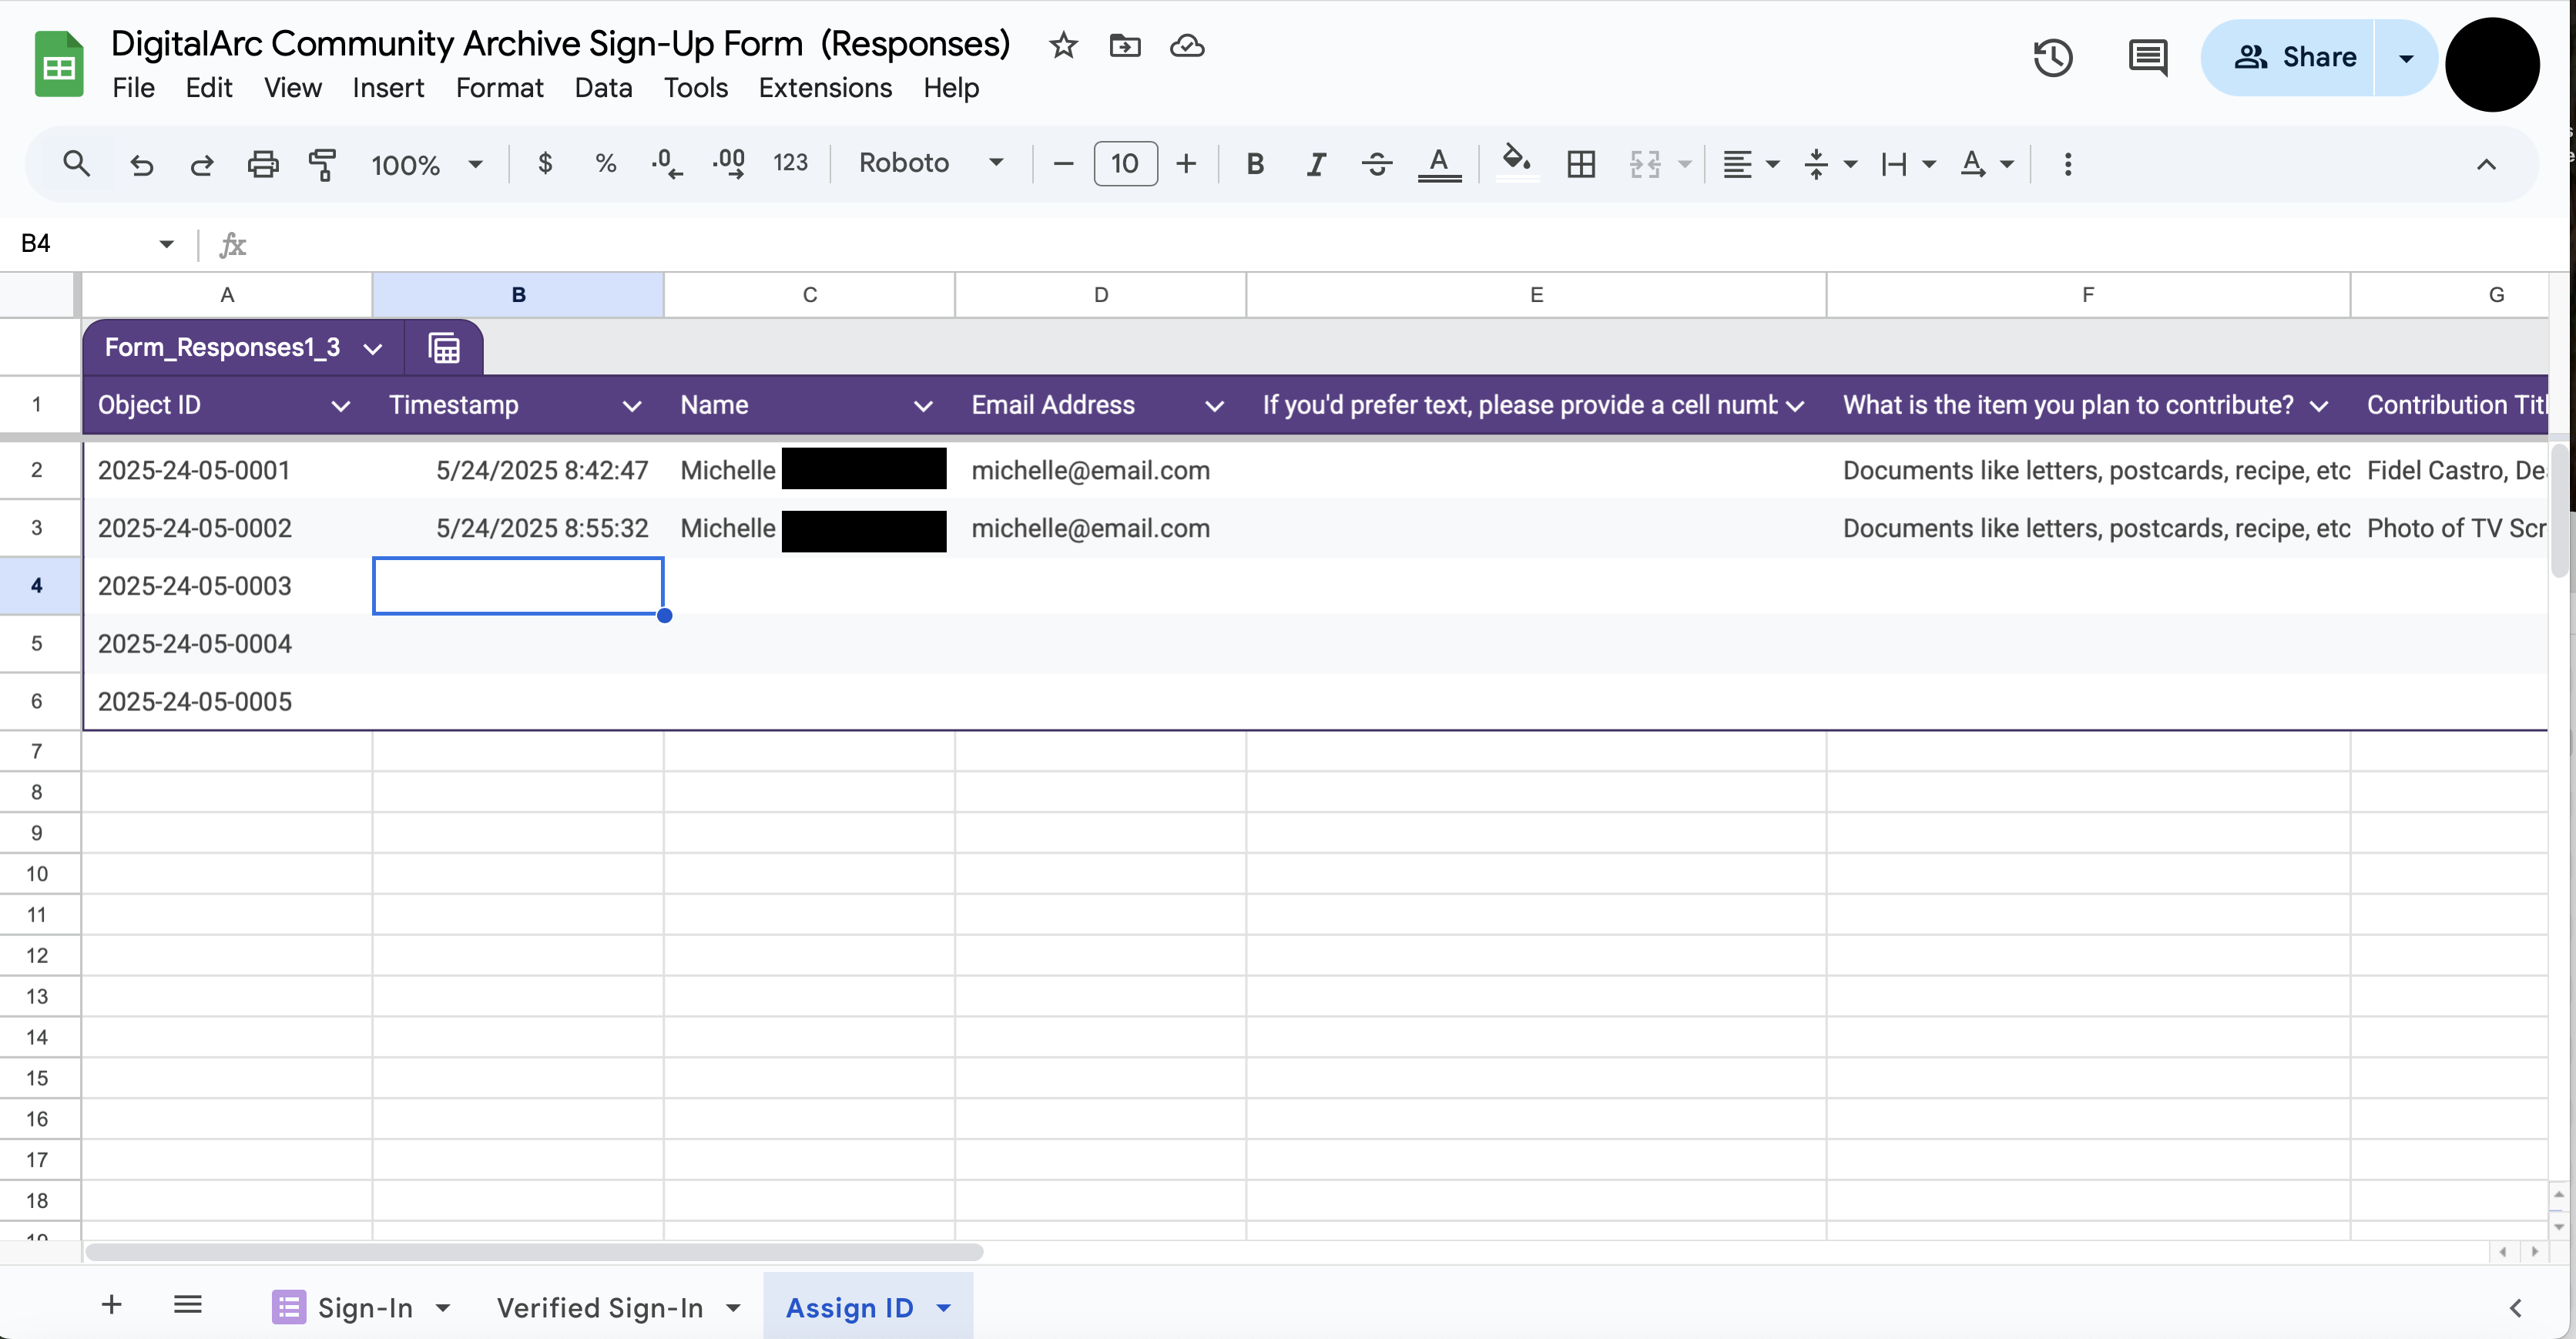
The sign-in spreadsheet should have three tabs:
Sign-in will mostly likely happen on-the-spot on event day. You may also encourage people to sign-in ahead of event day. In this case, you may have a mixture of existing entries and new ones happening in real time. Whether you have existing entries or you are working with a newly submitted entry, the following steps need to be taken to initially prepare the spreadsheet for tracking community contributions.
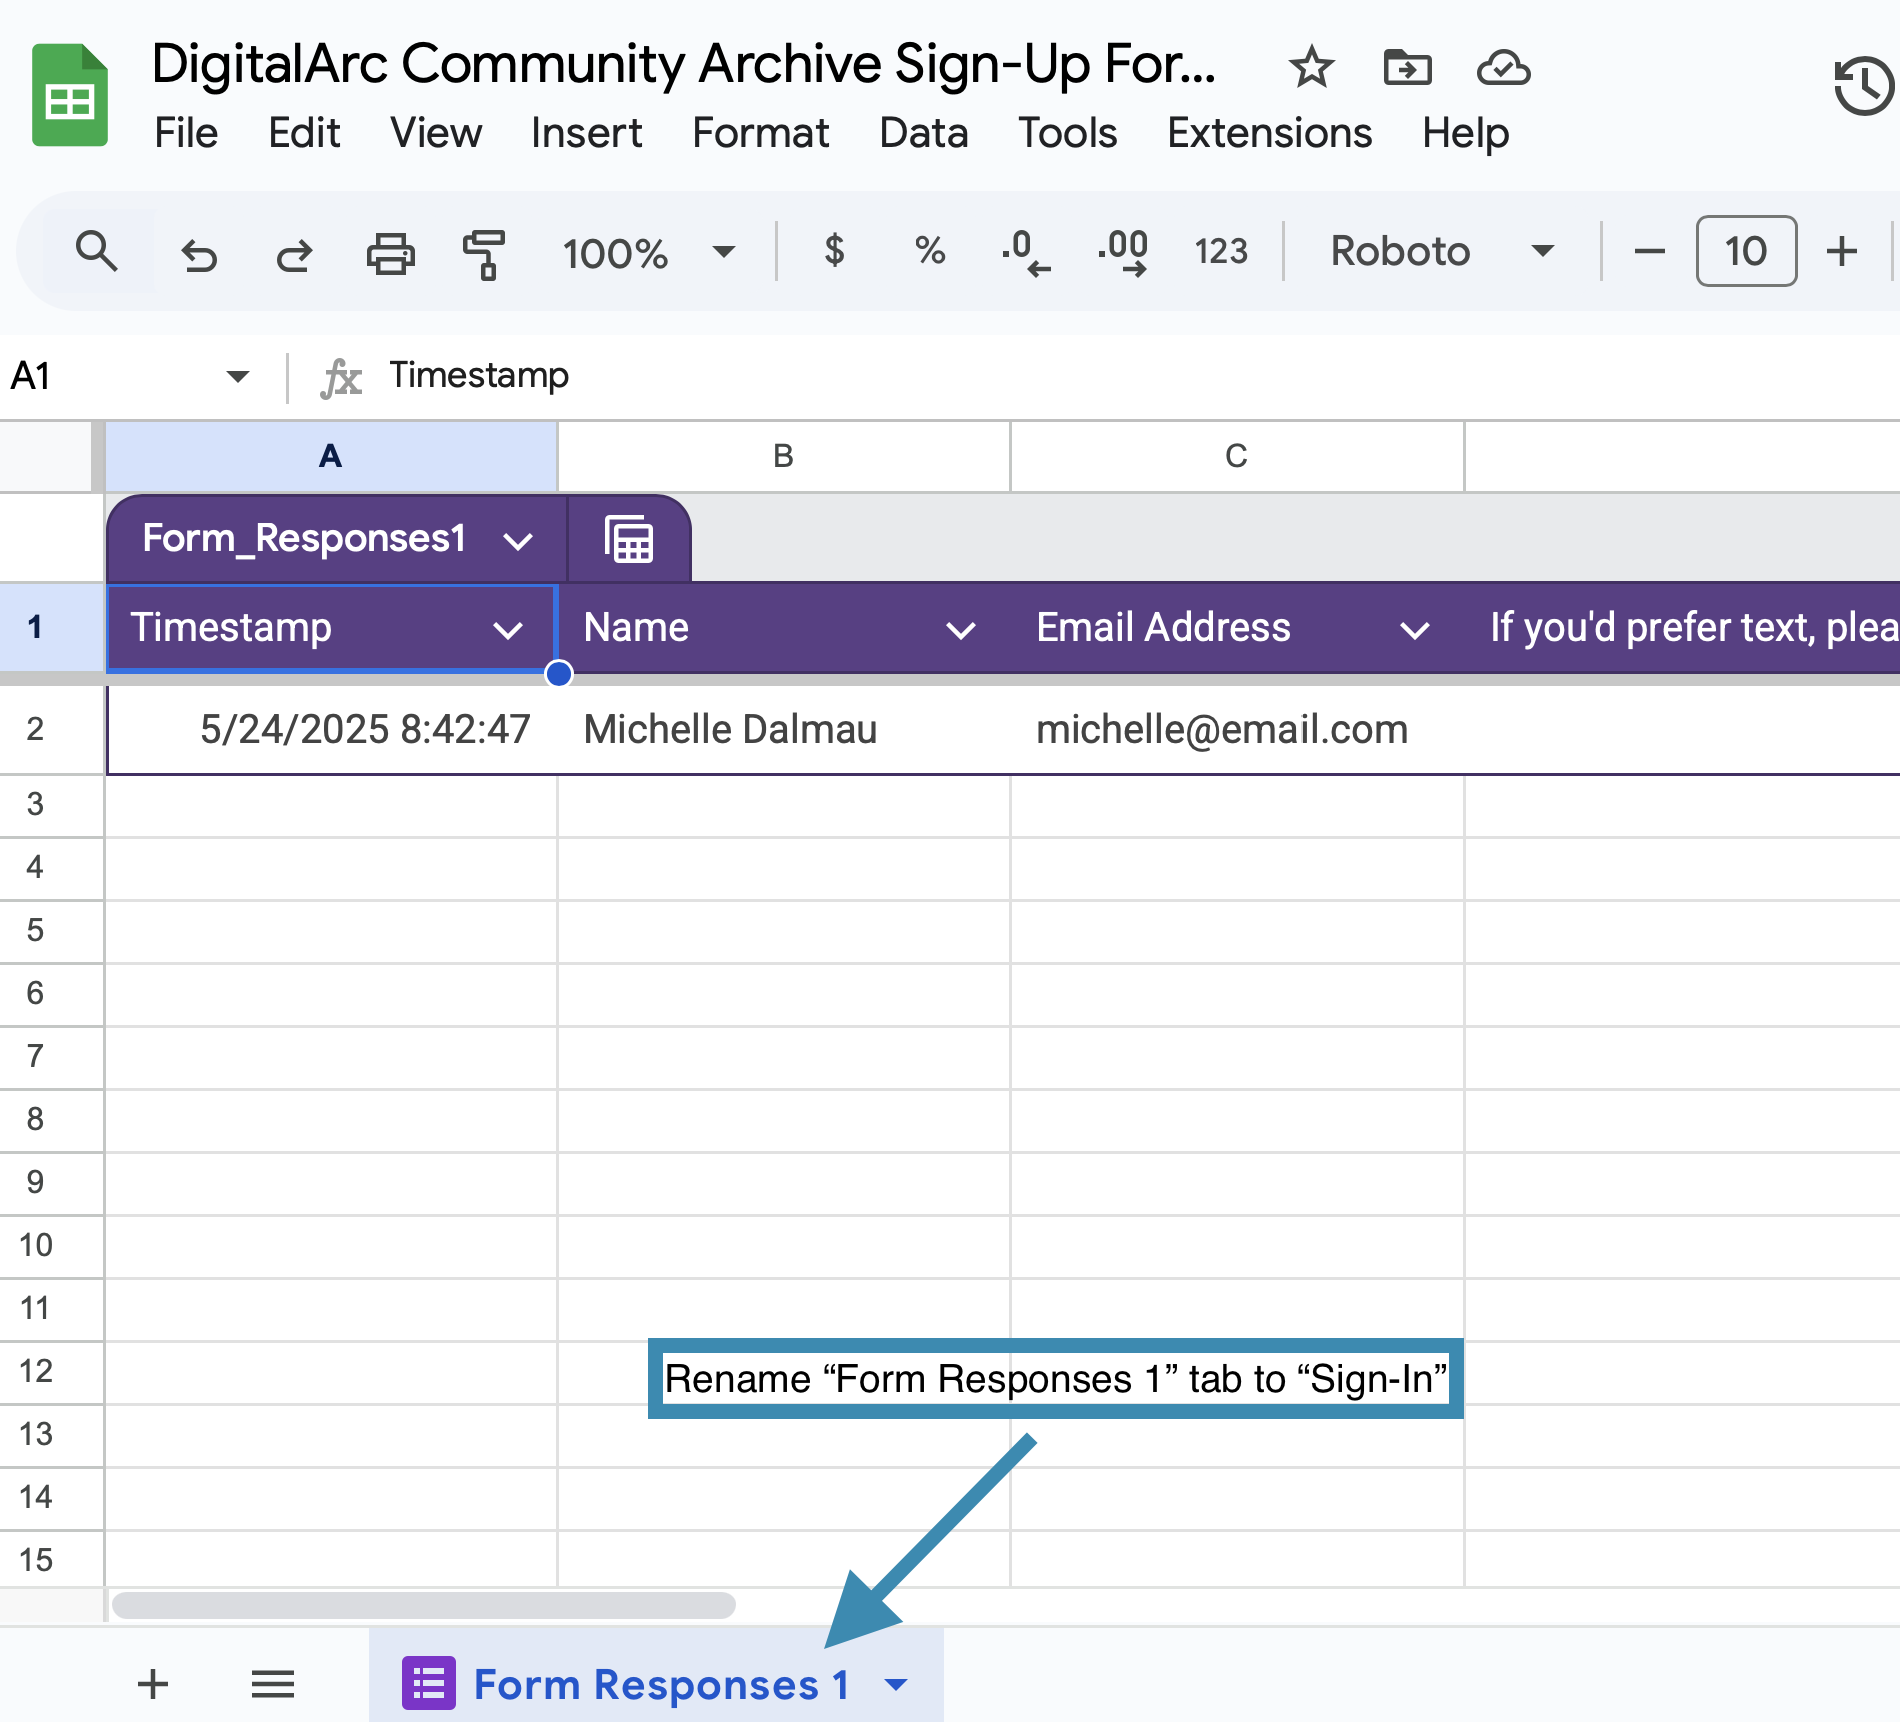
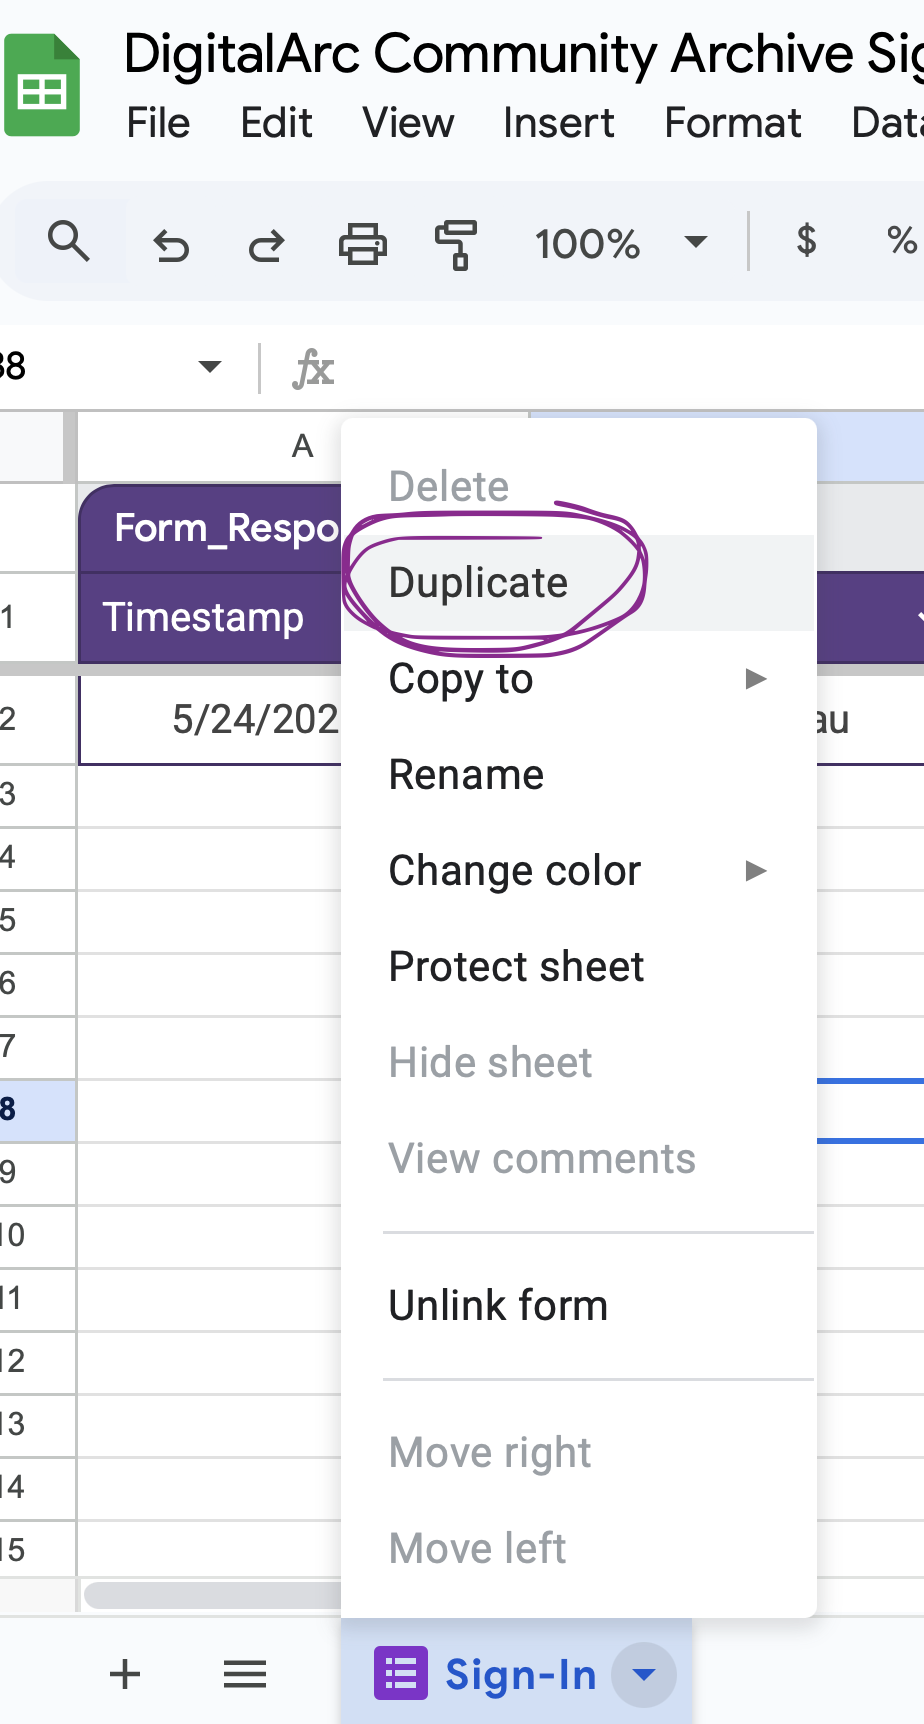
Now that you have the spreadsheet setup with all the needed tabs after checking-in your initial contributor, as new contributors sign-up, you will be copying and pasting information as follows:
The purpose of this step is to make sure that the contributor does not need to make any changes to what was originally submitted via the form and captured in the “Sign-In” tab. - Consider having the volunteer read back the information: - “Thank you, (NAME OF CONTRIBUTOR). I will now verify your sign-in information.” - Be attentive to the pronunciation of names. If you are unsure, ask the contributor to confirm the pronunciation.
The contributor should not part with their objects and sticker(s) as they walk through the process other than when handing objects over for digitization.
If you plan to use an audio recording device instead of a volunteer’s phone to record the interview/oral history:
As part of your event planning, you will need to consider how many stations you will need to quickly and effeciently accomodate your expected number of contributors. If your event is on the smaller side, you may need only 2 stations:
If your event is larger, you may want to consider creating separate stations for Text, Images, and Objects as appropriate. Contributors may also have objects which would require visits to multiple stations.
Start here if the contributor has a video to contribute, even if they have other objects. Once the contributor finishes the narration interview, the guide should check to see whether the video digitization has been completed. - If it has NOT been completed, the guide should take the contributor to the next station (if applicable) while the digitization is in progress. - If it HAS been completed, the video should be returned to the contributor and the guide should confirm that the IDs match and accompany the contributor to the next station (if applicable). –>
For the photography station, you should have:
There are three types of photography you may encounter (in order of expected frequency):
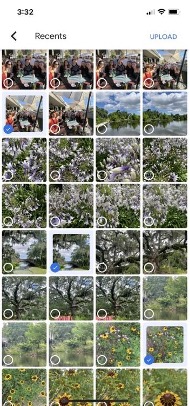
NOTE: If you are using an iPhone to take photos, you will need to change the default file format for your camera.
This will set your camera to save photos as JPEGs rather than HEICs.
The guide will hand over their sticker along with the corresponding object (held by the contributor) to the photographer. The guide will prompt the contributor to hand the photographer the object which corresponds to the ID listed on the sticker. The guide should wait with the contributor while the object is being photographed.
The photographer will:
If the photographers are busy, the guide can manage this on their own either in the photography station or outside the station, if it is busy or crowded. The photographer/guide should:
[BDFormLink]:
The guide should ask the contributor if they would like a portrait of themselves or a born-digital photo of a location, object, or other representative image relevant to their oral history.
The guide should help the contributor to:
If the contributor opts for a portrait of themselves, the photographer should
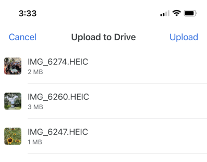
As time permits between photo shoots and/or the end of your event, be sure to upload all photos to your digital storage platform of choice.
Additionally, if using a cell-phone camera, make sure to track storage capacity on any cell-phones used. Not everyone will have unlimited storage on their phones, so you may need to periodically stop to upload images, even if there is a line of people waiting for photos. You can explain to the contributor and guide that you need a moment to upload.
Verify that all the images have uploaded in full before deleting any images from your device, especially when doing so to make additional space.
As time permits between photo shoots and/or the end of your event, be sure to upload all photos to your digital storage platform of choice.
Additionally, if using a cell-phone camera, make sure to track storage capacity on any cell-phones used. Not everyone will have unlimited storage on their phones, so you may need to periodically stop to upload images, even if there is a line of people waiting for photos. You can explain to the contributor and guide that you need a moment to upload.
Verify that all the images have uploaded fully before deleting any images from your device, especially when doing so to make additional space.
VERIFY that all the images uploaded fully before you delete images from your phone.
VERIFY that all the images uploaded fully before you delete images from your phone.
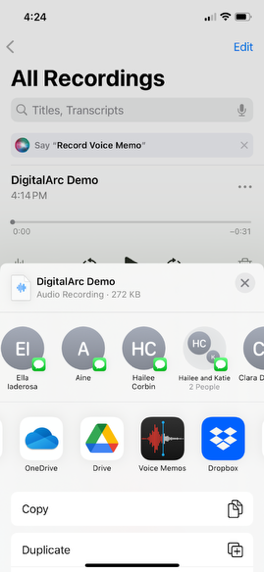
As time permits between oral histories and/or at the end of the event, ** make sure to upload all the audio recordings you took** to the folder that you have designated for these interviews.
Make sure to track storage space on your phone. Not everyone will have unlimited physical or cloud storage on their devices, so you may need to periodically stop in-between oral history interviews to upload audio files, even if you have people waiting to be interviewed. You can explain to the contributor and guide that you need a moment to upload the file(s). As always, VERIFY that all the audio files uploaded in full before you delete recordings from your phone, especially when freeing up space.
Note: The process for uploading iPhone recordings requires several additional steps.

The length of your Oral History Interviews will vary according to the objectives of your event and your technical & storage capacity. If the oral history is tied to a particular object, the majority of the relevant details can be covered in an interview no longer than 5-10 minutes.
Before you begin gathering oral histories, it is worth sitting down with community members and being intentional about the kinds of questions you intend to ask. This is because the information you gain from these oral history interviews will be a major source for your eventual metadata. Be sure to customize your interview questions to reflect the values and priorities of your community.
Once you have selected your recording device (see below), the actual contents of your recording will follow a standard set of questions.
For interviewers: Consider writing down timestamps (in the context of the interview, rather than using clock time) during the interview, to highlight moments that have a particularly great story, or where the transcription might be difficult to transcribe. (Suggestion courtesy of S. Love, Gary, IN.)
Community archives rebalance authority, value lived experience, and create a more liberatory, participatory archival process. Considering how your community stories will be represented ahead of time can help you craft an oral-history interview approach that better represents community values in the final digital archive.
Every digital archive object will have a web page. Remember that these interviews can help your community control how the community archive shows up in online searches. We’ll come back to this again, in the “Metadata” section of the post-event process.
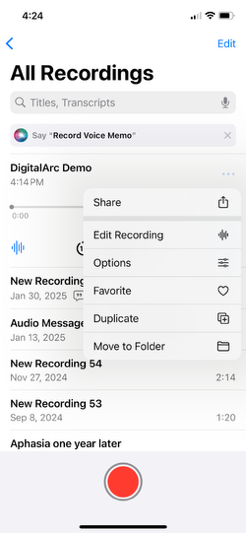
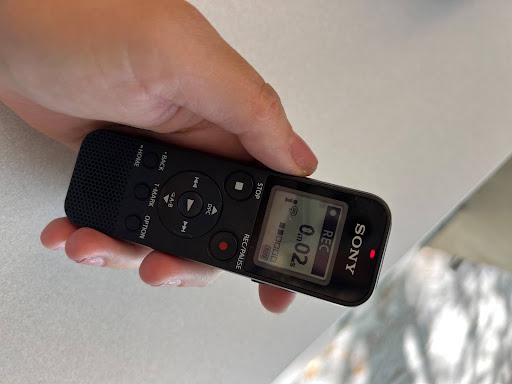
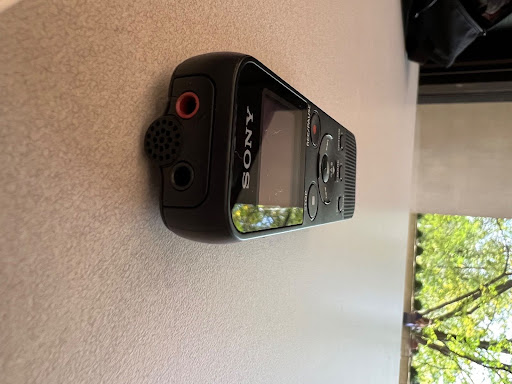
Your audio recording equipment will likely vary depending on the size and scope of your event. We have several sets of instructions for recording, one for iPhones, one for Androids, and one for a Sony PX series recording device.
Since there are different versions of Android, you may or may not have a voice recording app pre-installed. These instructions use the Samsung Voice Recorder app.
These instructions use the iPhone’s default Voice Memo app.
As time permits between oral histories, and/or at the end of the event, make sure to upload all the audio recordings you took to the “Interviews” Google folder (login gmail or gmail-affiliated credentials). Follow the setup instructions to get Google Drive installed on your phone and ready to handle the transfer of the audio files: http://tiny.cc/digitalarc-upload
Make sure to track storage on your phones. Not all of us will have unlimited space on our phones so you may need to periodically stop in-between oral history interviews to upload audio files, even if you have a line of people waiting to be interviewed. You can explain to the contributor and the guide that you need a moment to upload. VERIFY that all the audio files uploaded fully before you delete recordings from your phone, especially if you need to make space.
Make sure to track the battery usage on your phone.
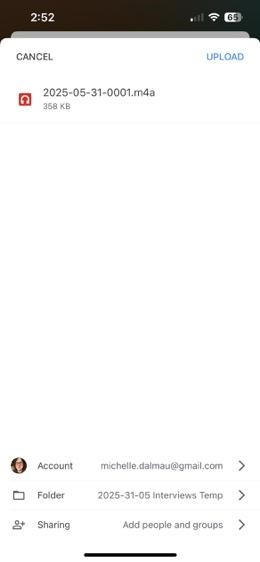
Uploading iPhone recordings to the proper Google Drivedrive destination is a multi-step process.
For the check-out station, you should have:
This should be the final stop for contributors to your community archive. The role of the guide here is to make connections between questions voiced by the contributor at sign-in or throughout the process. The guide should also help the contributor make sure that they have all of their items and corresponding ID sticker. The guide will also hold the recorder until it’s time to return it to the checkout volunteers.
The individual working the checkout station should:
Following the actual collection of all the photographs and audio files from your event, there will still be a number of tasks remaining.
The purpose of this section is to detail how to process the files you have generated into the final products which can be hosted on websites and returned to contributors.
In order to more easily keep track of the numerous photographs and audio files from a community history gathering event, it will be essential to have a system for standardizing file names.
If you have followed the system of Object ID stickers which we present in the Pre-Event Setup section, this will simplify the process.
In short, we recommend the following system for naming your files:
Hence 2024-03-21-0004 would correspond to the fourth item collected on March 21st, 2024.
Should you wish to use a different naming system, it is important to keep the following guidelines in mind:
You may have one photo of an object or many photos. Naming the files correctly will help when you’re ready to build your web site.
For an item ID of 2025-05-31-001-photo:
2025-05-31-001-photo.jpg or 2025-05-31-001-photo.png.This allows you to control the order in which the photos displays. For example, the first photo in the sequence would be named 2025-05-31-001-photo_01.png and the second photo on the sequence would be named 2025-05-31-001-photo_02.png.
The zero before the numbers “1” and “2” in these examples helps the computer sort them in order. The photo with the lowest number will be used as the featured photo on the page with the whole list of items.
Not only does having a coherent scheme for your file names make it easier to organize, it is actually a critical part of how the DigitalArc system works. The names that you assign your files must match with the names that you assign your metadata markdown files once you upload both of them to GitHub.
For example, the following pair of files will work correctly because they match exactly:


However, even small discrepancies will cause the item not to render correctly, such as in the following pair:

Notice that the image file contains one less 0 than the markdown file. In other cases, the file names may look superficially similar, but will be interpreted by GitHub Pages quite differently:

Even though the characters though all the date and item information is correct, the markdown file uses dashes to separate the information, while the image uses underscores.
If you have letters as part of your naming convention, be aware that DigitalArc is case sensitive. If you have discrepancies in the capitalization of your files, your item will not display correctly!
The key takeaway is that your files must match character for character, otherwise your items will not display properly.
This document walks through the best practices to transcribe the oral histories, stories, and memories collected during the day-of collection event.
This is broken down into six sections:
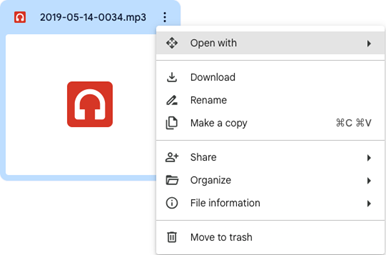
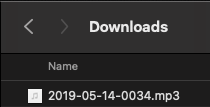
This section covers how to download and open an audio file from your computer. During the collection event, you will have retrieved the audio file from the recording device, renamed it, and stored it in a folder.
Note: If you are using an online storage software such as OneDrive or Google Drive, and you are not using a transcription software, you may not need to download the file to your local computer.
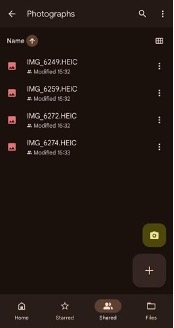
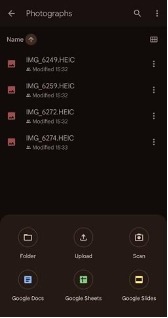
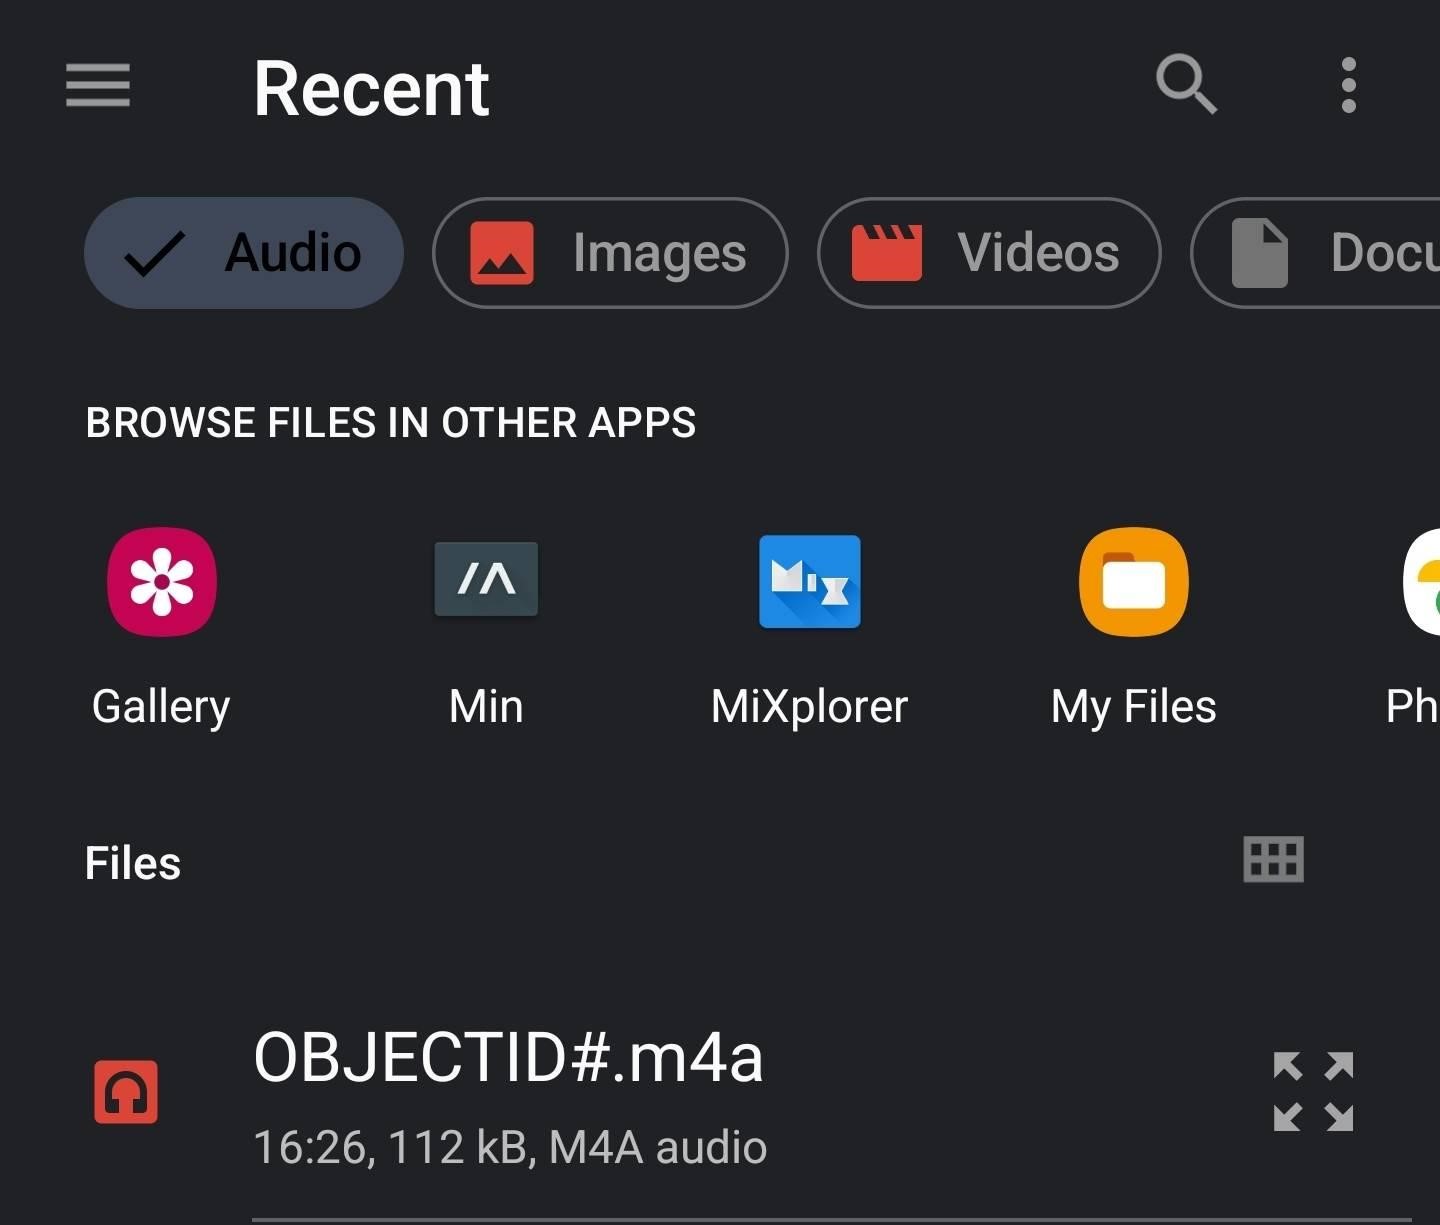
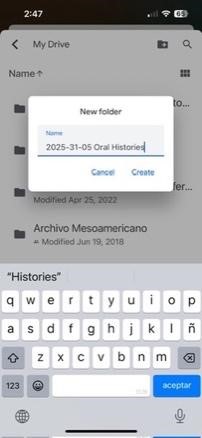
Note: The screen captures used during this section are from Google Drive and will use an arbitrary Object ID, used to show the file nameing convention suggested earlier in this guide.
The steps are as follows to download an audio file:

To open an audio file, simply double-click on the file on your computer. This will open the file in your computer’s default media player. This is the common way to open an audio file to transcribe it without the use of a transcription software.
Note: If you are using audio captured on a smartphone, you might encounter some errors when trying to open audio captured on any Android device on an iOS/Mac device and vice versa. This will normally be caused by a file-format difference. We are still trying to troubleshoot this problem.
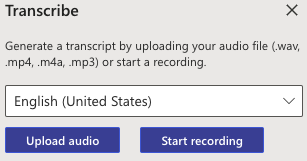
For opening an audio file using a transcription software, there will traditionally be an “Upload Audio” button.
This section covers the best practicies for transcribing audio files without the use of 3rd-party software. This includes:
This covers the best practices for transcribing an audio file manually. This is a tedious and time-consuming process, so do not be deterred by the process.
Here are some notes for best practices:
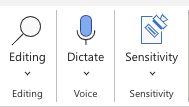
This section covers how to use the Voice-to-Text function in Google Docs. This includes:
In order to transcribe with Google Docs, you will need to use a Google Account. If your community organization has a community Google Account, we recommend using this account, as you will likely store other files related to your digital archiving project in it.
Notes:
Create a Google Doc for this audio recording in your Google Drive account. For steps on how to create a new Google Doc, you can follow this link.
You will need to activate the “Voice typing” feature within the document. For instructions on how to activate “Voice typing,” follow this link. Make sure to turn on the microphone.
Locate the audio file that you will be transcribing. Once you have found it, make sure the microphone in the Google Doc is turned on. It will appear red with a circle around it.
Notice a few things:
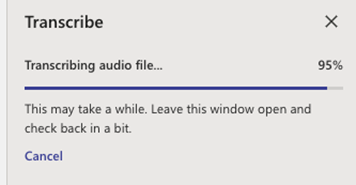
This section covers the best practices for transcribing audio files with the use of 3rd-party software. This includes:
We recommend, if possible, to use a Microsoft365 account version of OneDrive for this process. Using Microsoft Word in OneDrive allows for the transcript to be placed in the same folder as the audio file and other files for each contribution.
Notes:
To import an audio file:
![]()
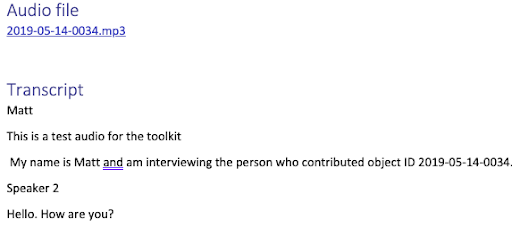
Once the audio file has been transcribed, it will appear in the side panel.
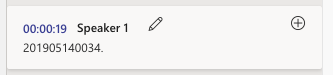
By default, the transcript will show the file name over the audio options, timestamps, and which speaker is speaking.
The audio controls are pinned to the top of this panel, allowing you to edit the transcript as the file is playing, without the need to scroll each time.
Notice that not all the text from one speaker is under the same timestamp. This is because Microsoft Word’s (and other transcription software) transcription feature transcribes by when words are spoken.
Once the transcript has been fully edited, they will be condensed under one “Speaker 1”.
To edit the transcript:
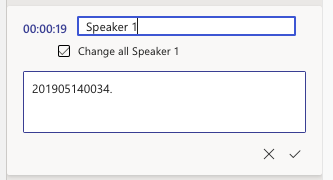
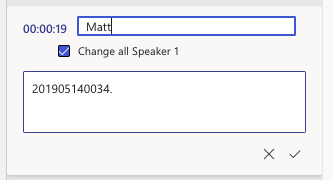
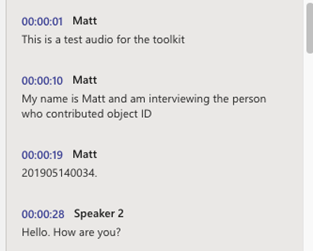
Notice that all the “Speaker 1” timestamps have now changed

Notice a few things:
Other transcription softwares don’t include the audio file in the transcription and require additional steps to export the transcript into a readable document. This is the reason we recommend using a Microsoft365 account, OneDrive, and Word within OneDrive.
Transcription software is not 100% accurate.
Some common errors the software makes include:
When cleaning a generated transcript:
This is a common question that we as a team struggle with. Do we include every “um” or “like” in the transcript for its full authenticity? Do we go through and correct the grammar? Do we remove the duplicated words? The answer to these and similar questions, unfortunately, is that it is up to you, your community, and the overarching goals of your community archive.
For returning the contributor’s raw files, clean up for the transcription should be kept to a minimum. This includes:
Keeping the files and the transcript alteration at a minimum allows for the contributor to have their experience preserved best.
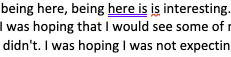
An example screenshot of a transcript that uses repeated words
For preparing the transcripts for upload, normally the cleaner the transcript, the better. This includes:
When preparing transcripts for upload, think of someone reading them like they would read a book or a published newspaper interview:
Photos and other forms of visual culture (objects of a variety of media in our society) carry a lot of information. For memory preservation, archivists try to retain as much of that visual information as possible, and photography is one tool for doing so. Summarized below, these fundamental techniques will help you to make your digital archive legible to future generations and people outside of your community.
TIP: Think of yourself as a photojournalist who is communicating information through photography, not an artist who is expressing herself.
You can edit photos without downloading any external software, such as Photoshop. These external links explain how to edit photos:
| Photo Editing Dos | Photo Editing Don’ts |
|---|---|
| Crop your image to focus on the subject, edit out distracting objects, but use your best judgment. | Don’t edit, crop, or blur out the image so much that it becomes misleading. |
| Save as .jpg or .png. | Don’t save as HEIC or PDF. |
| Use a naming convention (such as YYYY-MM-DD-####) and consider automating this process. | Don’t use photos from the internet or other sources that do not come from you, your collaborators, or the participants in the history harvests. |
| Blur out sensitive material such as mailing or email addresses. | Don’t use filters. |
| Remember what folder you save it in. | Don’t disrupt the aspect ratio. |
| Rotate the photo to make horizon lines and other straight lines straighter and to gently crop it. | That is, don’t stretch or shrink your image; sometimes this is mistaken for cropping. |
Remember that every detail in a photograph or a photo of an object—the framing, subject, any signs of damage, use of color, posing, etc.—opens new avenues for asking questions that lead to remembering the past and/or research. Your aim should not be to make the photos “beautiful,” but rather to honor their complexities by striving for objectivity in your editing. Always use your best judgment and remember that your approach for editing your archive can also be analyzed, not just the photograph itself.
This document walks through the best practices for editing and cleaning photographs that were collected during the day-of collection event.
This is broken down into four sections:
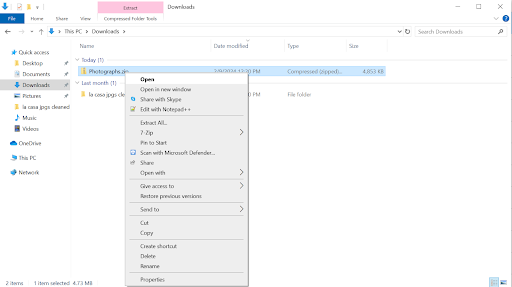
If you do not have access to Photoshop or software that will batch process the photos from the collection event, no worries, you can still do all the necessary cleaning on a Windows or Mac computer. This section will cover how to clean photos manually on a Windows computer.
If you will only be editing a few photos from the collection event, this section covers how to individually download photos that need cleaning.
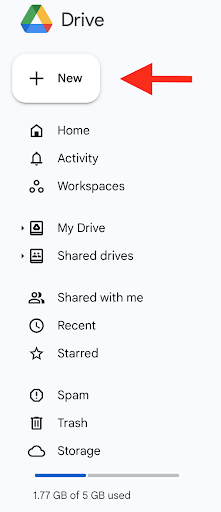
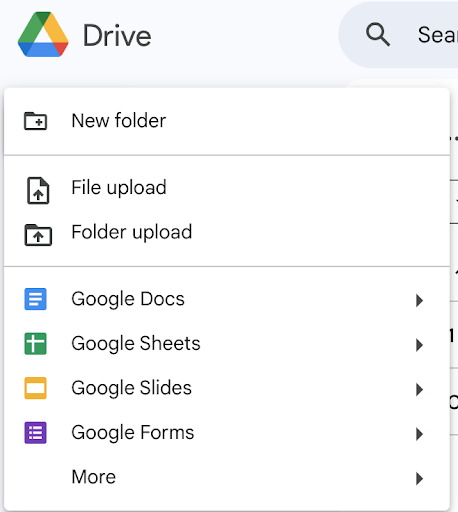
Note: The screen captures used during this section are from Google Drive and will use an arbitrary Object ID, used to show the file naming convention suggested earlier in this guide.
The steps are as follows to download an image:
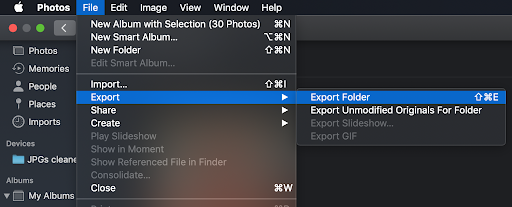
This section covers how to download the whole folder of photos from the collection event.


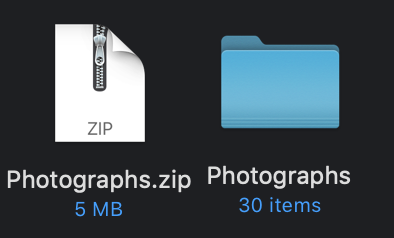
Locate the zip file on your local computer. By default, this will be in your Downloads folder. If you double-click the zip file, it will automatically open the file and create a folder for your photos.
Once you have downloaded all the photos that you will be editing, you will want to make sure that they have been imported to the “Photos” application on your Mac, which you will use to edit the photos.

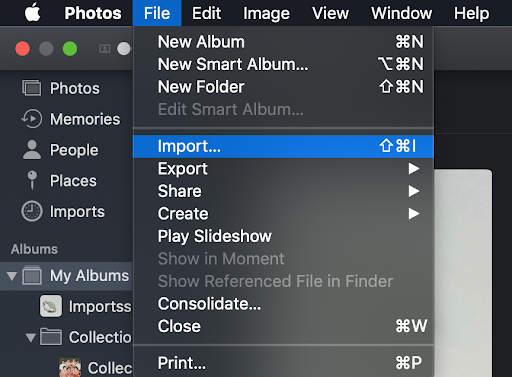

Now that you have imported the images into the Photos application, you can now begin editing.
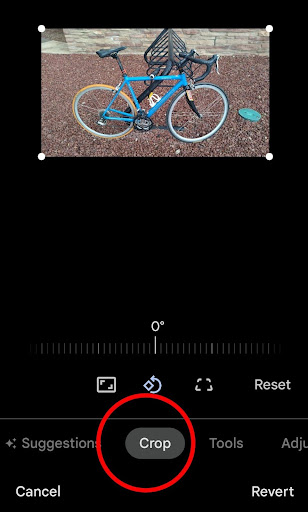
First, open the first image in the folder (or the image you would like to edit). You can do this by double-clicking on the image. Click on the “Edit” button, which is in the top right.

You should first consider cropping the image if it is off-center or contains unnecessary space. This can be achieved by selecting the “Crop” button at the top of the screen. From there, you can manipulate all four sides of the image by hovering the mouse over the selected edge and then clicking and dragging the edge to the desired cut-off point.

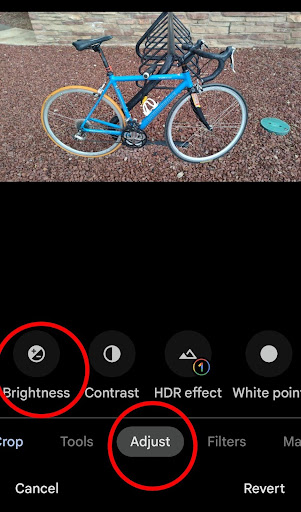
Next, try playing around with the lightness/darkness of the image by toggling to the “Adjust” button at the top of the screen. A menu on the right should appear, and “Light” should be the first option that appears at the top of the menu. You can adjust the lighting by dragging the bar in the middle towards the left or right. In some cases, images from the collection event could use more lighting, and making the photo brighter could enhance details from the object that was donated to the digital archive.
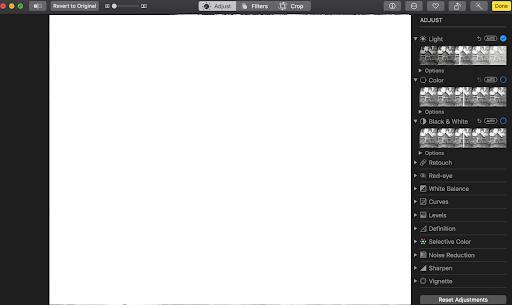
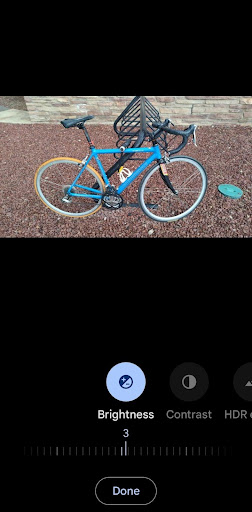
Once you have finished editing the photo, be sure to click the yellow “Done” button in the top right corner.

After you have repeated this process for all the other photos that need to be edited, you will want to re-upload the photos to the same place where you kept the originals.
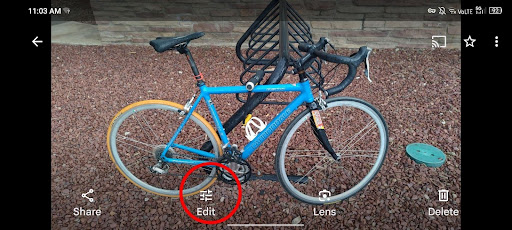
If you do not have access to Photoshop or software that will batch process the photos from the collection event, no worries, you can still do all the necessary cleaning on a Windows or Mac computer. This section will cover how to clean photos manually on a Windows computer.
If you will only be editing a few photos from the collection event, this section covers how to individually download photos that need cleaning.
Note: The screen captures used during this section are from Google Drive and will use an arbitrary Object ID, used to show the file naming convention suggested earlier in this guide.
The steps are as follows to download an image:
This section covers how to download the whole folder of photos from the collection event.
Locate the zip file on your local computer. By default, this will be in your Downloads folder. If you left-click on the zip file, then right-click, a menu will appear. Select “Open”. This will extract the folder and create a folder of photos that you can edit.
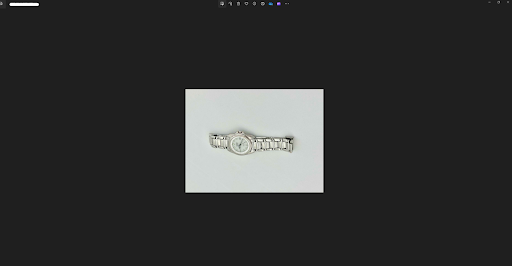
Now that you have the images on your local computer, you can now begin editing.
First, open the first image in the folder (or the image you would like to edit). You can do this by double-clicking on the image. Click on the “Edit image” button, which is the left-most icon in the bar in the center of the screen, with the icon with a pencil in it. You can also begin editing by doing (Ctrl+E).
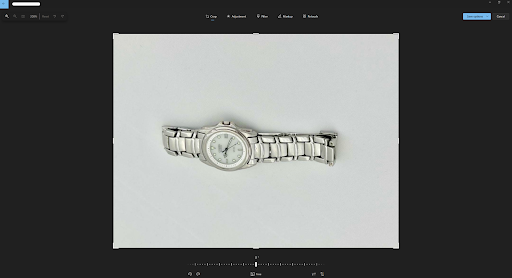
You should first consider cropping the image if it is off-center or contains unnecessary space. This can be achieved by selecting the “Crop” button at the top left of the center bar. From there, you can manipulate all four sides of the image by hovering the mouse over the selected edge and then clicking and dragging the edge to the desired cut-off point.
Next, try playing around with the lightness/darkness of the image by toggling to the “Adjustment” setting at the top of the screen, to the right of “Crop”. A menu on the right should appear, and “Brightness” should be the first option that appears at the top of the menu. You can adjust the lighting by dragging the bar in the middle towards the left or right. In some cases, images from the collection event could use more lighting, and making the photo brighter could enhance details from the object that was donated to the digital archive.
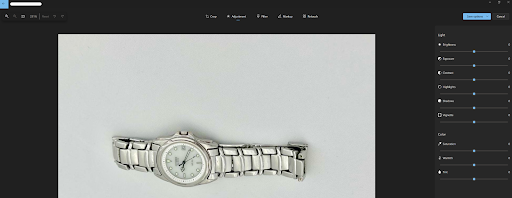
Once you have finished editing the photo, be sure to click the blue “Save options” drop-down menu in the top right corner. Since there are original copies of the photos on the cloud, you should select “Save” and overwrite the version on your device with the edits you just made.

Once you have repeated this process for all the other photos that need to be edited, you will want to re-upload the photos to the same place where you kept the originals.
This section will cover how to edit and clean photos using an iPhone. When using the default photo editing option on iPhone’s Photo App, there are many options to edit and clean photos. This guide will cover a few of them, but not all, so feel free to try the features on test photos yourself.
To edit a photo on iPhone, select the photo you want to edit and select Edit in the top right corner.

Contrast is used to adjust the contrast in the photo itself, bringing out either more of the darker tones or the lighter tones.
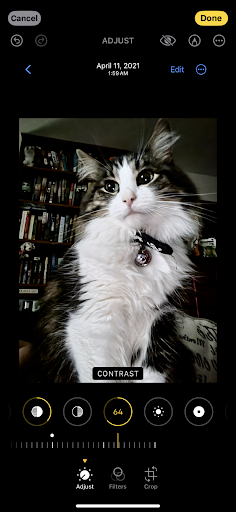
On the left, the photo is edited with bringing in the darker tones but increasing the contrast against the original photo on the right with no editing being done.
Brightness is used to adjust how bright or dark the photo is overall.
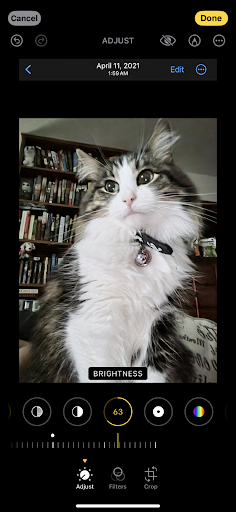

On the left, the photo is adjusted to bring the brightness up higher against the original photo on the right with no editing being done.
This section will cover how to edit and clean photos using an Android. When using the default photo editing option on Android’s Photo App, there are many options to edit and clean photos. This guide will cover a few of them, but not all, so feel free to try the features on test photos yourself.
To edit a photo on an Android device, select the photo you want to edit and select Edit towards the bottom left.
Cropping is used to adjust the borders of the photo itself, which can eliminate empty space and create a better focus on the central object of the photograph.
On the bottom left, the photo editor has a “Crop” function. From there, you can manipulate the edges of the photo to fit your needs.
Brightness is used to adjust how bright or dark the photo is overall. Navigate to this setting by clicking on “Adjust” at the bottom of the screen. From there, click on “Brightness” in the bottom left.
On the scale, you can toggle the brightness between 0 and 100. Lower numbers will result in a darker photo, higher numbers will result in a brighter photo.
Metadata is often described as “data about data,” but that definition is not super helpful! Instead, think of metadata as a consistent way to describe and provide context for a particular item. In the case of community archiving, these items would be photographs of artifacts and recorded oral histories or interviews with community members. At a minimum, when this information is known, metadata reflects information about the item (i.e., description, subjects covered, etc.), when the item was created, and who created it.
Meaningful metadata relies on a combination of “natural language” descriptions that reflect community-focused language and “controlled vocabularies”, which are structured sets of descriptions set up by large organizations to make search terms standard across many web sites.
The best source for metadata community contributions to your archive will come directly from the person making that contribution.
Community elements of metadata are important for describing things in “natural language” – colloquialisms, code-switching, cultural-specifics and more. Sometimes, “natural language” terms align with “controlled vocabularies,” which are library-focused tools like thesauri (Getty Thesaurus of Art & Architecture , Geonames, etc.) or authority lists like Library of Congress Subject Headings or Name Authority files that allows us to standardize how we describe items. When possible, include both “natural language” and controlled language in your metadata creation practices.
Rather than rejecting institutional frameworks entirely, community-generated metadata offers another approach that rebalances authority, values lived experience, and creates a more liberatory, participatory archival process. This approach can be used alongside conventional standards when appropriate.
Here’s a recommended community-centered process for collecting metadata collaboratively. Note that these prompts are also included in the oral-history section of the Digital Arc toolkit, for use in planning the oral history interviews.
If you used the sign-up form as part of a community sharing-collecting event, you will have collected some metadata from the community contributor that you can bring over to the metadata spreadsheet:
During the oral history in which community contributors may discuss the artifact photographed for the digital archive, you will gather other important bits of information:
If the interview/oral history is not focused on an artifact, but rather focused on storytelling, the stories shared will provide information that can make up the metadata for the interview/oral history:
If you have time, you may conduct additional research through reference services available at your local public library or history center. Your local college or university may also hold related archives.
By far, the easiest way to keep track of your metadata before setting up your site is to use spreadsheet software such as Microsoft Excel or Google Sheets. Using spreadsheets can streamline the metadata capture process. It also helps to examine all the metadata you have collected for each contribution, especially when considering category labels for grouping contributions thematically.
Included is a spreadsheet template for collecting your metadata for each item that, with a few minor steps, you can copy and paste into a Word document or Google document as you prepare the item records for publishing. Once you are comfortable with creating item records in GitHub, you can create these files directly in GitHub (using Markdown).
The template contains two tabs: “Item Descriptions” and “Instructions.”
Essential instructions are included here for quick reference with a link back to this document, if additional details are needed.
As you work on gathering and compiling the metadata for each item contributed to your online community archive, DigitalArc provides two important ways to make your items more discoverable: Tags and Categories.
Tags can be more free-form, assigned as metadata records are created per item. Tags are natural outcomes from community-based metadata creation; they are easier to define and assign primarily because they reflect community-specific language. While it is recommended to maintain a project-specific list of tags for re-use, it is also important to reflect as a concept or theme what the item represents. For example, if a contributor submits a postcard, tags may include: postcard, travels, Chicago (origin or destination of the postcard), Barack Obama Presidential Library (key topics or places mentioned in the postcard). You’ll want to provide no more than 5-10 tags per item.
Tags are searchable, but they are not currently used to filter results like Categories and Type (see below).
As you add items to the metadata spreadsheet, you’ll have a cross-cutting view of the items contributed by community partners. The next step is to determine overarching themes or categories. You might already have a sense of this before compiling metadata, or you may need to compile all the metadata before formulating categories. Often, analyzing the tags by grouping similar tags will point to a core set of categories for browsing your community digital archive.
The goal is to create a limited number of overarching categories (<20) to facilitate browsing across your digital archive. Categories can be based on time like decades (1900s, 1910s, etc.) or topics (Family, Religion, etc.) or types of content (Photographs, Oral Histories, Recipes, etc.). They can also be a mixture of these.
The metadata for a specific item will, naturally, be particular to that item. This will include unique, identifying details, and may include information related to the individual who submitted it.
If a participant has opted not to have their name included, be sure that you do NOT include any personal data about the individual(s) who submitted the item.
While you don’t need to start building your site yet, it helps to understand how to format the information above into a structure that will make building your site easier. We’ll cover how to use these metadata fields to actually build a web site in the section on Posting Items when you’re ready to Publish Your Site.
The spreadsheet template contains a tab called “Copy and Paste for Markdown.” It is one example of how you can use simple spreadsheet formulas to format the metadata that gets you one step closer to Posting Items using Markdown in GitHub. A description of the formula can be found in the “Instructions” tab of the spreadsheet template.
Your metadata cannot include double quotes (“”) and colons (:). If quotes are absolutely essential, use single quotes (‘) instead.
The DigitalArc web site is able to process the following metadata fields. The bolded fields are required, even if they are blank or have values like “Unknown”:
layout: item – This never changes
format: photo – This controls the list of checkboxes that show on the right hand page of your main collection page. While you can use other formats, these are the 4 item formats that you’re likely to encounter:
title: “ACLS Digital Justice Development Grant” – The title of the item
author: “Michelle Dalmau, Kalani Craig, Vanessa Elias, Jazma Sutton” – This can be blank. It’s used only if the item is a written/audio/video contribution and author and creator are different than the person who contributed the item.
contributor: “Michelle Dalmau, Kalani Craig, Vanessa Elias, Jazma Sutton” – The person or people who contributed the item to the collection.
group: “DigitalArc Grant Startup” – If you’re sorting your archive into family or content groups, this metadata field helps make that easier. This feature hasn’t been implemented yet. Coming soon! For now, you can use Category entries to make family groups easier to see
creator: “DigitalArc Platform Team” – The creator of the item (a brand, a person, a collective). If you want to list both authors and a publisher or a collective name for a group of authors, the creator metadata field makes that easier.
externalurl: https://www.acls.org/recent-fellows/?program_id=40090&_project_year=2024 – If the item originated as an outside link or has a social-media link that you want to link to, put that link here.
embedurl: – If the item originated as an outside link or has a social-media link that you want to include, put that link here.
creationdate: “May 22, 2024” – When was the item created? Dates can be exact, as they are in this example, or approximate like “circa 1985” or 1980s.
type: Website – The information listed in “type,” if used on the web site, will serve as a filter based on item types when searching or browsing your digital archive.. Type could be format-specific like: image, audio, video or genre-specific like: photographs, journals/diaries, recipes, interviews, etc. You can reference controlled lists from the Library of Congress or Dublin Core Type vocabulary. You can also create a community-specific list of types that you tailor for your content and manage for consistency.
If the community is using full metadata, this item type should be based on Library of Congress item types, which is more specific than the format metadata field above.
shortdesc: “This is an example of how to include a document (scanned or screen-captured). The development of the DigitalArc Toolkit was funded by an ACLS Digital Social Justice grant in 2024.” – This is the short description about the item that shows up on the all-items list page.
tags: [Community, Archives, Toolkit, Project Planning, Publishing] – This should contain a list of free-form tags, up to 20, that describe essential information about the item. They can be names of people of places, topics (more specific than categories), dates, events, purpose of item, format, etc. Enter tags in square brackets [ ] with each category separated by a comma.
categories: [ News Articles, Web Pages ] – This metadata field controls the filter buttons that show up on the main collection page. You’ll want to keep this list to under 20, if possible. Enter categories in square brackets [ ] with each category separated by a comma. What categories is your community using to group items by type? Separate these by commas.
teammember: – If a team-member did considerable work prepping an item or helping a contributor, they can be credited here.
Metadata starts and ends with a line that has three dashes and nothing else. (the dash next to the “zero” key on your keyboard). If something goes wrong with an item, the first thing to check is to make sure there’s no space after the three dashes.
Each item on your site will need the following information at minimum:
---
layout: item
format: document
title: "ACLS Digital Justice Development Grant"
author: "DigitalArc Platform Team"
contributor: "DigitalArc Platform Team"
creator: "DigitalArc Platform Team"
creationdate: 2024-05-22
type: "website"
shortdesc: "This is an example of how to include a document (scanned or screencaptured). The development of the DigitalArc Toolkit was funded by an ACLS Digital Social Justice grant in 2024."
categories: [ News Articles, Web Pages ]
---
Some items may have more metadata fields, or blank information, like so:
---
layout: item
format: document
title: "ACLS Digital Justice Development Grant"
author: "DigitalArc Platform Team"
contributor: "DigitalArc Platform Team"
group: "DigitalArc Grant Startup"
creator: "DigitalArc Platform Team"
externalurl: https://www.acls.org/recent-fellows/?program_id=40090&_project_year=2024
embedurl:
creationdate: "May 22, 2024"
type: "website"
shortdesc: "This is an example of how to include a document (scanned or screencaptured). The development of the DigitalArc Toolkit was funded by an ACLS Digital Social Justice grant in 2024."
categories: [ News Articles, Web Pages ]
teammember:
---
After your event, you will likely have a large number of high resolution images. When it comes time to create the website, you will likely need to use lower resolution versions of these images instead.
The purpose of this section is to outline how to manage these files, and specifically how to preserve the high resolution versions so that they can be sent to participants.
For more on sending out these images, see Sharing Files.
Before you begin sharing image/audio files or downscaling them for your website, be sure to keep copies of the originals.
This can be either in a Google Drive, flash drive, or external hard drive depending on the amount and size of your files.
When it comes time to edit or otherwise manipulate the files, be sure to copy the files first. The originals should stay intact.
This section covers how to send contributors their files without using a mail merge feature.
Without mail merge, this is a more tedious process because you will have to draft each email and send them individually.
- We have a template available for download [here](https://github.com/mdlandini/idah_toolkit_testing/blob/main/assets/images/Email%20Template%20for%20Sharing%20Files.docx).
- To download this template, click the link and then click "View Raw." This will start the download process.
Simply draft your email in your inbox and copy over the links that you have prepared for each contributor’s folder in the online storage platform of your choosing (e.g. Google Drive, Dropbox, etc.).
Note: If you are not using an online storage platform to store the files, you can attach them to the email as a .zip archive from your computer.
In addition to the transcription of any oral history components, you will also want to consider how your photos will be contextualized once/if they are posted to your website.
Much like a museum plaque, having text to accompany the images can make their importance more clear to potential readers.
Consider having a single paragraph in which you explain the history of the item and the importance of the item to both the contributor and the overall project.
Consider also including and particularly relevant quotes from the transcription (if the contributor has given the appropriate permission).
Depending on the size and scope of your history gathering event, you may also consider adding more detailed exhibit text that works with a larger theme.
For instance, a history gathering event focused on an educational institution could warrant exhibit text that focuses on how certain items have been used in the broader context of education, or any possible nostalgic details.
In other words, the objective is to leave the reader with an understanding of why this object matters not just to the contributor, but to them as well.
The short version? Google Docs for programmers
First warning: don’t pay attention to any scary GitHub YouTube videos. We’ll provide simpler ways to use GitHub that don’t require you to be a programmer.
Like Google Drive or iCloud, Github offers a free place to store files online and collaborate on their contents. The difference is that Github is especially good at storing the files that run computer-oriented projects, and at tracking the individual lines of a file, so that many people can make changes to single document and have all of their changes preserved.
Github also offers a built-in place to built web sites using static-site content management systems like Jekyll (which is what we’re using right now to make this documentation site).
GitHub allows for:
All of these things make Github a great place to host websites for free.
Consider making an individual account for yourself using a personal email and a group account for your community using a group-shared email. Then
You can create a repository using your individual account, with the same contents as your group account. Use that as a playground to test changes before you make those same changes to your group account.
Because you used the “Collaborator” setting to add your individual account to your group account, you’ll be able to make changes to both when you’re logged in using your individual account.
Jekyll is what web site developers call a static-site content management system (CMS).
The “content management system” part is easy to understand. Web site authors every where use content management systems like Jekyll and WordPress to build easy-to-maintain web sites without needing extensive technical skills.
To make the static part of “static-site CMS” easier to understand, it helps to compare static-site CMS to dynamic-site CMS solutions.
Some web pages are built on demand. That is, when you click on a link, a series of computer programs and different computers work together in real time to combine content, design and computer code. This web page is created on the fly and sent specifically to the site visitor who requested it.
Dynamic CMSs makes it more efficient for web developers to re-use and quickly update the parts of a web page that are common across a whole web site–navigation bars, logos, headers and footers–without generating every single page on the site from scratch each time something changes.
Dynamic CMSs also come with form-based writing and design tools–that is, you can point and click to make text bold instead of using complex HTML.
Static-site CMSs also allow the re-use of common web site elements like logos and navigation.
The primary difference is that static-site content management systems–like this one–create all of the webpages a visitor might see not when a visitor visits but when a web site author changes something.
Static site generators, like Jekyll, often use text-based formatting and design rather than point-and-click writing tools. However, the formatting commands are simplified and easier to work with. For instance, to make text bold, you put two asterisks around a word or sentence: **bold**.
Because a web site visitor triggers the generation of a page when they visit, it can be easier for a web site administrator to manage very large sites with hundreds of thousands of pages of content–like newspapers or university web sites.
Dynamic sites are subject to hacking, though. If a hostile computer user finds their way into the database or design settings of a dynamic web site, they can change things, add viruses, or break the whole site. Large companies with lots of resources can afford to spend the time and money to constantly monitor dynamic sites for intruders with bad intent.
Static sites are far less subject to hacking, which makes long-term maintenance easier. Sites like this one, which use a program called Jekyll to generate all of the page elements, can still be updated regularly. The downside is that each change requires that the entire site be regenerated, which can take time for sites with more than a few hundred pages.
Unless you have lots of time and money to check on your site daily, static sites are easier to maintain.
If you don’t have thousands of pages of content, static sites are almost as easy to update and change.
Dynamic sites are also often more costly than static sites to maintain because dynamic sites require several different kinds of web services integrated together, to function properly, while dynamic sites only require a single, simplified kind of web service.
For people who want easy site maintenance and are willing to learn a few basic skills, static sites are much easier in the long run.
It helps to get a few files named and formatted correctly before you start. Some of this is covered in the Post-Event Clean-Up section but we’ll go over it here in shorter form again to make things easier.
Photos and other forms of visual culture (a broad category that encompasses images, art, objects, and other everyday visuals) contain a lot of information. For memory preservation, archivists try to retain as much of that visual information as possible, and photography is one tool for doing so. Summarized below, these fundamental photo editing and naming techniques will help you to make your digital archive legible to future generations and people outside of your community.
You may have multiple images of an object—choose the best photo of the object. Determine if the image of the object you will share on the community digital archive needs to be edited in any way.
If you need more support, visit our documentation page.
TIP: Think of yourself as a photojournalist who is communicating information through photography, not an artist who is expressing themselves.
You can edit photos without downloading any external software, such as Photoshop. These external links explain how to edit photos:
Remember that every detail in a photograph or a photo of an object—the framing, subject, any signs of damage, use of color, posing, etc.—opens new avenues for asking questions that lead to remembering the past and/or research. Your aim should not be to make the photos “beautiful,” but rather to honor their complexities by striving for objectivity in your editing. Always use your best judgment and remember that your approach for editing your archive can also be analyzed, not just the photograph itself.
For more on metadata, see our documentation.
Creating a community-archive web site has lots of technical steps.
This section covers the individual steps you’ll need to take to
Skip to our Expert-Mode setup instructions. Follow those 5 condensed steps to make a copy of our example site and customize a few things for your community.
Proceed through the individual sections listed below in “Setting Up Your Site” table of contents (or the links in the left-hand navigation area underneath the “Setting Up Your Site” link) one by one.
Each of these steps will break creating a website at Github into smaller, more manageable activities.
As you work through these steps, you might get lost in Github’s user interface. These three strategies will help you learn Github as you create your site and make changes to it.
Get to know the files in our example site, which has example items of several different types–photos, document scans, videos–so you don’t have to start from scratch.
Before you create your account, it helps to understand how Github usernames will be seen by your website visitors.
Your Github username will be included in the website address people will use for to find your community, so choose it carefully.
The “free” option will mean people can see, but not edit, the files that run your web site.
Ready? *Create a new Github.com account by following the directions here**
GitHub uses “repository” to describe the place where all of the files for a single project are stored.
You’re going to copy a repository that we’ve already made, so that you have example files to work from rather than having to create files from scratch.
https://github.com/DigitalArcPlatform/templateyourusername.github.io (where yourusername is the username you chose when you created your Github account). In our example, where the username is newcitycommunityarchive, you would name your repository newcitycommunityarchive.github.io. Your github username must be exactly the same as the first part of your repository name, and “.github.io” must appear after your repository name.Your new “repository” or “place where all your files are stored” _config.yml file contains settings for exhibit info, font, and color choices that affect the entire web site.
The next few sections of documentation will cover each one of these things one by one, but reading through this first before you start trying to make changes will help you get your bearings.
**If you get lost look for the Code button toward the **
One file in your newly copied web sit controls a lot of the information on the site: _config.yml. You can generate one at https://digitalarcplatform.kalanicraig.com/MakeConfigFile/
Once you’ve downloaded your config file:
_config.yml from the list of files in your repository. All of the main settings for your site are in this file.In your _config.yml, you’ll see a reference to the site name and author.
Most of the files you create will be “authored” by your community-archive group.
The first field, author, is a short-hand computer-friendly nickname for your group. It shouldn’t have any spaces or special characters
The second field, authorname, is the name that displays to your public audiences. If you have a quote character (“) in your group name, that can cause problems because the author name itself is surrounded by quotes. Either change the quote in your author name to a single apostrophe (‘), or change the double-quote characters around the whole authorname field to single apostrophes.
author: "YourGroupNickName"
authorname : "Kalani Craig"
The main page visitors will encounter has several things that can be customized.

The photo that appears on the right side is the first thing you can change easily. To replace the provided site-logo photo with one that’s specific to your community:

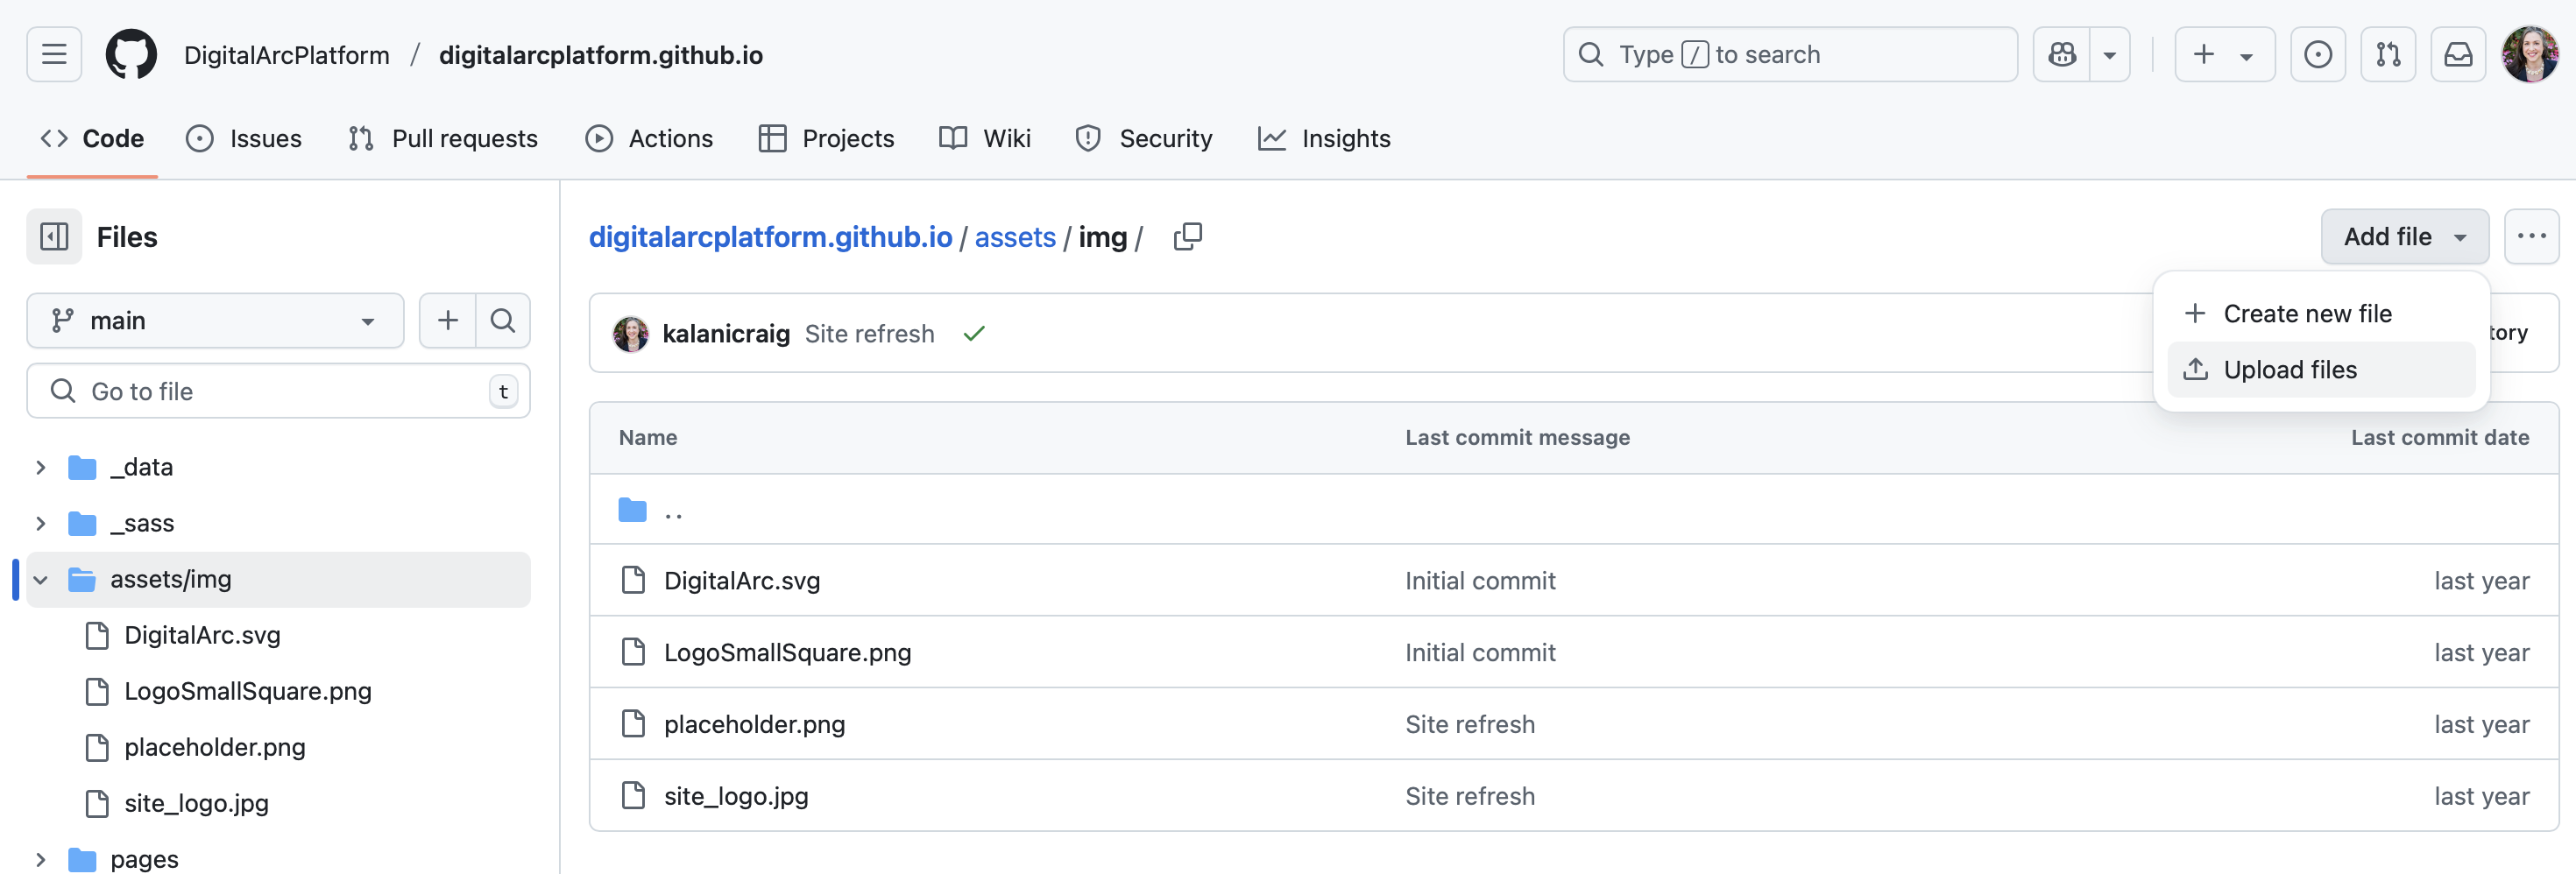
When a community contributor has an oral history or a story but no photo of an object, there’s a photo placeholder. To replace the object-placeholder photo with one that’s specific to your community:
The main text on the home page can be customized by editing the ‘index.md’ file in the ‘pages’ folder.
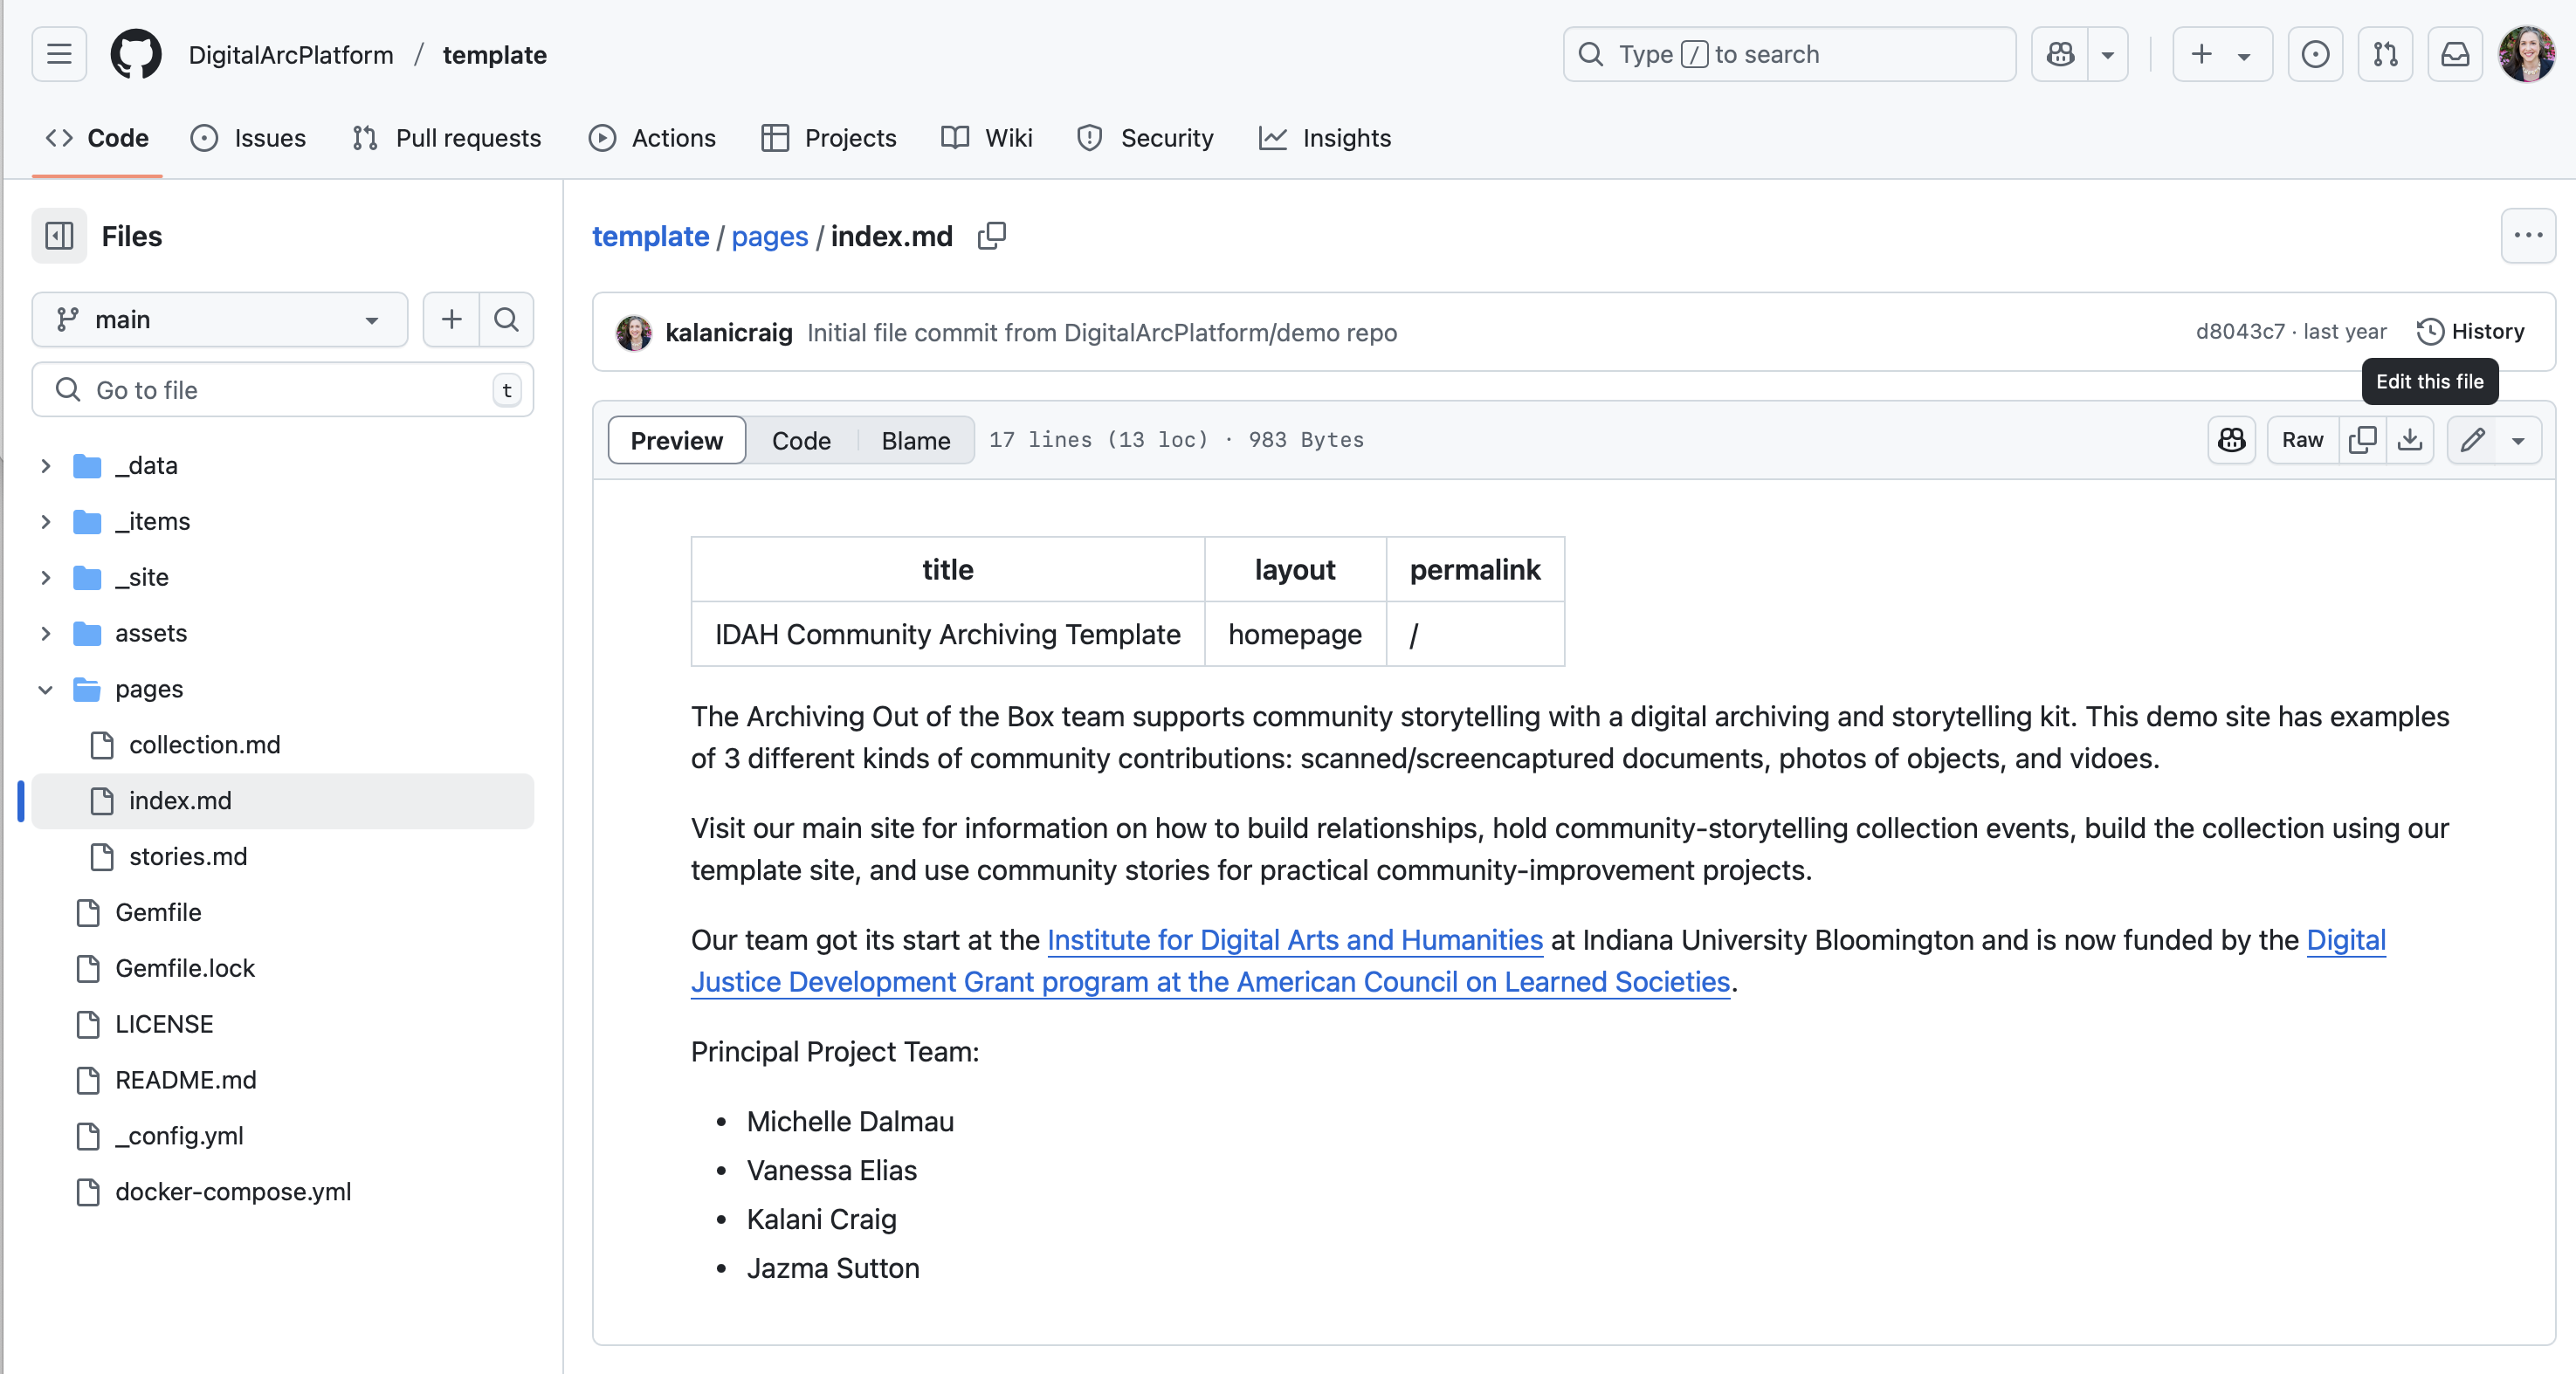
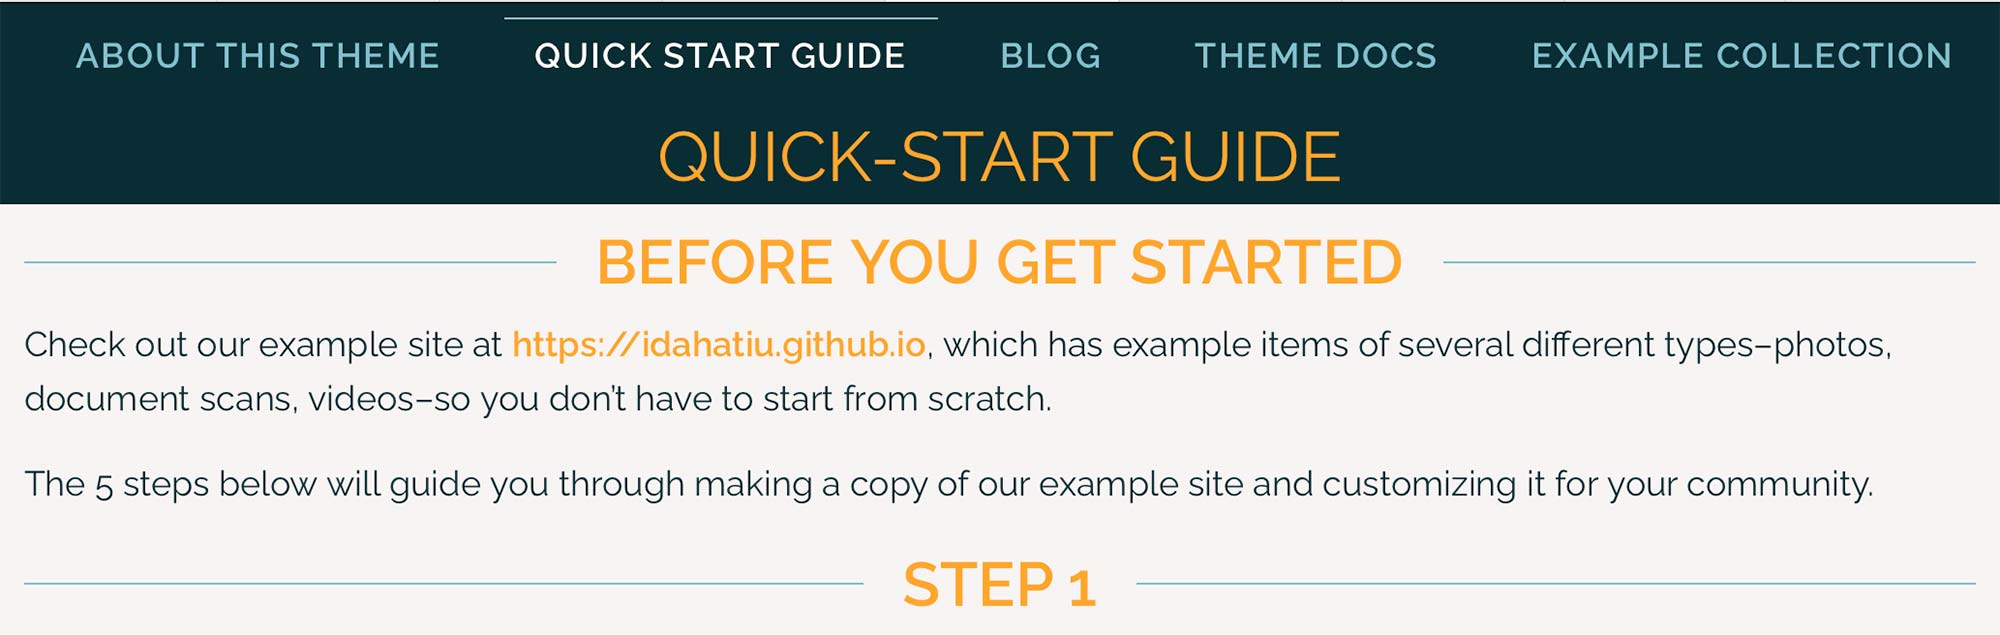
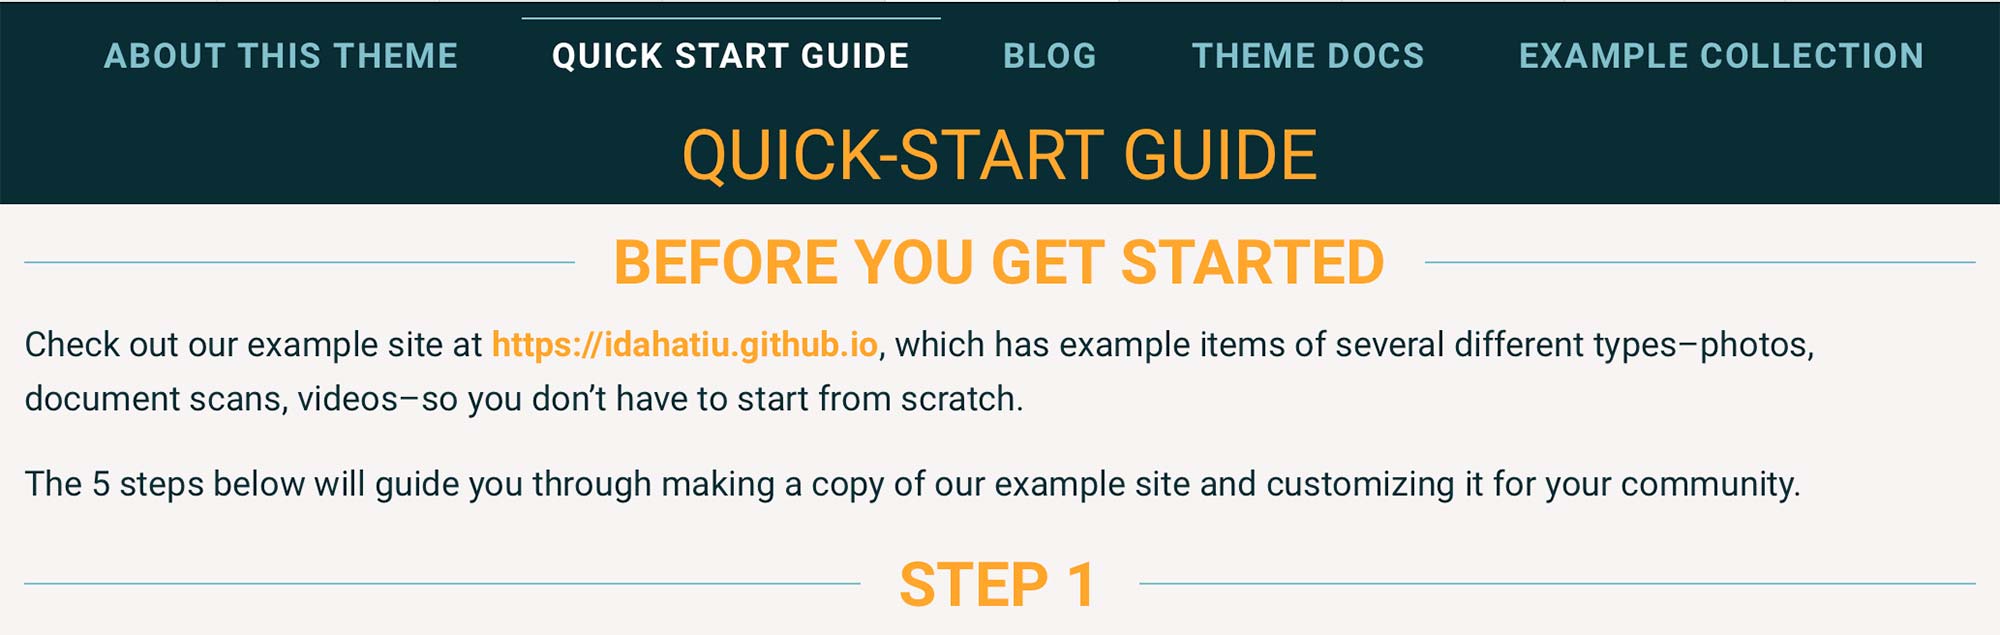
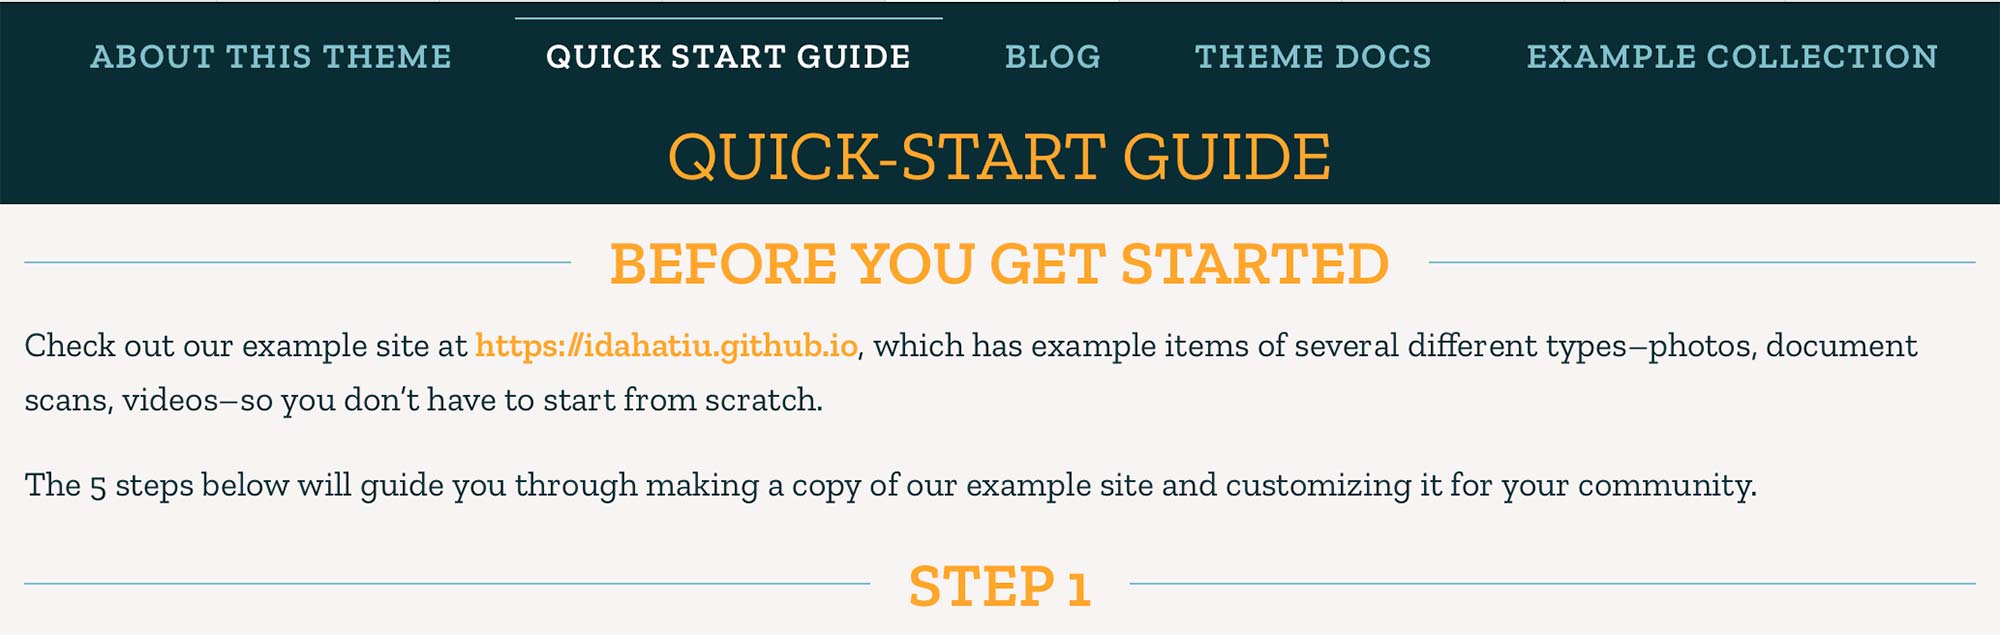

This theme uses 3 fonts: a headline font, a body font, and a monospace font for code blocks/syntax highlighting.
You can create your own font set by creating a new font file in the _sass/fonts/ folder and importing a set of fonts to replace the values there. The collection at Google Fonts is a good starting point.
There are two main pages in the DigitalArc template site that are visible to viewers. The files that control these pages are at https://github.com/DigitalArcPlatform/template/tree/main/pages. Those two pages are visible in the navigation for visitors to click on:
index.md file. We used the name “index” because “index.html” is the most common placeholder file for default display if there is no other content in a folder.collection.md file. That file automatically creates the digital-exhibit list of community-contributed objects that are created by uploading .md files to the _items folder and adding corresponding images to the /assets/items/ folder.You can change the navigation-menu items that appear in the top navigation of your site. For example, if you want to link to an existing “About Us” page on another website, or link to a new page in your community archive, you can.
Before you start:
The current file at _data/navigation.yml looks like this:
# Site navigation links

- title: Our Community
  url: /
  excerpt:
  image:

- title: Our Collection
  url: /collection
  excerpt:
  image:
To add a navigation link to an existing About Us page at https://digitalarcplatform.github.io/about/, you would copy one of the navigation-item sections and make changes to it, like this:
# Site navigation links

- title: Our Community
  url: /
  excerpt:
  image:

- title: Our Collection
  url: /collection
  excerpt:
  image:

- title: About Us
  url: https://digitalarcplatform.github.io/about/
  excerpt:
  image:
If you are comfortable with Github and technology in general, this quick 5-step overview will lead you through creating an account, configuring your account, and publishing to the web.
If you get stuck anywhere, the “Setting Up Your Site” and “Troubleshooting” sections will help you identify common issues quickly.
Create a new Github.com account by following the directions here
https://github.com/DigitalArcPlatform/templateyourusername.github.io (where yourusername is the username you chose when you created your Github account). In our example, where the username is newcitycommunityarchive, you would name your repository newcitycommunityarchive.github.io.The _config.yml file contains settings for exhibit info, font, and color choices that affect the entire web site.
Once you’ve downloaded your config file:
_config.yml from the list of files in your repository. All of the main settings for your site are in this file.Each item in the collection has an item ID (no spaces or punctuation) with one or more files associated with it (e.g. 0001.md).
_items folder and look at one of the example items. Get a feel for what you need to gather about each item.YYYY-MM-DD-ItemNo (so the 4th item collected on May 15, 2022, would be 2022-05-15-004)_items folder (2022-05-15-004.md) and a photo in the /assets/items/ folder (2022-05-15-004.jpg or 2022-05-15-004.png).
_items folder has a bunch of information about each item in the first few lines. Each line has a field type (e.g. author), and then a colon, and then the info that goes in that field surrounded by double quotes (author: "Drew H"). You can get more information about what goes in these item fields in the Metadata: Line by Line section of this documentation.Now we need to tell Github to publish your project to the web.
The item IDs you chose during the event are the single most important piece of prep work for posting items.
The item IDs assigned during the event are used to name two sets of files, each of which belongs in a specific folder:
_items folder. If the item ID was 2025-05-31-001-photo, this text file will be called 2025-05-31-001-photo.md .For specific information on posting your images, transcripts, etc., see Photos, Audio, or Video
Before you delete the sample items, make your first item .md file or else the _items folder will disappear.
The meta-data that you prepped using contributor sign-up information in the post processing phase will give you all of the information you need to fill out the text file.
_items folder in your Github repo.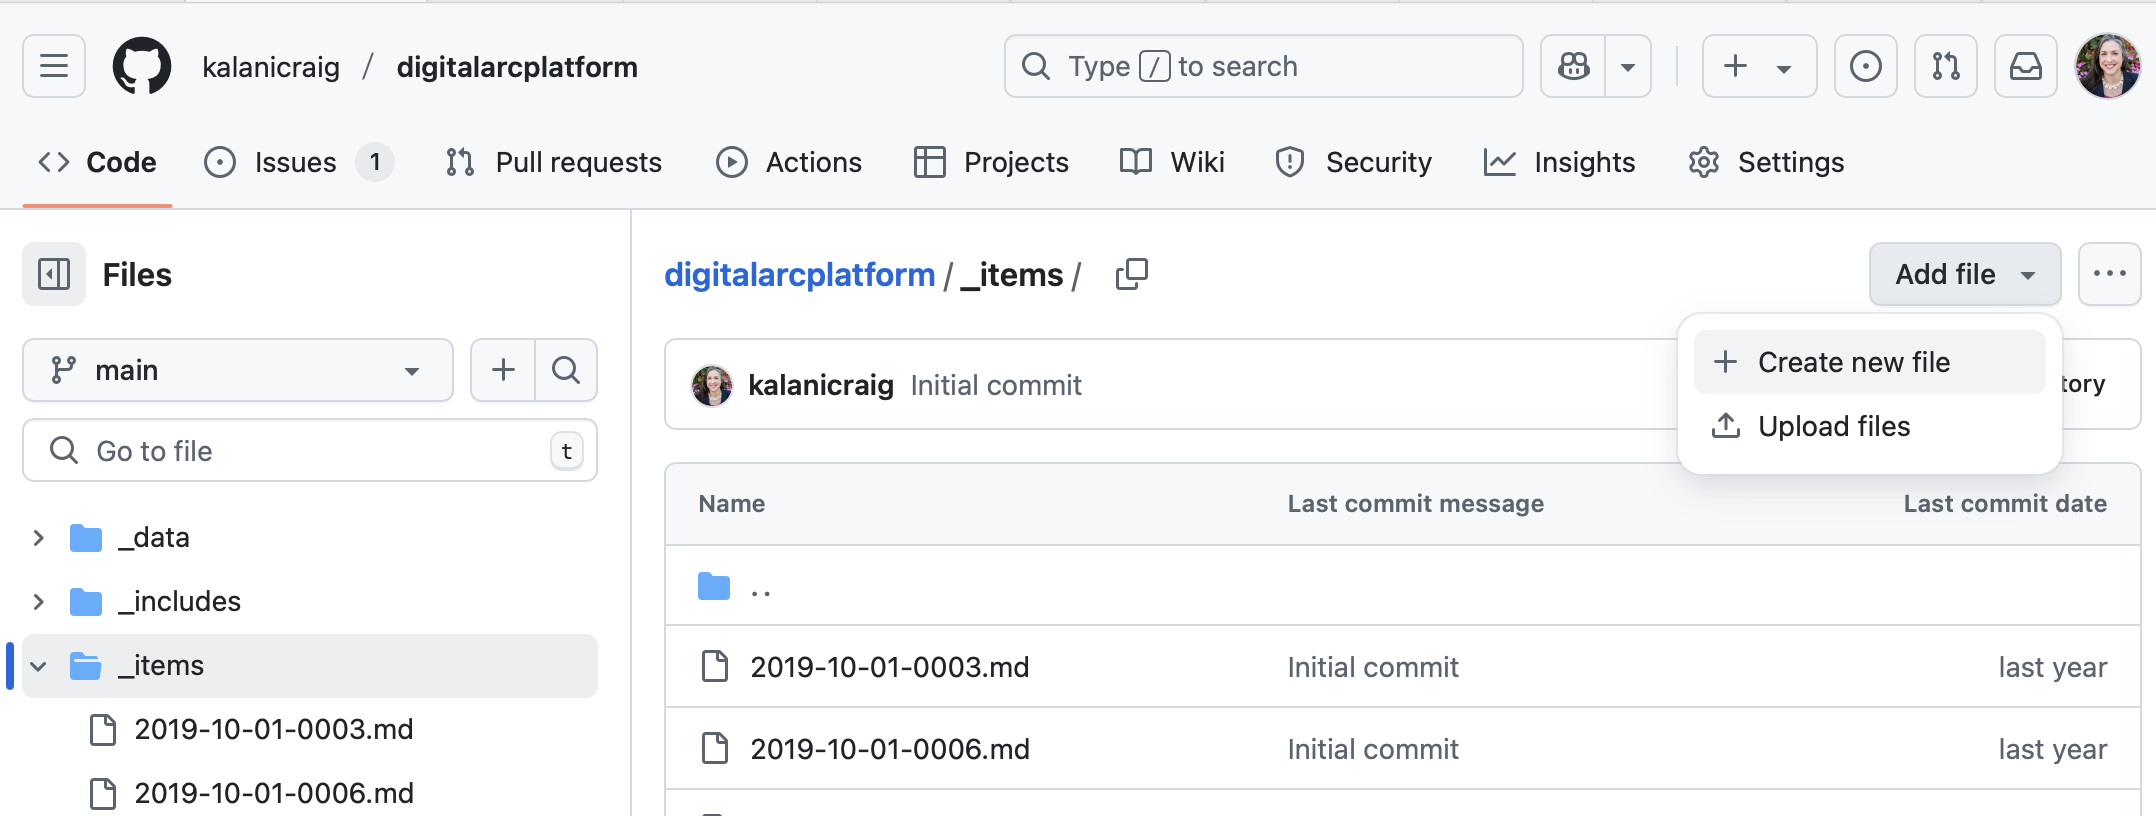
2025-05-31-001-photo.md)
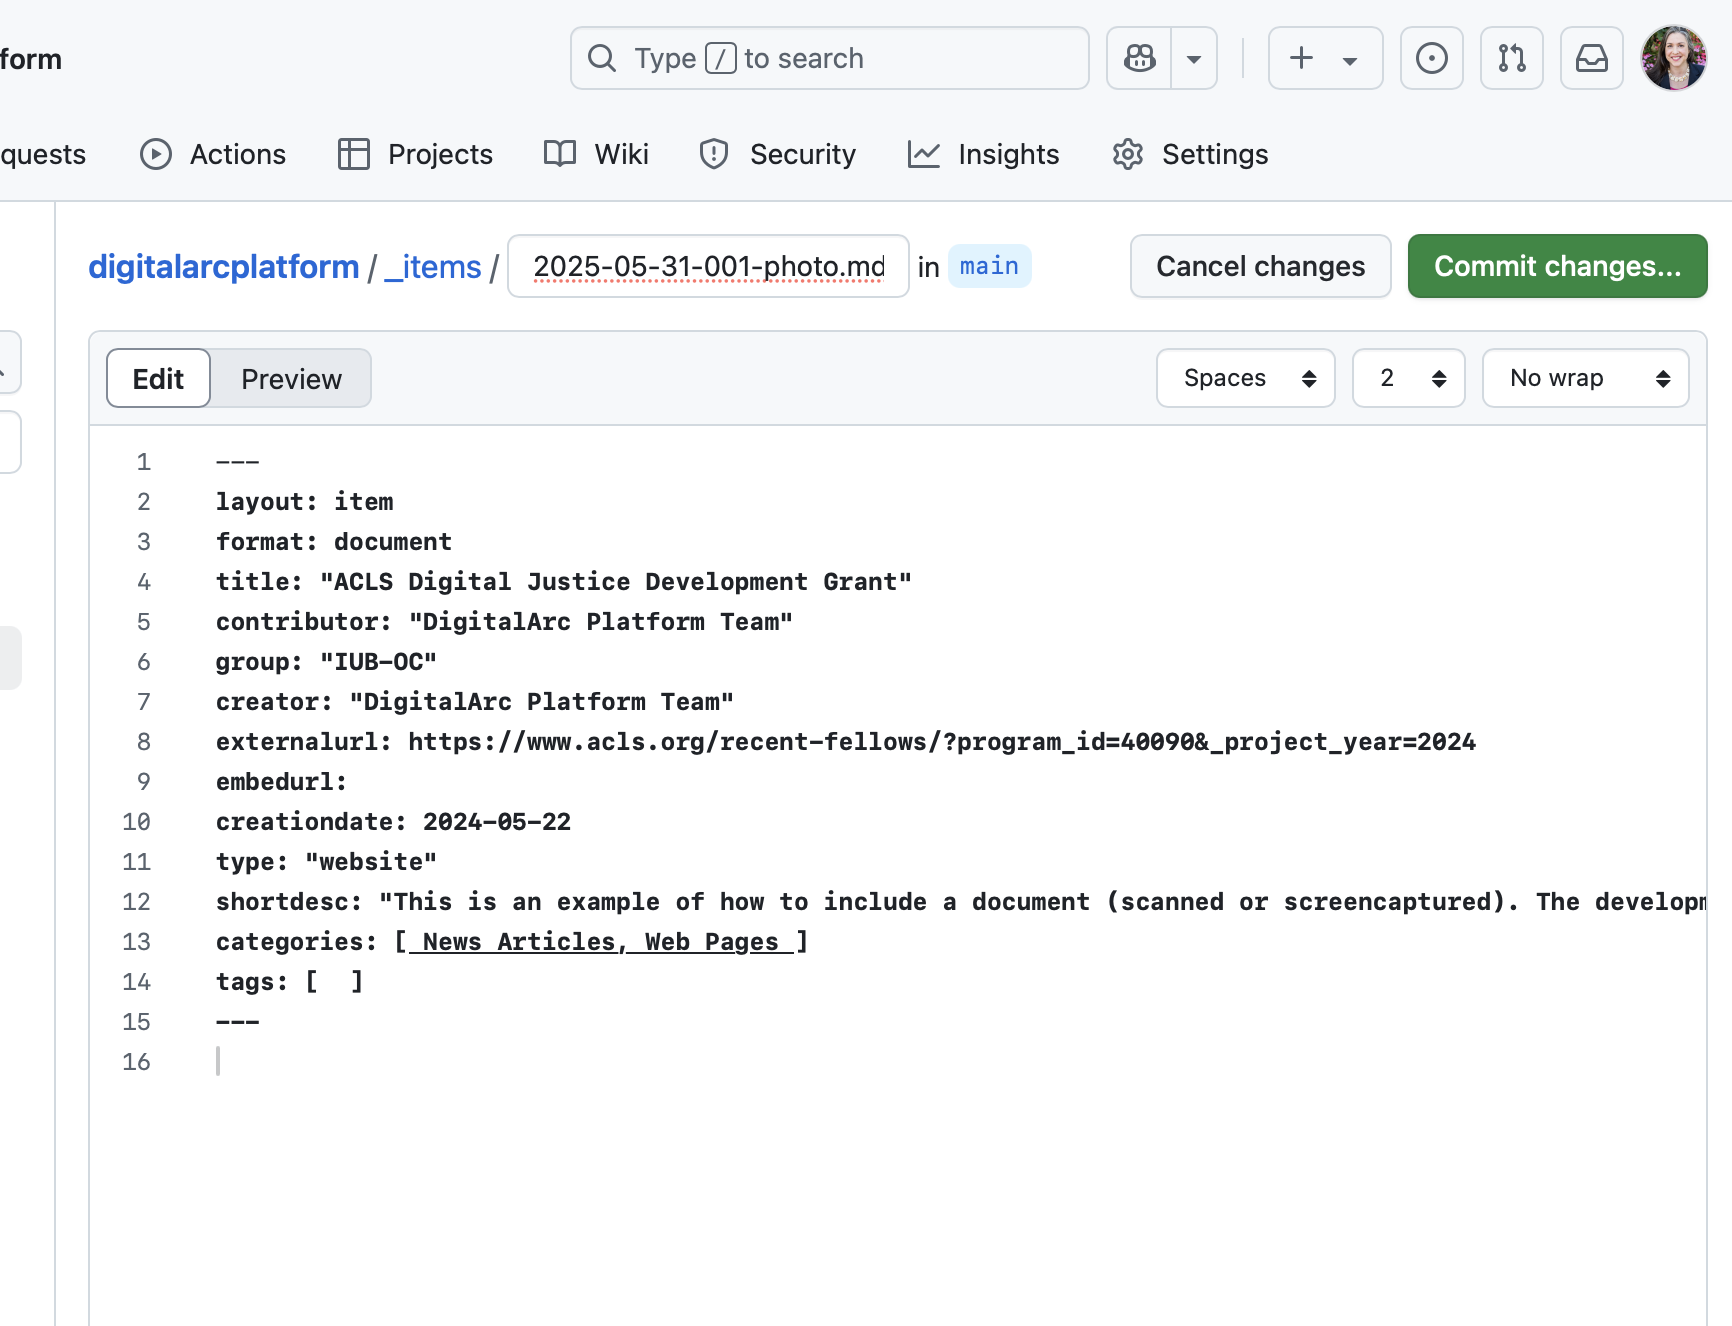
As you look through these examples, you’ll see colons :, spaces, and quotes " used to divide information that’s important to you from information the computer uses to format your pages. Check each of these things for each line of information in this part of your file
---
layout: item
format: document
title: "ACLS Digital Justice Development Grant"
contributor: "DigitalArc Platform Team"
group: "IUB-OC"
externalurl: https://www.acls.org/recent-fellows/?program_id=40090&_project_year=2024
embedurl:
creationdate: 2024-05-22
type: "website"
shortdesc: "This is an example of how to include a document (scanned or screencaptured). The development of the DigitalArc Toolkit was funded by an ACLS Digital Social Justice grant in 2024."
categories: [ News Articles, Web Pages ]
tags: [  ]
---
Get a blank template of the item-page markdown by clicking here
At the top of the example item text file, you’ll see three hyphens --- . These tell the system that builds your website that there’s metadata, or information about an object that’s used to build the web site, coming up. The first line of every item file needs to be these three hyphens, without any extra spaces or characters after the hyphens.
The next line starts with “layout” and has the word “item” after the colon. This says, “Please use the layout that DigitalArc has customized to automatically display item photos, transcripts, and item info”. This line is also helpful for understanding the other lines of metadata.
Each metadata line has a variable–“layout”–and a value for that variable. That is, the variable before the colon says “this is a placeholder”; whenever the website system sees a reference to “layout”, it will replace that reference with the actual value that comes after the colon (“item” in this case).
The lines that follow these first three hyphens are variables and values that hold the object info that you prepped in post-processing, including things like “item name” and “contributor name”.
Categories control the filter buttons that show up on the main collections page (see https://digitalarcplatform.github.io/demo/collection). The square brackets that show up here only occur once, regardless of how many categories you list. Here’s an example of the category line with one, two, and three categories.
categories: [ News Articles ]categories: [ News Articles, Web Pages ]categories: [ News Articles, Web Pages, Books ]As of version 1.0.2 (February 2026),, tags are not yet used.
After the metadata, there’s another set of three hypens to mark the end of the metadata. Like the hyphens that start each item file, these need to be on their own line with no spaces before or after
If you don’t want to write any additional information after the last three-hypen line, you don’t need to.
If you do have other information that you’d like to include, press “enter” or “return” to add a blank line after the metadata-closing hyphens and then type whatever you want. The text that you display here will show to the user below the photos on the website. That text is formatted using “markdown”, which is a simple text-based way to tell the computer to make text look the way you want it to.
# big header## medium header**bold***italic- bullet point text1. number one.
1. number two.
Once an Item Text File exists, you can add photos to match.
Before you start: Make sure your photo files are named properly first and are saved to your computer; you cannot upload directly from Google Drive or other file hosting services. It’s hard to rename photos using Github’s web-based editing system.
assets folder in your Github repo.items folder in that assets folder.
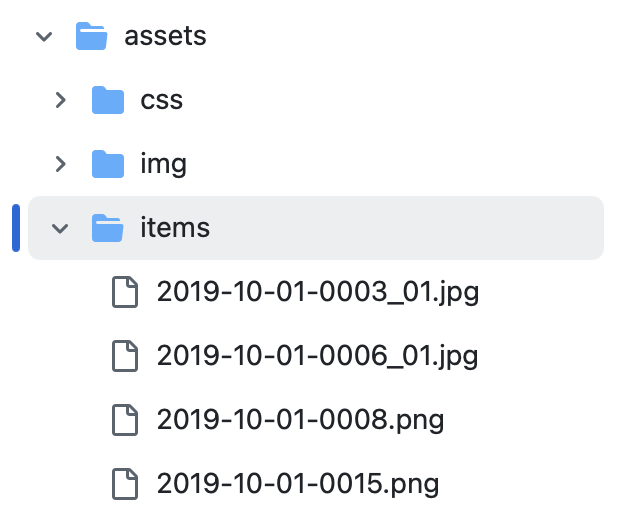
If you have several photos, make sure the photo you want to use as the main photo in the list is the first photo listed in the assets/items/ folder.
If you plan to include audio interviews with a contribution in your collection, the process is very similar to naming and uploading photos.
Before you start: Make sure your audio and transcript files are named properly first and are saved to your computer; you cannot upload directly from Google Drive or other file hosting services. Both audio files (.mp3) and transcript files (with the word “_Transcript” in the file name) are stored in the “assets/transcripts” folder.
itemnumber.mp3.
.mp3; if your audio is not formatted as .mp3, you will need to convert it to .mp3 before uploading..docx extension) and should be named itemnumber_Transcript.docx.2023-10-14-0001, your audio file would be named 2023-10-14-0001.mp3 and the text version of the transcript would be named 2023-10-14-0001_Transcript.docx.To upload audio and transcript files:
assets folder in your Github repo.transcripts folder in that assets folder.
Uploading and maintaining videos in your Github repository or Google Drive can be challenging due to filesize constraints. We recommend uploading to YouTube so that you can automatically link to the video through the video’s URL.
To get the link to a YouTube video:
?si=, you may want to consider removing this as well as any text that follows it..md file in the items folder and look for the lines that start with externalurl: and embedurl:.embedurl: .externalurl: .For an example of how this looks, visit https://digitalarcplatform.github.io/demo/items/Item-3-video.html
This theme uses 5 colors:
You can create your own palette by creating a new palette file in the _sass/colors/ folder and assigning your own values to the color values there. These palettes offer a guide for choosing colors with appropriate contrast, and the Coolors tool is a good platform for refining the colors.
You can change the labels that display in front of the metadata that’s at the bottom of each item page. For example, if your community is multilingual, you can display metadata labels in several languages.
Before you start: Make sure you leave the field variable-name portion of the line (the part of each line before the colon) the same. Change only the field label (the part after the colon, in quotes).
The current file at _data/metadata.yml looks like this:
# Input or alter the string after each field to change how that item is displayed in metadata tables on each item page.
# You can create your own metadata attributes by following the model below. Note that any new groups will require modification of the html layout for items in order to display correctly.
fields:
  title: "Title"
  creator: "Creator"
  contributor: "Contributor"
  creationdate: "Date"
  type: "Type"
  shortdesc: "Short Description"
  group: "Group"
  categories: "Categories"
  tags: "Tags"
  teammember: "Team Member"
  contributorquote: "Contributor Quote"
If you want to display metadata labels in both English and Spanish, your metadata.yml file might look like this:
# Input or alter the string after each field to change how that item is displayed in metadata tables on each item page.
# You can create your own metadata attributes by following the model below. Note that any new groups will require modification of the html layout for items in order to display correctly.
fields:
	title: "Título/Title"
	creator: "Creador/Creator"
	contributor: "Colaborador/Contributor"
	creationdate: "Fecha/Date"
	type: "Tipo/Type"
	shortdesc: "Descripción corta/Short Description"
	group: "Grupo/Group"
	categories: "Categorías/Categories"
	tags: "Etiquetas/Tags"
	teammember: "Miembro del equipo/Team Member"
	contributorquote: "Cita del colaborador/Contributor Quote"
In the Navigation Options section of this documentation, we noted the two main pages that display in the DigitalArc template (the “Our Community” index.md file, and the “Our Collection” collections.md file, both in the pages folder of the main Code section.)
If you want to add a page with your own content, there’s a placeholder new-content-example page, which you can use as starting point to make your own pages, at /pages/samplenewpage.md
You can either use this page as a guide to make a new .md file, or you can change the name of this page and its contents to create your new file, whichever seems easiest.
samplenewpage above the Edit/Preview tabs (after /demo/pages/ and before in main).
 .
.title in the YML front-matter (the stuff between the --- lines).layout: page line. This adds your website’s navigation, header, and footer.digitalarcplatform.github.io and you want people to see this page at digitalarcplatform.github.io/about, change that line to read permalink: /about.#) and including this text.In the samplenewpage.md, you’ll see these instructions repeated, so you can easily modify the file to display new content for your community.
---
title: Sample New Page
layout: page
permalink: /newpage
---

# Want to add a new page that doesn't exist?

1. Update the name of the markdown file in the field that reads `samplenewpage` above the Edit/Preview tabs (after `/demo/pages/` and before `in main`)
1. Change the value in the line that begins with `title` in the YML front-matter (the stuff between the `---` lines).
1. Keep the `layout: page` line. This adds your website's navigation, header, and footer.
1. Set the permalink value to the website address you want people to go to. For instance, if your site URL is `digitalarcplatform.github.io` and you want people to see this page at `digitalarcplatform.github.io/about`, change that line to read `permalink: /about`
1. Replace the text here, starting with the large header (the line that starts with `#`) and including this text.
GitHub has a feature called “Pages” that will turn any Github site into a public website.
Turning that feature on is very easy:
The “Actions” tab has a running log of how the changes you’ve made to your files match up with what is published for users to see. Each change you make creates a “workflow” run, or a series of processes that interprets your metadata and images as web pages.
A green icon means the workflow run was successful. A yellow icon means the workflow run is still going. A red icon mean the publication step ran into some issues.
There are a few things you can do to make error checking easier.
As always, before manipulating/editing your files, be sure to make a backup!
There are generally a few things that can result in publishing errors.
Your repository must be named based on the username of your GitHub account, otherwise the website will not build properly. Note, however, that this can easily be remedied:
[yourusername].github.ioOnce you’ve finished, go to the “Actions” tab to check the build progress.
Every .md file in your site has two sets of 3 hyphens (---), as the first line of the .md file and as a divider between the “front matter” metadata and the main part of the .md file. These need to be positioned and typed exactly.
Check each recent file and look at both instances of the 3-hyphen lines
There are two characters that can create problems for the metadata between the two sets of hyphens: quotes and colons.
Each front-matter line is the name of a type of information, a colon, and the actual information that gets used. For instance, the title of a page is set in this front matter:
title: Title of Page
If the page title actually has a colon in it, that can break the publish. Add quotes around the whole title to make the second colon show up as a colon instead of being something the computer reads as a computational marker.
title: Title of Page: this is a page that does something

title: "Title of Page: this is a page that does something"
Too many quotes can also be an issue. If the page title has quotes around it, and there are also quotes in the title, that can create a problem. Use apostrophes as quotes inside the double quotes
title: "Title of Page: "Some word" is in quotes"

title: "Title of Page: 'Some word' is in quotes"
Any time you add a new page, you will have to edit the contents of _data/navigation.yml to add that page to the navigation bar at the top of the site. See Navigation Options for details on how to do that.
Check to make sure you have consistent naming in the .md file and the photo file. It’s easy to put a hyphen in one file name and an underscore in another:
File-name.md
File_name.jpg
Because of the underscore in the File_name.jpg, the computer will see these as two different items.
Items are sorted by alphanumeric order based on the .md file name: Numbers before letters, punctuation before numbers.
Numbers will sort by alphabet, so “1” will be immediately followed by “10”, where “01” will sort before “02”, and so on to “10”. Adding the extra zero before the 1 will let you sort numbers in order up to 99. If you have 100 objects, you’ll want two zeroes before single-digit numbers and one zero before double-digit numbers.
Error 404 means that, as far as your web browser is concerned, the page you are looking for does not exist. Often even minor details can cause this to happen. If you have recently edited a page which now 404s, try the following:
_data/navigation.yml are spelled correctly (even down to upper vs. lowercase).url fields in _data/navigation.yml correspond to the permalink fields in your webpage markdown files.Several kinds of characters can create issues.
If you see a weird black-outlined box instead of an actual character, you might have a file with an emojis, characters with accents (cedillas, acute and grave, etc.), or a file written in languages that make use of characters beyond the 26-letter English alphabet. Using “UTF-8” characters can help. Check this UTF-8 Character List for a copy-paste of a wide variety of characters that will display propelrly inst
Note that markdown is sensitive to certain characters, in particular: :, #, *, -, and `. If you have recently made a change involving any of these characters, make sure that this is intended and, if so, that you have properly escaped the character with either a backtick ` or backslash \.
Curvy quotes and curvy apostrophes need to be replaced with straight double quotes and single apostrophes.
Unlike your local operating system, Github deletes empty folders.
Any time that a folder is empty, Github will automatically prune it. In order to create a new folder, there must be a file in it.
There are two ways to create a new folder in Github:
/
newFolder/placeholder.mdIf you’ve checked the Actions tab and all of your workflows have run successfully–that is, the most recent run on your Actions tab has a green icon–your web browser has most likely cached a number of the files that it needs to properly display your website. Your computer tries to save bandwidth by showing a cached, or saved, version of every website you visit, and if you have a recently saved version still in memory, your changes might not show up. In other words, your changes are live for other people, but the browser on your local computer is showing you an old version.
Thankfully this is easily resolved by “hard” refreshing the page using one of the following key command depending on your operating system:
This will bypass your broswer’s cache and pull new data to load your website.
There are a number of common file types for audio (e.g. .wav, .flac, .m4a) Currently, DigitalArc only supports .mp3 audio uploads. If you have non-.mp3 audio that you want to use, you will have to convert it using third-party software. Two of the most widely-used and freely available options are:
This section is meant to provide you with resources and suggestions for acquiring grants, preserving your website, and secondary literature on best practices for community archiving.
Looking for a printable version of the full process? Click Here
This section is meant to provide summaries of some foundational literature and toolkits for community archiving.
Forner, Karlyn et al. “Learn from the Past, Organize for the Future.” Digital Community Engagement: Partnering Communities with the Academy, 2020, https://doi.org/10.34314/wingodigital.00002.
This opening chapter focuses on the history and development of the Student Nonviolent Coordinating Committee (SNCC) Digital Gateway project and the collaboration between the committee and Duke University. As part of this collaboration, both the university and the activist partners clearly laid out their respective obligations and values, as well as addressed questions of ownership and governance. In particular, this chapter emphasizes the importance of allowing activist partners to engage in both the daily tasks of project creation and the larger development of it.
Hubbard, Melissa. “Archival Resistance to Structural Racism: A People’s Archive of Police Violence in Cleveland.” Digital Community Engagement: Partnering Communities with the Academy, 2020, https://doi.org/10.34314/wingodigital.00003.
Chapter 2 describes the creation of A People’s Archive of Police Violence in Cleveland (PAPVC), a digital archive which documents the history of police violence from the perspective of the citizens of Cleveland, Ohio. Specifically, this chapter addresses questions about the relationship between archival collections, dominant narratives, and counter-stories, proposing that archives built through relationships and ethics of care at the community level limit the possibilities of “archival amnesty” and promote deeper thinking about the role that large institutions play in the creation of archives. This chapter concludes with a discussion of the role that archives such as PAPVC can play at the individual community level, the institutional level, and at the national level.
Anderson, Marvin, and Rebecca Wingo. “Harvesting History, Remembering Rondo.” Digital Community Engagement: Partnering Communities with the Academy, 2020, https://doi.org/10.34314/wingodigital.00004.
Chapter 3 surveys the collaboration between Marvin R. Anderson, former State Law Librarian of the Minnesota Supreme Court, and Rebecca S. Wingo, an Assistant Professor of History at the University of Cincinnati, in producing the Remembering Rondo: A History Harvest project, an account of the Rondo community before it was destroyed by freeway construction. This chapter carefully details how Wingo was able to orchestrate a history harvest event for the deracinated Rondo community of St. Paul. There is particular emphasis placed on how Wingo organized her students into teams with teams with specific tasks & objectives over the course of the event, as well as how she reached and engaged with members of the Rondo community. The chapter concludes with a look at the projects which followed from Remembering Rondo, namely ReConnect Rondo, a bridge over the freeway that initially destroyed Rondo, and the Rondo Commemorative Plaza.
Brock, Julia, et al. “‘Send Out a Little Light’ The Antioch A.M.E. Digital Archive.” Digital Community Engagement: Partnering Communities with the Academy, 2020, https://doi.org/10.34314/wingodigital.00005.
Chapter 4 documents the process of creating the Antioch A.M.E Digital Archive, a collection of records pertaining to the Antioch A.M.E. church initially founded in Decatur, Georgia, but now located in Stone Mountain. Even more so than the previous chapter, this account closely describes how this church’s community reached out to the Center for Public History at the University of West Georgia, and how this led to a highly productive relationship between historians and community members. In particular, this chapter addresses scenarios in which community partners were wary of the project or raised questions about ownership, and how both groups reached agreements and navigated subsequent points of disagreement. The conclusion of this chapter looks at the role that flexibility and friendliness, particularly in communication structure, contributed to the success of the overall project.
Sullivan, Amy C. “Seen and Heard: Using DiCE to Reconnect Communities and Enrich History Pedagogy.” Digital Community Engagement: Partnering Communities with the Academy, edited by Rebecca Wingo, Jason Heppler, and Paul Schadewald, University of Cincinnati Press, 2020. https://doi.org/10.34314/wingodigital.00006
Historian Amy C. Sullivan mobilizes history harvests to mediate healing with survivors of two different kinds of traumatic events. Her two groups of participants—one composed of survivors of self-harm in the 80s and 90s, and the other of survivors of a mass murder in the 70s—engage in oral history methods and ethics to add their narratives to the historical record. Sullivan foregrounds the pedagogical, ethical, and healing possibilities of Digital Community Engagement.
Collier, Patrick, and James J. Connolly. “Everyday Life in Middletown: The Archive as Community.” Digital Community Engagement: Partnering Communities with the Academy, edited by Rebecca Wingo, Jason Heppler, and Paul Schadewald, University of Cincinnati Press, 2020. https://doi.org/10.34314/wingodigital.00007
Chapter 6 explains how diary writing captures crucial details about ordinary life, making it an ideal strategy for the Everyday Life in Middletown community archive. Based on a collaborative model of engagement, the project calls on fifty-four volunteers to submit diary entries to a public platform, which are then analyzed publicly for a blog and also for scholarly research. The authors argue that this method works around the “observer/observed dynamic” that characterizes anthropological or historical study.
Schuette, Allison, Megan Telligman, and Liz Wuerffel. “Mobilizing Digital Stories: Collaborating to Educate and Engage a Local Public in Realities of Homelessness.” Digital Community Engagement: Partnering Communities with the Academy, edited by Rebecca Wingo, Jason Heppler, and Paul Schadewald, University of Cincinnati Press, 2020. https://doi.org/10.34314/wingodigital.00008
To address the challenges of the proportionally small homeless community of Porter County, Indiana, the authors of Chapter 7 developed a traveling exhibition and digital story collection, publishing interviews with homeless women. The two platforms expanded viewership for the exhibition content. Organizers and participants co-created the content through a methodology that prioritizes listening while interviewing, editing, and facilitating conversations with homeless individuals.
Beaujot, Ariel. “Hear, Here: Digital History and Community Engagement Activating Social Change.” Digital Community Engagement: Partnering Communities with the Academy, edited by Rebecca Wingo, Jason Heppler, and Paul Schadewald, University of Cincinnati Press, 2020. https://doi.org/10.34314/wingodigital.00009
Creators of this community engagement project used toll-free phone technology, a website, and student volunteers to collaboratively re-write their town’s stories. Called Hear, Here, it took the team four years to collect 69 stories about locally meaningful places and monuments in an 8-block downtown area. Author Ariel Beaujot found that this system instigates and supports debate, which has led to some social changes in the town of La Crosse, Wisconsin.
Thompson, Aubrey, and Ildi Carlisle-Cummins. “You Can’t Make Ketchup Without Smashing a Few Tomatoes: Reflections on a University-Community Partnership.” Digital Community Engagement: Partnering Communities with the Academy, edited by Rebecca Wingo, Jason Heppler, and Paul Schadewald, University of Cincinnati Press, 2020. https://doi.org/10.34314/wingodigital.00010
Colleagues Aubrey Thompson and Ildi Carlisle-Cummins have created a podcast that challenges their own institution, UC Davis, through research and activism. They discovered that their land-grant university was responsible for slashing agricultural jobs for corporate benefit by inventing a tomato harvester. This chapter exposes how universities can deprive their own communities, and the podcast brings this reality to light to engage the broader community in dialogue.
Sutton, Jazma. “’Go to the Attics, the Closets, and the Basements’: Black Women’s Intergenerational Practices of Memory Keeping in Oxford, Ohio.” Genealogy, vol. 8, no. 3, 2024. https://doi.org/10.3390/genealogy8030102.
Looking beyond institutional archives and into the private homes of Black women, Sutton offers Descendant Archival Practices, a method for researching the archives that Black women maintained in the 19th and 20th centuries. By studying these home-based archives, which compile oral histories, documents, and artifacts, Sutton addresses the misconception that Black histories are lost to time, holding historians accountable for not investigating gaps in institutional archives.
Sutton, Jazma & Kalani Craig. “Reaping the Harvest: Descendant Archival Practice to Foster Sustainable Digital Archives for Rural Black Women.” Digital Humanities Quarterly, vol. 16, no. 3, 2022. http://www.digitalhumanities.org/dhq/vol/16/3/000640/000640.html
Sutton and Craig draw attention to the ethical concerns of transferring analog archives to a digital platform, and how the mixed-media Descendant Archival Practices methodology ensures that Black histories are digitally preserved in this transfer, too. Demonstrating the method in action from previous history harvests, Sutton and Craig honor Black women as the ancestral custodians of Black histories and underscore the importance of intergenerational collaboration in moving their historical materials online.
Drake, Jarrett M. “#ArchivesForBlackLives: Building a Community Archives of Police Violence in Cleveland.” Medium, 22 April 2016.
Black archivist Jarrett M. Drake calls archivists to social justice action, with the goal of creating independent archives. After discovering a hole in Twitter’s historical record, Drake developed the platform http://Archivingpoliceviolence.org as a decolonial archive, where witnesses of police violence have shared oral histories. Since historically, archives and institutions of power have operated together, stories about marginalized people exist more reliably when not stored with archival authorities.
Hughes-Watkins, Lae’l. “Moving Toward a Reparative Archive: A Roadmap for a Holistic Approach to Disrupting Homogenous Histories in Academic Repositories and Creating Inclusive Spaces for Marginalized Voices.” Journal of Contemporary Archival Studies, vol. 5, no. 1, Jan. 2018, p. 6. https://digitalcommons.kent.edu/libpubs/269.
Hughes-Watkins poses the question of how archives, which conventionally serve entrenched and monolithic narratives, can change their practices in order to serve a reparative role. By “reparative archive,” Hughes-Watkins means a set of practices which serve to reach out to disenfranchised communities and cooperate with them. In particular, she uses Kent State University’s collaboration with black alumni from the Black Campus Movement in order to build a physical and digital exhibit through special collections. In this process, she emphasizes three main ideas: Acquisition of items, Advocacy, and Utilization.
Johnson, Valencia. “Archiving Student Activism Toolkit.” Project Stand. https://standarchives.com/archiving-student-activism-toolkit-3/. Accessed May 23, 2025.
This toolkit, tailored for activists who donate their collections to institutional archives, trains them on how to ensure the best conditions for their donated material. It Johnson’s toolkit gives activists an idea of the considerations they should make ahead of selecting an archive, meeting with archivists, and their right to establish rules for the collection. Likewise, Johnson tells archivists to familiarize themselves with the motives of their institution and determine an ethical mode for acquisition within their institutional framework.
Kuo, Rachel, and Lorelei Lee. “Dis/Organizing: How We Build Collectives Beyond Institutions: A Non-Comprehensive Community Toolkit and Report.” Hacking/Hustling. https://hackinghustling.org/wp-content/uploads/2021/10/DisorganizingToolkit.pdf
Based on research on and experience with activism, Kuo and Lee offer strategies for resisting the institutionally led disintegrations of political collectives. They define the term “dis/organizing” as “messy on purpose,” or strategically disruptive to institutions. The toolkit is crucial to read before developing a political collective of any scale to prepare for how to handle money, resource access, social differences, leadership, and technology—all areas relevant to digital community engagement, too.
UCLA Community Archives Lab. WordPress, 2016, https://communityarchiveslab.ucla.edu/.
This page narrates the mission, method, and publications of the UCLA Community Archives Lab. It focuses on the relationship between institutions and independent, community-based archival workers to find ethical ways for institutions to investigate the archives of these memory organizations.
Community Archiving: A tool for transgenerational learning. Activist Handbook, 2022, https://activisthandbook.org/organising/community-archiving. Accessed May 8, 2025.
Calling the toolkit “the Wikipedia for activists,” this page summarizes the ethics of community archiving and an overview of its steps. Its accessible writing style and introductory scope serves an audience not already familiar with independent community archiving. Throughout, the Handbook signals how the archiving process functions differently depending on the project, and its steps accommodate this flexibility.
Berry, Dorothy. The Dorothy Berry Collection of What Are We Black Archives, Syllabus Project, 2023, https://syllabusproject.org/what-are-black-archives/. Accessed May 8, 2025.
Writing in both descriptive and poetic language, Dorothy Berry defines the “artificial archive,” a technically impossible global inventory of Black archival material. Her proposed artificial archive accounts for entire people, institutions, anonymous photographs, food, ephemera, social media, and any person’s own idea of what an archive is. It points to the limited scope of things (let alone objects) that a typical institutional archive can physically contain, excluding a world of archival material about Black people.
Home Bound. Community-Archive Jekyll Theme by Kalani Craig, 2023, https://homeboundatiu.github.io/. Accessed April 18, 2025.
This online catalogue documents Home Bound, an independently curated, grassroots exhibition featuring 19 works on paper, sculpture, and video by Indiana University students. The digital archiving platform allowed the curator to offer a professional website for artists to include on their resumes as exhibition experience, contributing to an ethics of collaboration. The exhibition was open during the spring of 2023 at the IU Sciences Library.
Remembering Freedom: Longtown and Greenville History Harvest. The Longtown History team and Mediumish Jekyll Theme, 2022, https://longtownhistory.github.io/.
The descendants of the Greenville Settlement, a rural Black community founded in 1818, use this website to help preserve and share the town’s history. The descendants, who were already active participants in protecting their town’s stories before the history harvest, share oral histories, an online exhibition, and a tour of their Homecoming Event where the history harvest took place.
La Casa, La Comunidad. DigitalArc Jekyll Theme by Kalani Craig, 2025, https://lacasaiu.github.io/. Accessed May 8, 2025.
Celebrating 50 years at IU in 2023, the cultural center La Casa archived its memories on this DigitalArc website. It features an online collection of photographs, memorabilia, and student-written articles that image its history. A 3D Virtual Walkthrough of La Casa archives the house itself and takes the website user on a written tour around La Casa, demonstrating the many services that the cultural organization provides. Finally, an online catalogue of photographs captures its 50th Anniversary Celebration Banquet.
Remembering Rondo. “A Sustainable Shared Authority: The Future of Rondo’s Past.” YouTube, 30 Oct. 2024, https://www.youtube.com/watch?v=77U5h8Ed46I.
This recording of the keynote address for the International Federation for Public History follows the development of the Remembering Rondo project after its completion in 2017. The first 40 minutes of this video contain a talk given by both Dr. Rebecca S. Wingo and Mr. Marvin Anderson, who speak on both the process of the project’s initial creation and significance, as well as address practical & ethical concerns about the long-term hosting and management of a shared digital resource. The remainder of the video is devoted to a Q&A for Dr. Wingo & Mr. Anderson in which the audience poses questions about the intersectionality of Remembering Rondo and plans for future expansion of the project.
“Remembering Rondo | A History Harvest.” A Partnership Between Rondo Avenue, Inc. And Macalester College, https://omeka.macalester.edu/rondo.
Built using Omeka, this website hosts the current version of the Remembering Rondo history harvest. It features the ability to search through items, individual persons, and entire exhibits by using metadata tags. This site features a wide variety of historical items such as newspapers & photographs, as well as interviews with Rondo residents.
If you have never researched grants before, it might be difficult to know where to look. Grants cater to specific projects in the sciences, city development, artistic practice, and more; when you can articulate the specific needs of your project, you will have more success finding the right grant for it. The guide below creates pathways that connect your project with city, state, and national resources, preparing you to direct your grant research for your own needs.
Before you start your research, ask yourself and your community: what geographic region do we cover? what specific needs do we have, and how much money will help us meet those needs? Are there components of the project (rather than the entire project) that we could focus on securing funding for? What is the timeline for completing your community’s needs? Who does the project team consist of and intend to serve? Answer these questions as specifically as possible, and as you think, keywords will emerge that pertain to your community, such as:
Keep these keywords handy—they will help you narrow your search. The next decision you need to make is whether the scope of your project is better suited for local, state, or national grants.
City councils typically have some local grant funding and staff that can connect grantseekers with pools of money. Search for your city’s council plus “grants” in Google to get started. Or, if you already have a contact in local government, ask them directly. Local grants are often hyper-specific, reducing competition, and/or offer less money than state and national grants. You should also check with the city’s historical office and the city development group. Finally, your keywords for searching local grants can be more specific to your community (such as Calumet region history in addition to Black history).
Government and private institutions tend to have larger financial resources than local government does and therefore apply to large-scale projects. Check with your state’s humanities council and financially successful corporations such as the Lilly (whose endowment allocates money for donations).
These grants offer the most money and therefore can be more competitive and labor-intensive in the application and project follow-through than are niche, local grants. These are often directed toward filmmakers due to the time and financial cost of producing movies.
These tips should help you to sift through the thousands of funding opportunities and the sometimes-unhelpful search engines hidden behind paywalls. Even partial financial support for your community archiving event or digital preservation can help to bring the project to fruition.
Thanks to the work of at-home archivists, we have documents, photographs, and objects that tell the histories of overlooked populations in the Midwest. In support of their independent archival practices, institutional archives have offered professional advice meant to help preserve the lifespan of these objects, both physical and digitized. DigitalArc has compiled these best practices below, focusing especially on storage and object handling.
A standard digital preservation practice: the 3-2-1 method
One copy of a document in your storage, physical or digital, is never enough. Archivists have developed the 3-2-1 Rule to help prevent tragic losses of important objects and documents. While there are different interpretations of this rule, generally, the goal is to always have at least 3 copies of data (your first or “original” copy of data and 2 backup copies). Then, be sure to store those two copies on two different storage types (disc and tape, for example, but this changes depending on the technology available. Finally, keep one copy off-site in a remote location, ideally a few miles away from your other two copies. Coordinate with your friends to cross-backup your documents.
This example from Backblaze is very tech-reliant, but it demonstrates how the 3-2-1 Rule works.
The Easiest 3-2-1 Backup
Storing digital media can be expensive depending on the amount of material you have, especially if you are storing more than 128 gigabytes of data.
Flashdrives: Do not use flash media or flash drives because the charge slowly dissipates, so you need to connect them to power regularly to avoid losing data. This is not sustainable and therefore not recommended.
Discs: We recommend making several copies of Blu-ray discs if you have a few hundred GBs of personal documents. M-DISCS are affordable, can hold a lot of info, and are stable for 1000 years. DVDs only last 7-10 years before potentially degrading. This option is cost-effective, as well.
The Cloud: While the title suggests your data goes into the air, data stored in the “cloud” actually goes to cables that cross the deep ocean floor.
DigitalArc offers the following services:
Note: You can use systems like Wasabi, Cyberduck, and Rclone to transport your media from your hard drive (computers, CDs, etc) or do it manually.
Encrypted data means data that has been scrambled to avoid its legibility for potential hackers or scammers. This step is recommended before moving your data to the Cloud if you do not intend to access that data frequently. Encryption services include Restic, Kopia, and Rclone.
Like photo albums, newspaper clippings, diary entries, and other archivable analog materials, websites are also worth archiving digitally. We recommend using the Wayback Machine managed by Internet Archive to do so. Learn more here.
Store documents in space with temp 70F or lower, and less than 60% humidity, and away from sources of daylight. Basements are usually dark but humid, unless you have a dehumidifier down there. Use pencils with a soft lead to label photos using a naming convention as discussed during in-person workshop. Digitizing photo collection is recommended, but NOT a replacement for physical copies.
Materials: no metal paper clips, pins, rubber bands, adhesives like tape. Paper folders should be made from non-acidic, lignin-free paper WITHOUT a center seam because the adhesive in it could degrade over time. Store documents in acid-free folders and boxes that pass the Photographic Activity Test.
The tips above were taken from these references. Please consult these links for the latest best practices.
3-2-1 strategy: Pusin, Yev. “The 3-2-1 Backup Strategy.” Backblaze, May 23, 2024, https://www.backblaze.com/blog/the-3-2-1-backup-strategy/.
This section houses information for more complicated aspects of handling your data, such as batch processing of photos and audio files, as well as automated ways to share files with contributors.
If you have access to Photoshop, this section covers how to clean the photos from the collection event in a batch process. This means that the edits you make will be applied to all the photos in the collection at one time, which should eliminate time spent on photo cleanup.
Your photos may vary in size, and this might impact your ultimate output onto the digital community archive. Batch photo resizing can ensure that all photos are similar pixel length and will appear similarly sized on the digital archive.
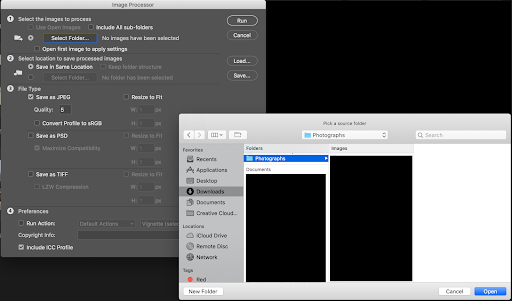
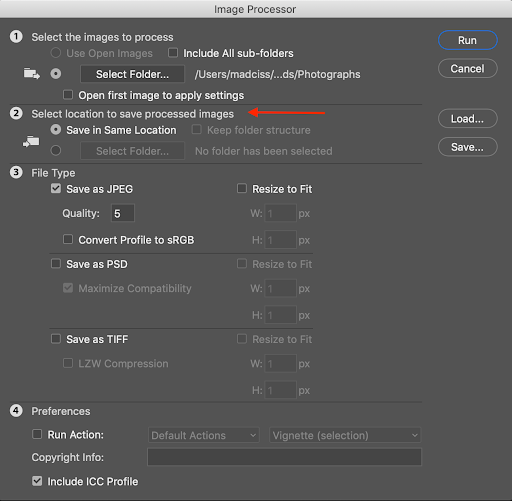
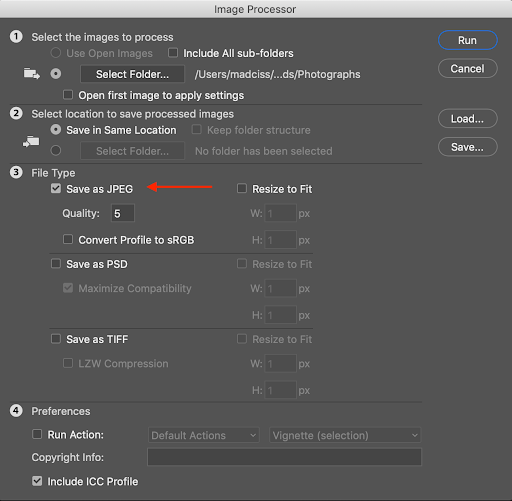
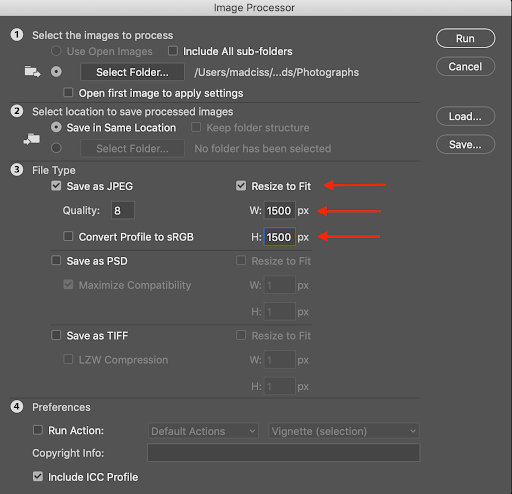
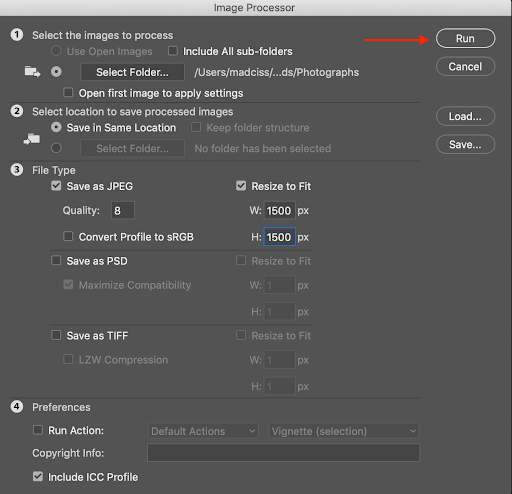
Before you start, it will be easier to create a csv file for the mail merge process. For this example, we will be using Microsoft Excel on a Microsoft365 Account.
Note: If you are not using a software with mail merge, you can ignore this section.
This section covers how to send contributors their contributions using a mail merge feature.
Note: For this guide, we will be using Microsoft Outlook and Microsoft Word on a Microsoft365 Account. The process for mail merge is roughly the same across systems, but you might have to Google “insert system mail merge.”
Once these steps are complete, Outlook will create a draft and queue for each email recipient in the .csv file.
Note: Depending on the number of contributions, this will take some time (upwards of 5 to 10 minutes for large mail merges). We recommend not touching Outlook until all the emails have been successfully sent.