
Oral History Interviews
The length of your Oral History Interviews will vary according to the objectives of your event and your technical & storage capacity. If the oral history is tied to a particular object, the majority of the relevant details can be covered in an interview no longer than 5-10 minutes.
- If the contributor has multiple items, begin with the lowest ID number and move sequentially for each interview.
- Check the contributor’s sticker for their permissions(ANON, NA, etc.); reassure them that you will respect their selection.
- If no audio (NA): Audio will be used only for transcription purposes. Transcribe and delete the audio.
- If anonymous (ANON): De-identify the interview before posting it, and the “contributor” information on the website will say “Anonymous Contributor”
- If personal use (PRIV): Do NOT use the interview on the community archive website. Send the contributor the recording along with the digitized object for their personal archives.
Story-telling as Metadata
Before you begin gathering oral histories, it is worth sitting down with community members and being intentional about the kinds of questions you intend to ask. This is because the information you gain from these oral history interviews will be a major source for your eventual metadata. Be sure to customize your interview questions to reflect the values and priorities of your community.
Interview Recording Protocol
Once you have selected your recording device (see below), the actual contents of your recording will follow a standard set of questions.
For interviewers: Consider writing down timestamps (in the context of the interview, rather than using clock time) during the interview, to highlight moments that have a particularly great story, or where the transcription might be difficult to transcribe. (Suggestion courtesy of S. Love, Gary, IN.)
- To begin the interview, the interviewer should state their name and the contributor’s Object ID. For example:
- “My name is _____ and I am interviewing the community member who contributed (Object ID) as part of (Event Name).”
- If the contributor is basing their oral history on an artifact, ask the following questions, but be aware of the length of the interview:
- What is the name of your object?
- When and where did you acquire it? (What year, city, etc.)
- What is the date of the item’s creation?
- How would you physically describe your object?
- What is the object’s significance?
- When you see this object, what kind of memories does it recall?
- Is there anything I didn’t ask you about this object that you would like to talk about?
- If the contributor is basing their oral history on a photo or other image which conveys the topic they would like to discuss, ask the following questions:
- Which memory would you like to share with us today?
- Why is this memory significant to you?
- How does this memory relate to your identity?
- Is there anything I didn’t ask that you would like to talk about?
Remember Your Intentions
Community archives rebalance authority, value lived experience, and create a more liberatory, participatory archival process. Considering how your community stories will be represented ahead of time can help you craft an oral-history interview approach that better represents community values in the final digital archive.
Every digital archive object will have a web page. Remember that these interviews can help your community control how the community archive shows up in online searches. We’ll come back to this again, in the “Metadata” section of the post-event process.
- Remember your collaborative set of oral history prompts and how that can help describe community contributions effectively:
- Title
- Prompt: “What would you call this item?”
- Intention: Community defined naming
- Description
- Prompt: “Tell us the story behind this.”
- Intention: Centering personal meaning
- Date
- Prompt: “When was this from? Approximate is okay.”
- Intention: Valuing memory over precision
- People
- Prompt: “Who is in this photo/story?”
- Intention: Naming and honoring individuals
- Place
- Prompt: “Where did this take place?”
- Intention: Grounding materials in place
- Emotions/Significance
- Prompt: “How does this item make you feel?”
- Intention: Centering effect and cultural value
- Permissions
- Prompt: “How should this item be used/shared?”
- Intention: Honoring agency and consent
- Tags/Keywords
- Prompt: “What words would help people find this?”
- Intention: Enabling community-generated vocabularies
- Title
Audio Recording Device Options
Your audio recording equipment will likely vary depending on the size and scope of your event. We have several sets of instructions for recording, one for iPhones, one for Androids, and one for a Sony PX series recording device.
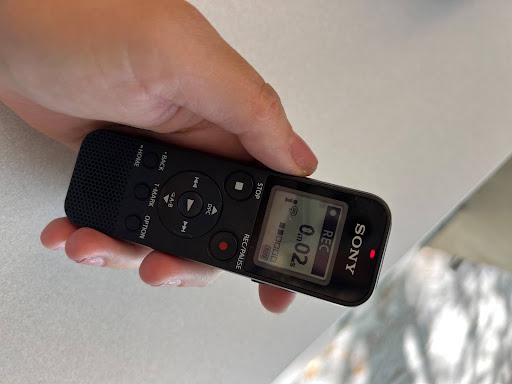
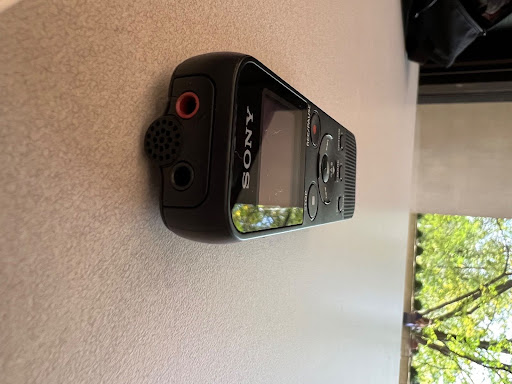
Recording with a Sony PX Audio Recorder
- Power on your recording device using the button on the side
- To record, press the REC/PAUSE button, marked with a red circle. Make sure the device has started recording before beginning the interview. You should see a red light and the recorder timer counting upwards.
- Position the recording device so that it is between the interviewer and the contributor. Make sure that the microphone is facing both the interviewer and the contributor.
- Use the interview protocol described above
- Once finished, press “Stop” to end the recording.
- Power off the recorder and hand it to the guide.
- The guide will accompany the contributor to the check-out station and will hand over the recorder to the volunteer working that station.
Recording with an Android
Since there are different versions of Android, you may or may not have a voice recording app pre-installed. These instructions use the Samsung Voice Recorder app.
- Make sure that your Android device is fully charged.
- Open the Samsung Voice Recorder app.
- Press the red circle to begin recording. Make sure the recording has started for a few seconds before beginning the interview.
- Position your phone so that it is between you and the contributor. Make sure the bottom of your phone is facing both you and the contributor.
- Conduct the interview as described above.
- Once you have finished the interview, press the square button to stop the recording.
- Be sure to save the recording with the Object ID number as the file name.
Recording with an iPhone
These instructions use the iPhone’s default Voice Memo app.
- Make sure that your iPhone device is fully charged.
- Open the Voice Memo app.
- Press the red circle to begin recording. Make sure the recording has started for a few seconds before beginning the interview.
- Position your phone so that it is between you and the contributor. Make sure the bottom of your phone is facing both you and the contributor.
- Conduct the interview as described above.
- Once you have finished the interview, press the square button to stop the recording.
- Be sure to save the recording with the ObjectID number as the file name.
- Tap on the completed recording. To rename you can either: a. Tap the three dots in the upper right corner (…) i. Select “Edit Recording” ii. Tap on the default file name (i.e., Herman B Wells Library) and rename using the Object ID that pertains to the interview. iii. Once you have renamed, tap anywhere else on the screen to view the “Done” button. iv. Tap “Done” b. Double-tap on the list with all the recordings and rename the file on that screen.
Uploading the Audio Recordings
As time permits between oral histories, and/or at the end of the event, make sure to upload all the audio recordings you took to the “Interviews” Google folder (login gmail or gmail-affiliated credentials). Follow the setup instructions to get Google Drive installed on your phone and ready to handle the transfer of the audio files: http://tiny.cc/digitalarc-upload
Make sure to track storage on your phones. Not all of us will have unlimited space on our phones so you may need to periodically stop in-between oral history interviews to upload audio files, even if you have a line of people waiting to be interviewed. You can explain to the contributor and the guide that you need a moment to upload. VERIFY that all the audio files uploaded fully before you delete recordings from your phone, especially if you need to make space.
Make sure to track the battery usage on your phone.
Uploading Android Audio Recordings to Google Drive
- Locate the intended Google Drive folder, preferably through the Google Drive app
- Press the “+” button at the bootom right of the screen.
- Select “upload.”
- Using the filters at the top of the Android file browser, choose “Audio.”
- Alternatively, you can use the menu in the top left to select “Audio.”
- You should now be able to see your audio recording.
- Select the recording and it will begin to upload automatically.
Uploading iPhone Audio Recordings to Google Drive
Uploading iPhone recordings to the proper Google Drivedrive destination is a multi-step process.
- Locate Google Drive
- Open Voice Memos app.
- Tap on the recording you wish to upload (make sure the recording is named using the Object ID).
- Tap the three dots in the upper right corner of your recording.
- Select “Share.”
- Scroll until you see the icon for Google Drive. If it doesn’t appear, tap “More” and then scroll through all of your apps until you locate it.
- Create a Folder in Your Personal Google Drive
- Select “Folder” at the bottom of your screen. Select “My Drive” and create a new folder by selecting the folder icon with a plus sign (+) on the top right.
- Label the folder with today’s date so you can temporarily save all audio recordings in this folder on your personal drive.
- Click “Create” to save the folder.
- When uploading your first recording, after you create the folder, you can select “Save here.”
- Select “UPLOAD” and the file will be added to your personal Google Drive account.
- Move Audio Recordings to the Project’s Google Drive
- Now, we need to move the file from your personal Google Drive account to the shared folder for this workshop. Exit the Voice Memos app and return to the Google Drive app.
- Locate your audio recording in your personal Google Drive “My Drive” tab. You may need to search for your folder by using part of the name: “2025-05.”
- Tap the three dots to the right of the file. Scroll down and tap the “Move” button.
- Tap the “Shared with me” button.
- Search or browse for the “02_Community Partners Stories” folder. Select the folder.
- Select “Interviews.”
- Tap “Move here” on the bottom right of your screen.